Hey guys, looked around on the web a bit and couldn't find an install for these that was specific to the Golf R so I kinda winged it. Ended up being a pretty straight forward install but I figured I'd do a write up on it anyway. I've gotten a lot of benefit from other people's DIY's so thought I'd contribute a bit. Note this write up should also apply to the Tyrolsport bushings as they are more or less the same.
Anyway before I start, better do the obligatory disclaimer:
Do this install at your own risk. If you mess something up in the process it's not my fault. This is meant to serve as a guide, and is for informational purposes only.
Okay with that out of the way, lets get started.
Tools Needed:
- Channel lock or similar pliers
- Flat head screwdriver
- 1/4 & 3/8 drive ratchet handles
- Various extensions
- Torx T25 socket or driver
- 8mm socket
- 10mm socket
- 13mm deep socket (you will definitely need the deep socket, possibly a regular one too)
Step 1: Remove intake snorkel and engine cover. Not gonna go into a lot of detail on this, there are several other write ups that include these steps.
Step 2: Disconnect the battery. Use a 10mm socket or combo wrench to loosen the nuts on the battery terminals. Once you have the battery disconnected remove the front half of the battery box by pressing in the tabs near the bottom of the front panel and lifting up and away from the battery.

Step 3: Using a 13mm socket remove the retaining clamp from the lower left hand side of the battery. At this point you can lift out the battery. Be careful here: The battery kind of sits down in a channel in the battery tray which holds it stable and makes it feel kind of heavy at first. Carefully lift it up out of the tray taking care not to shake it around too much and make sure to keep it level and upright. Once out, set the battery aside.

Step 4: At this point I removed the back half of the battery box by popping off the 3 tabs (on the lower left, right, and back). Next, remove the 3x 10mm bolts that hold the battery tray in place. Once free, work the battery tray up and out. It took a little bit of working it around to get the flange out from in between the cables below the fuse box. I found it helpful to remove the fuse box cover so I could work the cables around a little bit.


Step 5: At this point you will have free access to the bracket supporting the shifter linkages. First you will need to remove the 2x 13mm bolts and 1x 13mm nut the fasten the plastic bracket to the transmission. I used a 3/8" drive ratchet with a 13mm deep socket to get the first two, and then added a 2" extension to get the nut off the third. Note that the 3rd bushing/nut are not visible in the below pic, the arrow points in the direction where they are located behind some other stuff.

Step 6: Now you will start to remove the stock rubber bushings. To remove each bushing you first have to work the metal sleeve out from the middle of it. The best way I found to do this was with a little 1/4" drive 8mm socket, which was slightly smaller in diameter than the sleeve. I just punched each sleeve out from above with the socket. With the sleeve removed it was fairly easy to work the flexible rubber bushing out with the blade of a dulled flat head screwdriver. I tried not to damage the bushings just in case I wanted them later.
Now take a minute to compare the stock bushings to the solid ones. The solid bushings consist of two parts which I will refer to as the base and the cap. For each mounting point on the bracket, you will install the base of the bushing underneath. Then the cap goes on top of the bracket and mates to the portion of the base that passes through the bracket.

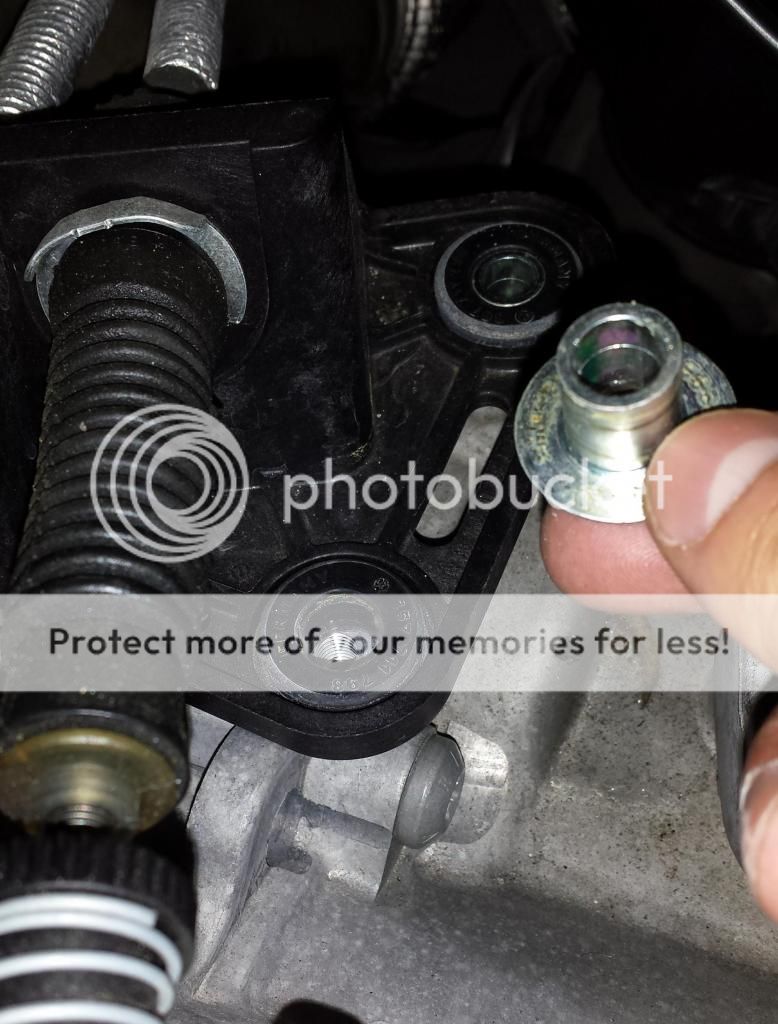
Step 7: Carefully install the bushing bases. Once all three bases were in place I put the caps on the two lower bushings, got the bolt holes lined up, and got the bolts started in the holes. Then I put the cap on the upper bushing, made sure every thing was nice and flush and got the nut hand tight. I then tightened the two lower bolts and finally tightened the upper nut. The pic below shows the upper bushing pieces installed and mated before reinstalling the nut.

Step 8: CAUTION: Before you start putting everything back together, don't forget to jump in the car and row through the gears. Make sure everything shifts easily into place. If not you may have to do a linkage adjustment, although I'm not even sure if it's possible to get things that out of whack doing this install.
Step 9: Finally, just everything back together in reverse order!
Impressions: A nice improvement over stock in terms of shifter feel. It makes the shifter feel more solid as you go through the gears. Specifically it cleans up most of the flex/slop you get when moving side to side. It also cleans up a little of of the slop you get moving the shifter fore/aft. At $28 shipped, this is a nice mod for those of us who want to get a more solid and precise shift feeling but don't necessarily want the super short throw and notchiness of the short shift kits. Also, from what I've read about the 42dd linkage bushings, I'm thinking they would compliment this mod pretty well and I think I might do those next.
Anyway this was my first DIY install writeup, so hopefully everything made sense. If there are any questions, I'd be glad to answer them.
Anyway before I start, better do the obligatory disclaimer:
Do this install at your own risk. If you mess something up in the process it's not my fault. This is meant to serve as a guide, and is for informational purposes only.
Okay with that out of the way, lets get started.
Tools Needed:
- Channel lock or similar pliers
- Flat head screwdriver
- 1/4 & 3/8 drive ratchet handles
- Various extensions
- Torx T25 socket or driver
- 8mm socket
- 10mm socket
- 13mm deep socket (you will definitely need the deep socket, possibly a regular one too)
Step 1: Remove intake snorkel and engine cover. Not gonna go into a lot of detail on this, there are several other write ups that include these steps.
Step 2: Disconnect the battery. Use a 10mm socket or combo wrench to loosen the nuts on the battery terminals. Once you have the battery disconnected remove the front half of the battery box by pressing in the tabs near the bottom of the front panel and lifting up and away from the battery.
Step 3: Using a 13mm socket remove the retaining clamp from the lower left hand side of the battery. At this point you can lift out the battery. Be careful here: The battery kind of sits down in a channel in the battery tray which holds it stable and makes it feel kind of heavy at first. Carefully lift it up out of the tray taking care not to shake it around too much and make sure to keep it level and upright. Once out, set the battery aside.
Step 4: At this point I removed the back half of the battery box by popping off the 3 tabs (on the lower left, right, and back). Next, remove the 3x 10mm bolts that hold the battery tray in place. Once free, work the battery tray up and out. It took a little bit of working it around to get the flange out from in between the cables below the fuse box. I found it helpful to remove the fuse box cover so I could work the cables around a little bit.
Step 5: At this point you will have free access to the bracket supporting the shifter linkages. First you will need to remove the 2x 13mm bolts and 1x 13mm nut the fasten the plastic bracket to the transmission. I used a 3/8" drive ratchet with a 13mm deep socket to get the first two, and then added a 2" extension to get the nut off the third. Note that the 3rd bushing/nut are not visible in the below pic, the arrow points in the direction where they are located behind some other stuff.
Step 6: Now you will start to remove the stock rubber bushings. To remove each bushing you first have to work the metal sleeve out from the middle of it. The best way I found to do this was with a little 1/4" drive 8mm socket, which was slightly smaller in diameter than the sleeve. I just punched each sleeve out from above with the socket. With the sleeve removed it was fairly easy to work the flexible rubber bushing out with the blade of a dulled flat head screwdriver. I tried not to damage the bushings just in case I wanted them later.
Now take a minute to compare the stock bushings to the solid ones. The solid bushings consist of two parts which I will refer to as the base and the cap. For each mounting point on the bracket, you will install the base of the bushing underneath. Then the cap goes on top of the bracket and mates to the portion of the base that passes through the bracket.
Step 7: Carefully install the bushing bases. Once all three bases were in place I put the caps on the two lower bushings, got the bolt holes lined up, and got the bolts started in the holes. Then I put the cap on the upper bushing, made sure every thing was nice and flush and got the nut hand tight. I then tightened the two lower bolts and finally tightened the upper nut. The pic below shows the upper bushing pieces installed and mated before reinstalling the nut.
Step 8: CAUTION: Before you start putting everything back together, don't forget to jump in the car and row through the gears. Make sure everything shifts easily into place. If not you may have to do a linkage adjustment, although I'm not even sure if it's possible to get things that out of whack doing this install.
Step 9: Finally, just everything back together in reverse order!
Impressions: A nice improvement over stock in terms of shifter feel. It makes the shifter feel more solid as you go through the gears. Specifically it cleans up most of the flex/slop you get when moving side to side. It also cleans up a little of of the slop you get moving the shifter fore/aft. At $28 shipped, this is a nice mod for those of us who want to get a more solid and precise shift feeling but don't necessarily want the super short throw and notchiness of the short shift kits. Also, from what I've read about the 42dd linkage bushings, I'm thinking they would compliment this mod pretty well and I think I might do those next.
Anyway this was my first DIY install writeup, so hopefully everything made sense. If there are any questions, I'd be glad to answer them.
")

