I have always hated having to open up the change compartment to charge my phone in the car so I got bored and decided to tinker a little bit last night with the blank buttons in front of the shifter. I am not a pro at all when it comes to car electric systems so this was the easiest and least expensive way to make this without soldering any wires or getting to technical.
Tools needed:
Linesman Pliers
T25 Torx bit
Razor Blade (or drill and coping saw)
Parts needed:
USB car charger (for 12v socket)
6" USB Male to Female extension
12v accessory socket (http://shop.advanceautoparts.com/p/autocraft-single-12v-dc-outlet-ac741-a-1201/6250132-P)
Quick-Set Epoxy
Electrical Tape
This is strictly a DIY and i am in no way responsible if you mess your car up in any way!
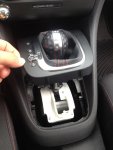
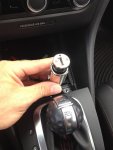
To start things off, I removed the shift lever cover by pulling up from the front side closest to the change tray.

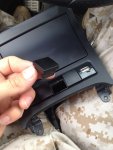
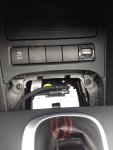
After that I removed the two T25 screws holding the change compartment assembly in place. Use a magnetic bit if you've got it because the screws aren't easy to get out if you drop one down below.

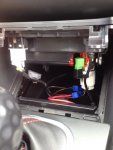
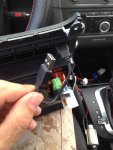
Disconnect the dongles for the traction control button (top-left) and the 12v accessory socket (mid-right) by depressing the releases on the side of the connections.

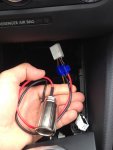
The 12v Accessory Socket that I picked up from advanced auto came with the necessary wires and 2 crimp splicers. I crimped the black wire (ground) of the new accessory socket directly into the brown wire in the existing connection. I crimped the red wire (hot) of the new accessory socket directly into the red/black wire in the existing connection.

I then plugged the USB charger directly into the new socket that I installed and set it aside for later.

I took these pictures after i did the work so don't mind the completed USB port in the background.
Next up grab the change compartment and remove the button that you would like to install the port on by depressing the release buttons from underneath.

Trace the USB connection (female side) on the top (centered) of the blank button and then cut that section out to make the hole. I used a razor blade and in turn scratched up the top of the button a little bit, but it may be more effective if you have the tools to drill a 1/8" hole through the center and then use a coping saw to cut the rest out more precisely.
Once you have the hole, using clear or black Epoxy, secure the female end of your 6" USB Male to Female extension to the blank button from the bottom facing upwards and let the Epoxy dry.
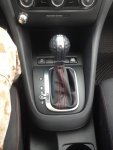
Insert the button back in to the console and it should look like this.

Attach the Male end of the USB extension into the USB car charger that was plugged into the new accessory socket from before.

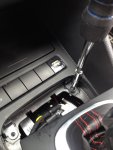
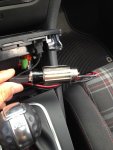
Connect the original accessory socket connection and the traction control connection. At this point I found an open area to the right of the DSG shifter (underneath the faceplate) to put the new 12v socket and then I started putting everything else back together the same way I took it off.

Once complete it looked like this:

In hindsight I was not happy with how I scratched the face of the blank button so that is why I ultimately just covered the face of the button with electrical tape.. But it works so I'm happy!
Tools needed:
Linesman Pliers
T25 Torx bit
Razor Blade (or drill and coping saw)
Parts needed:
USB car charger (for 12v socket)
6" USB Male to Female extension
12v accessory socket (http://shop.advanceautoparts.com/p/autocraft-single-12v-dc-outlet-ac741-a-1201/6250132-P)
Quick-Set Epoxy
Electrical Tape
This is strictly a DIY and i am in no way responsible if you mess your car up in any way!
To start things off, I removed the shift lever cover by pulling up from the front side closest to the change tray.
After that I removed the two T25 screws holding the change compartment assembly in place. Use a magnetic bit if you've got it because the screws aren't easy to get out if you drop one down below.
Disconnect the dongles for the traction control button (top-left) and the 12v accessory socket (mid-right) by depressing the releases on the side of the connections.
The 12v Accessory Socket that I picked up from advanced auto came with the necessary wires and 2 crimp splicers. I crimped the black wire (ground) of the new accessory socket directly into the brown wire in the existing connection. I crimped the red wire (hot) of the new accessory socket directly into the red/black wire in the existing connection.
I then plugged the USB charger directly into the new socket that I installed and set it aside for later.
I took these pictures after i did the work so don't mind the completed USB port in the background.
Next up grab the change compartment and remove the button that you would like to install the port on by depressing the release buttons from underneath.
Trace the USB connection (female side) on the top (centered) of the blank button and then cut that section out to make the hole. I used a razor blade and in turn scratched up the top of the button a little bit, but it may be more effective if you have the tools to drill a 1/8" hole through the center and then use a coping saw to cut the rest out more precisely.
Once you have the hole, using clear or black Epoxy, secure the female end of your 6" USB Male to Female extension to the blank button from the bottom facing upwards and let the Epoxy dry.
Insert the button back in to the console and it should look like this.
Attach the Male end of the USB extension into the USB car charger that was plugged into the new accessory socket from before.
Connect the original accessory socket connection and the traction control connection. At this point I found an open area to the right of the DSG shifter (underneath the faceplate) to put the new 12v socket and then I started putting everything else back together the same way I took it off.
Once complete it looked like this:
In hindsight I was not happy with how I scratched the face of the blank button so that is why I ultimately just covered the face of the button with electrical tape.. But it works so I'm happy!
Attachments
-
 IMG_2362.jpg275.9 KB · Views: 9,372
 -
 IMG_2370.jpg242.2 KB · Views: 4,170
 -
 IMG_2364.jpg245.6 KB · Views: 3,824
 -
 IMG_2365.jpg238.3 KB · Views: 3,818
 -
 IMG_2366.jpg271.3 KB · Views: 3,885
 -
 IMG_2367.jpg327.5 KB · Views: 4,097
 -
 IMG_2368.jpg279 KB · Views: 4,199
 -
 IMG_2369.jpg293.5 KB · Views: 3,914
 -
 IMG_2363.jpg229.5 KB · Views: 4,868
 -
 IMG_2361.jpg282 KB · Views: 3,574
Last edited:
