Tetsuei
needs m0ar shiny.
This is in no way meant to be a DIY by an expert in automotive wiring, but instead, more of a step by step of me fumbling around trying to figure out how to install an Escort 9500ci, with the display unit of the radar detector built into an Audi OEM auto-dimming rear-view mirror, sold by http://www.radar-mirror.com.
DISCLAIMER: I TAKE NO RESPONSIBILITY FOR ANY BODILY OR CAR DAMAGE IF YOU FOLLOW THIS GUIDE AND SOMETHING FUCKS UP. DO ALL OF THIS AT YOUR OWN RISK.
Cost of the radar detector and mirror setup was $1599 (MSRP for the detector), $150 for the OEM auto-dimming mirror, and another $50 for the optional red LED display for the 9500ci. The red display fits in much better with the rest of the car - if I had an R, that would be a different story, with the stock display being blue.
Before I get into it, let me say this. As someone who has never done wiring for a car before, this was a pain in the ass. Start to finish this took about 7 hours to do. Some of it I would have never been able to do if Onomarn from the MKV forums wasn't there to help me figure these things out, so big ups to him.
If I had to do it all over again, I might seriously debate letting someone else do it. I probably would be able to do it much faster the second time around since we had no idea what we were doing, but it was still a huge PITA. ataman's install (located here: http://golfmk6.com/forums/showthread.php?t=15533), while enticing, didn't tell me jack about how to do it, unfortunately.
Tools used:
Torx T25
Coat hanger
drill (various drill bit sizes)
2 part epoxy
liquid nails
lots and lots of zipties of various sizes
I will confess that I didn't get pictures of the entire process, but I'll try and verbalize as much as I can that I didn't get to capture in the photos.
First off:
Test to see if your entire setup works or not. Fail on my part that I didn't get a picture of the interface module. It'll be the one with 10 phone jacks, each jack labelled with a color and what needs to be plugged in. I'll see if I can't get in under my dash in the next few days and take a picture of it tucked away all ugly like.
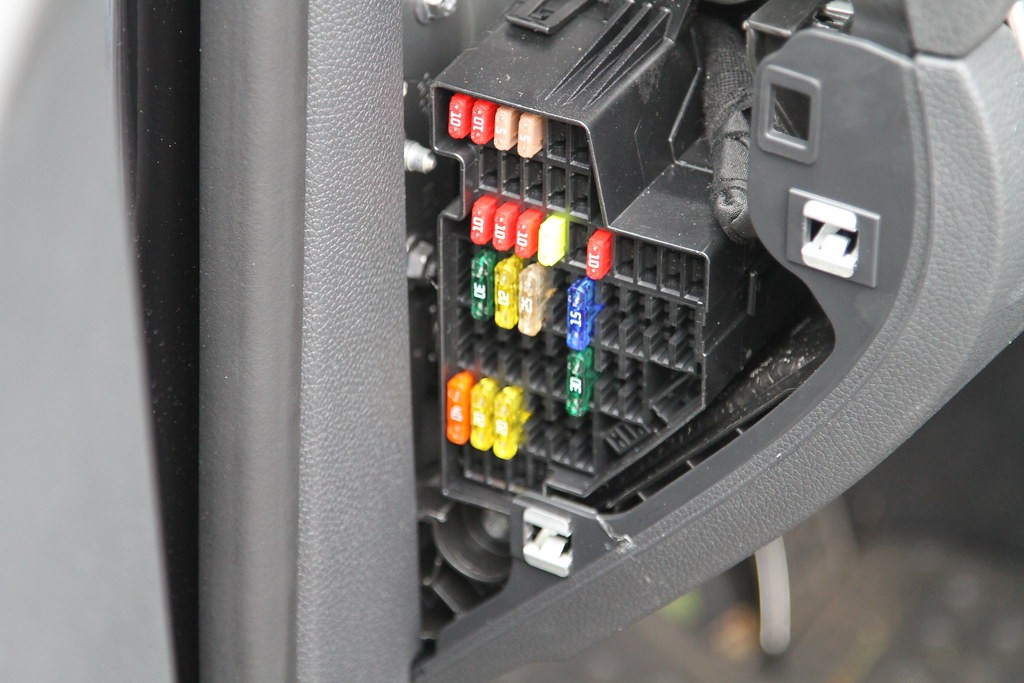
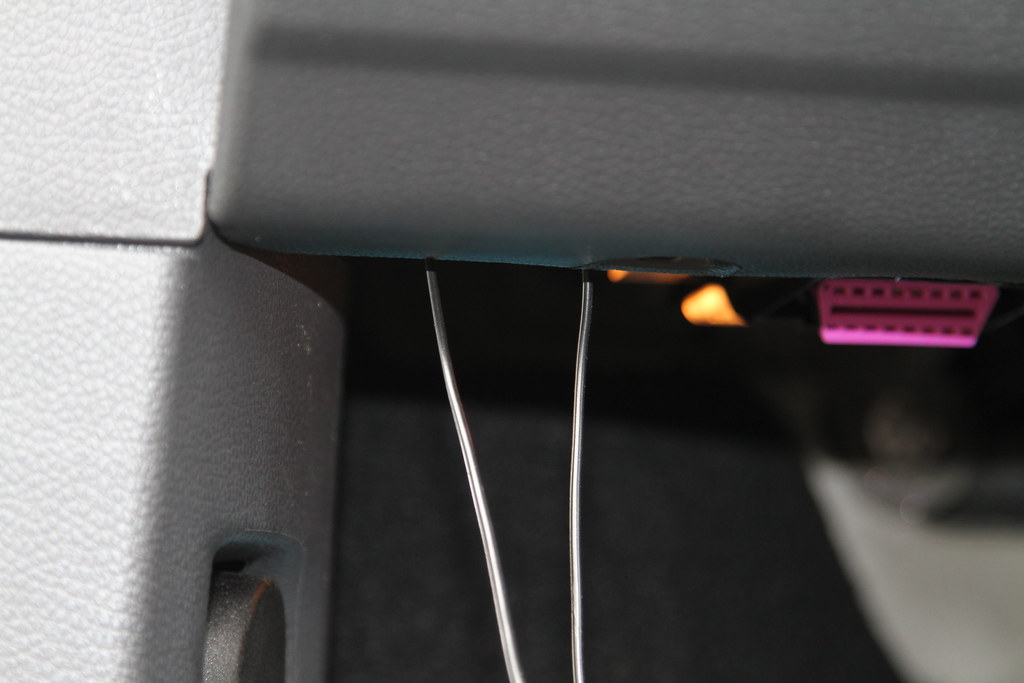
When you open the driver's side door, that panel on the side of the dash has a small slot towards the bottom where you can fit in a thin flathead screwdriver to pop it open. Once you do that, you'll see the fuse panel, as displayed here:

Took me a while to find a detailed fuse diagram for the Mk6, but here it is: http://www.golfgtiforum.co.uk/index.php?PHPSESSID=a319389d8273146d80fb9c4682f5956e&topic=178454.msg1677010#msg1677010 This is very, VERY helpful in finding a good location to wire into if you're doing it the correct way, which I didn't. I can't really tell you where to plug it in to - you'll have to find one that's only on when you turn on the ignition, and I personally stripped the connector and wrapped the exposed wiring around 20 amp fuse, as shown here:

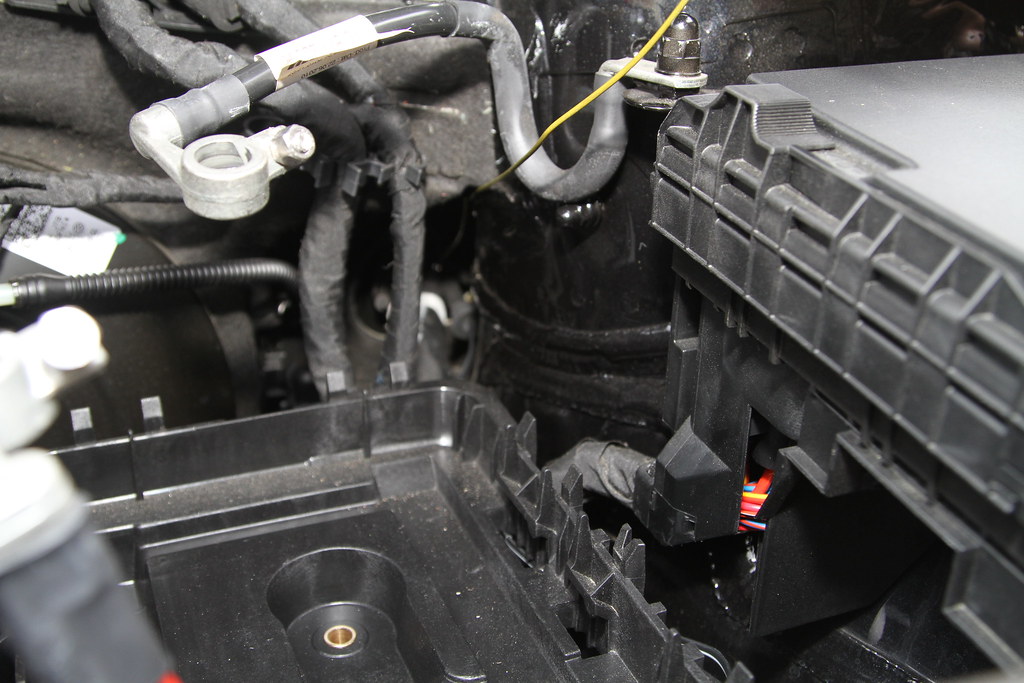
There is also a grounding wire for the interface module, and this one was a bit harder to find somewhere that fit well - I ended up attaching it above the fuse box as shown here.

Once you've got all the wiring set up, what I did was to cut the wiring, thread it through the paneling to come out under the dash as shown below, and then from there we spliced both ends back together. There's probably a way to do it without cutting the wires, so if you can figure it out, more power to you.

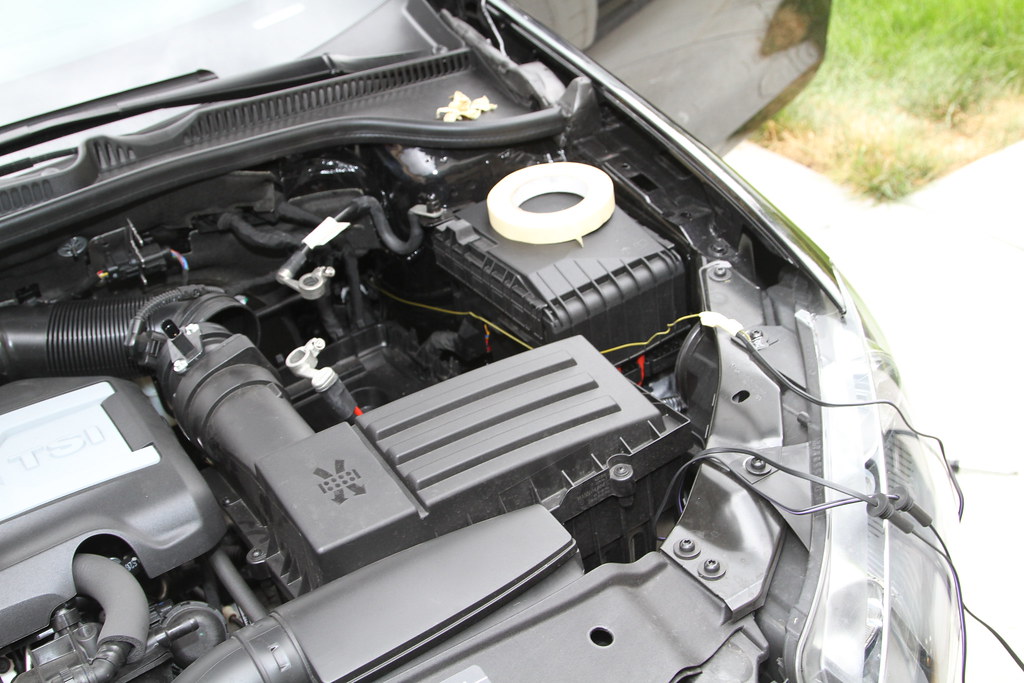
After you've got that set up, take all of the other components (radar receiver, 2x front laser shifters, rear laser shifter, GPS antenna, display module, control module, concealed alert LED, and the speaker) and plug them into the unit, and turn the car on. Make sure that the display unit powers on, and run the 9500ci through its check diagnostic to ensure that all the components are working correctly.
Once you've confirmed that, it's time to get to work.
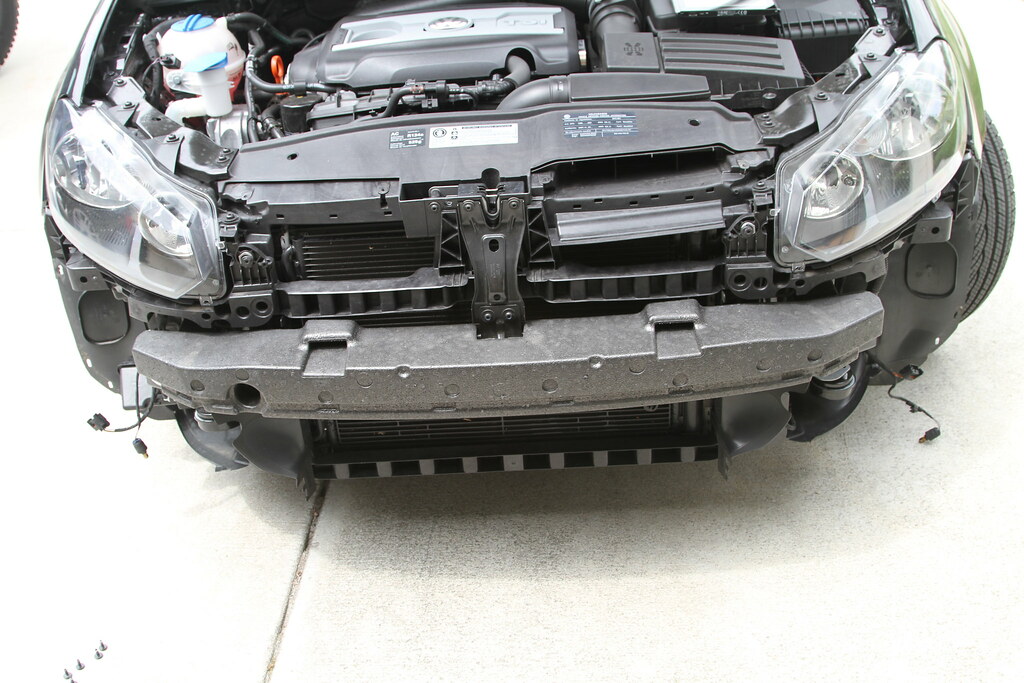
Removal of the front bumper. You do not need to remove the headlights, but I found this writeup (http://www.golfmk6.com/forums/showthread.php?t=16059) by gunmetal5 here to be fantastic, so big ups to gunmetal5 for helping out with that DIY. That helps you get started out - there are about six or seven screws on the bottom of the bumper on either side that you will also need to remove to fully remove the bumper. This is not covered in gunmetal5's writeup, as you do not need to fully remove the bumper to replace your headlights.
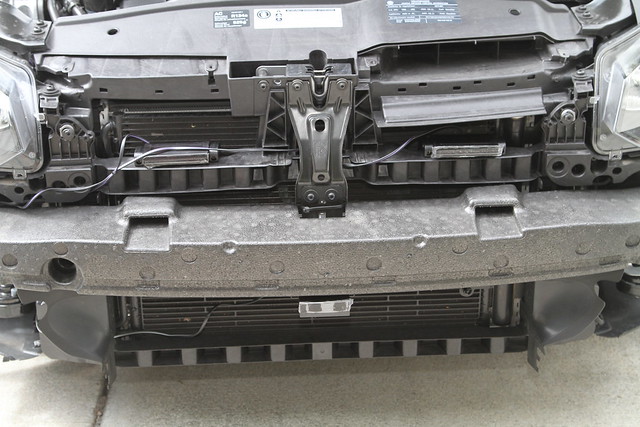
Before you fully remove the front bumper, you will need to unhook the wires connecting your side marker lights as well as your fog lights on each side. Once that's done, you can fully pull away the bumper and you should see the following:

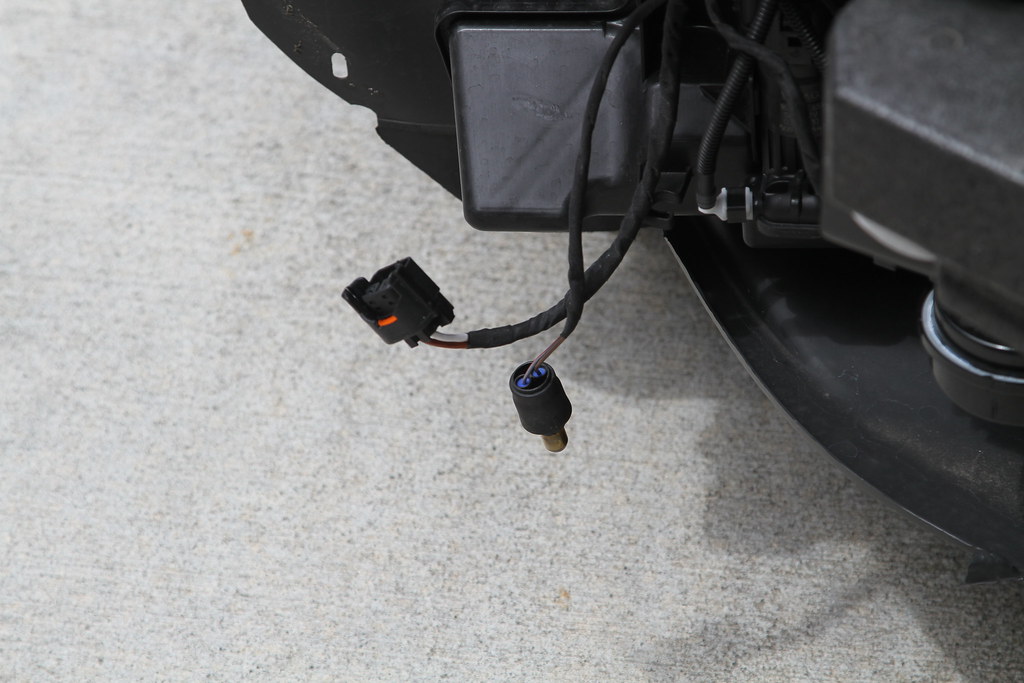
Closeup of the removed side marker light bulb and fog light connector:

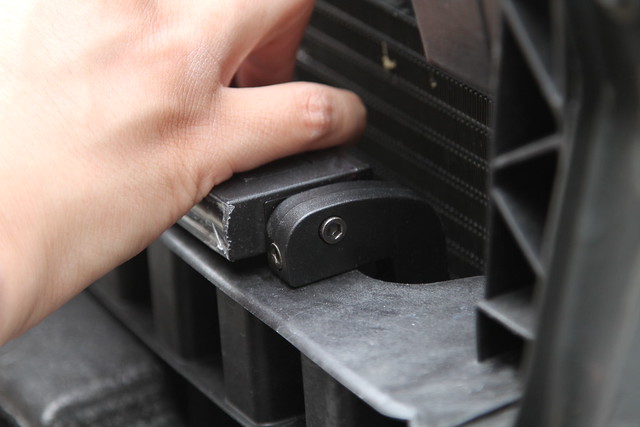
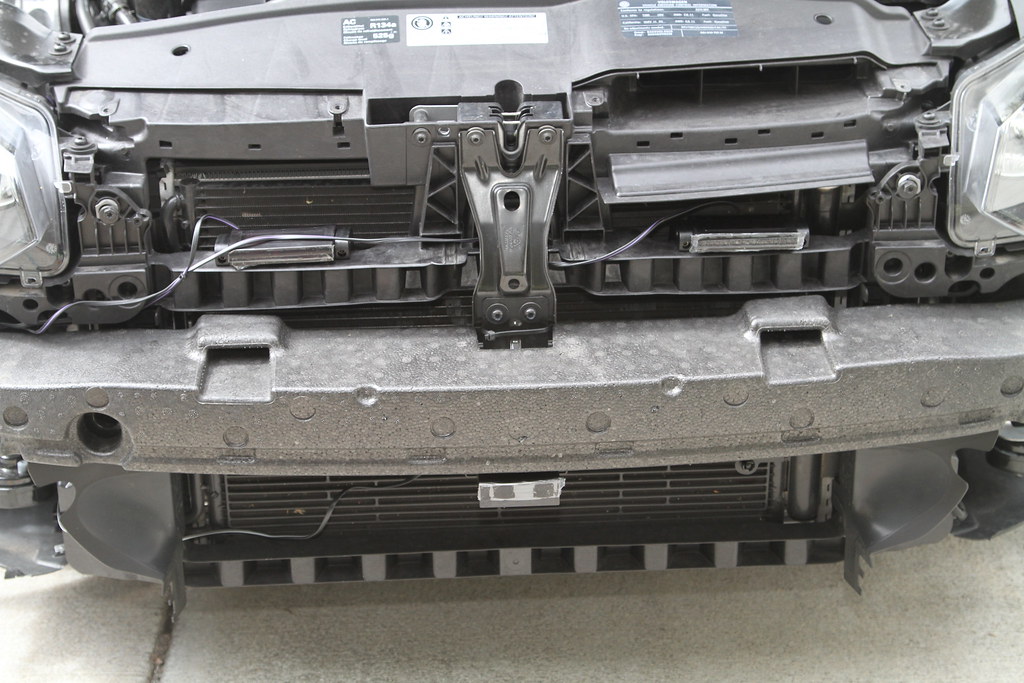
The two laser shifters, like in ataman's post, are mounted by tightening the hex screws on the sides and the front-facing edge of the brackets on either side, after sliding the mounting clamps as shown below.
The front radar receiver is quite possibly the most pain in the ass item out of them all. There is no solid area to mount it like ataman did, and I have no idea how he did his setup - I ended up having to drill into the styrofoam, lining the inside of the holes with two part epoxy, and screw the bracket into the foam, using two of the supplied washers on each screw as the screw will not go in completely on account of hitting a metal frame inside the styrofoam. To make this admittedly terrible setup slightly more secure, I secured a system of interlocked zipties, one of which you can see above the styrofoam in the middle on the metal bracket, and looping down and through the bracket supporting the radar receiver.
You'll see in the image above that we ran the wires from all three units towards the passenger side of the car - we ended up changing our minds, and looping around towards the driver's side. there is a gap below the headlight that allows us to thread the wires through there and into the engine bay.
You might be able to do this next part without removing the battery, provided you have paper-thin hands and arms. Not having those attributes, I had to remove the battery as well as the two-piece side walls that surround the battery. There is a battery-securing bracket on the side closest to the engine that you will need a long extended ratchet to access before you can remove the battery (remember, remove the positive connector first!). Once you've done that, this allows you to get to the grommet that many of the engine bay cables go through to get into the cabin.

On account of the really cramped space behind the driver's footwell, I was only able to take a picture of the unwound wire coat hanger poking out from the other side. This is one of those "go by feel and have someone else spotting the other side for you" kind of things. We had to use masking tape because Onomarn misplaced his electrical tape halfway through the install - it was sitting next to his R32 parked on the street when we finally found it. :mad0259:

You'll want to thread one cable through at a time (remember, there are three, one for each receiver), making sure to tape the cable to the coat hanger wire well so that it won't pull away from the coat hanger wire when you're pulling it through.
After you've threaded the three wires through, you should be done with everything in the front at this point, so you can choose to put everything back together, in reverse order that you performed it. For reference, this is the order that I put stuff back together in.
Battery enclosure rear piece, battery enclosure front piece, battery, battery securing bracket, battery sleeve, battery cover, front bumper, then finally upper grille.
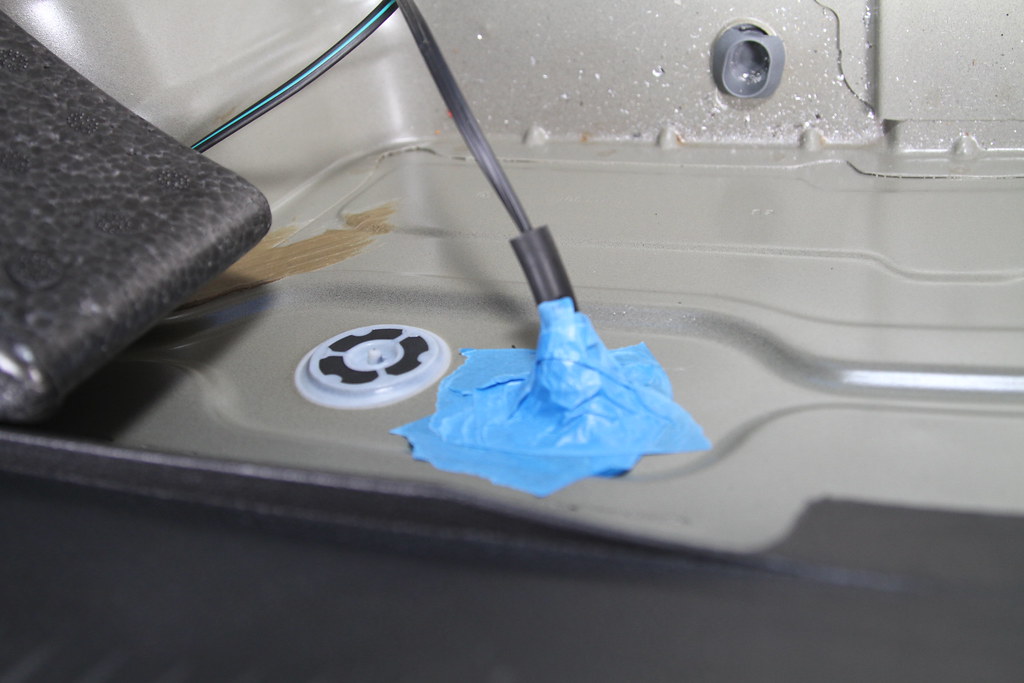
The rear sensor comes next. The rear laser shifter/receiver sensor is the perfect size to be placed right above the license plate, using the top two license plate bolts. This means you can run this right on top of your plate. To get the connector cable through into the trunk, you have to remove one of the license plate light housings and then we ended up removing everything in my trunk including the spare tire so that we could drill a hole in the spare wheel well large enough to allow us to run the connector cable and its RJ-45 (telephone) jack through. Hole drilled, once again we employed the coat hanger to pull the cable through and into the trunk. After we pulled it into the car, I decided to tape that hole shut as well as I could - with a ton of painters' tape.

After I made sure it was secured, I folded down the driver's side rear seat so I could run the cable through on the side. From there, I took a flathead screwdriver to lift the edge of the side trim at the bottom (No picture of this now, will update in the coming days) so I could tuck the wiring underneath. You'll only be able to tuck a bit a time, so take your time and take breaks if your fingers are starting to hurt. Tucking the cable from the rear laser receiver all the way along the trim from the back to the front, I had it exit towards the front of the driver's footwell, behind the pedals. Once you've run this cable, all that's left are the interior pieces and cosmetic stuff.
DISCLAIMER: I TAKE NO RESPONSIBILITY FOR ANY BODILY OR CAR DAMAGE IF YOU FOLLOW THIS GUIDE AND SOMETHING FUCKS UP. DO ALL OF THIS AT YOUR OWN RISK.
Cost of the radar detector and mirror setup was $1599 (MSRP for the detector), $150 for the OEM auto-dimming mirror, and another $50 for the optional red LED display for the 9500ci. The red display fits in much better with the rest of the car - if I had an R, that would be a different story, with the stock display being blue.
Before I get into it, let me say this. As someone who has never done wiring for a car before, this was a pain in the ass. Start to finish this took about 7 hours to do. Some of it I would have never been able to do if Onomarn from the MKV forums wasn't there to help me figure these things out, so big ups to him.
If I had to do it all over again, I might seriously debate letting someone else do it. I probably would be able to do it much faster the second time around since we had no idea what we were doing, but it was still a huge PITA. ataman's install (located here: http://golfmk6.com/forums/showthread.php?t=15533), while enticing, didn't tell me jack about how to do it, unfortunately.
Tools used:
Torx T25
Coat hanger
drill (various drill bit sizes)
2 part epoxy
liquid nails
lots and lots of zipties of various sizes
I will confess that I didn't get pictures of the entire process, but I'll try and verbalize as much as I can that I didn't get to capture in the photos.
First off:
Test to see if your entire setup works or not. Fail on my part that I didn't get a picture of the interface module. It'll be the one with 10 phone jacks, each jack labelled with a color and what needs to be plugged in. I'll see if I can't get in under my dash in the next few days and take a picture of it tucked away all ugly like.
When you open the driver's side door, that panel on the side of the dash has a small slot towards the bottom where you can fit in a thin flathead screwdriver to pop it open. Once you do that, you'll see the fuse panel, as displayed here:
Took me a while to find a detailed fuse diagram for the Mk6, but here it is: http://www.golfgtiforum.co.uk/index.php?PHPSESSID=a319389d8273146d80fb9c4682f5956e&topic=178454.msg1677010#msg1677010 This is very, VERY helpful in finding a good location to wire into if you're doing it the correct way, which I didn't. I can't really tell you where to plug it in to - you'll have to find one that's only on when you turn on the ignition, and I personally stripped the connector and wrapped the exposed wiring around 20 amp fuse, as shown here:
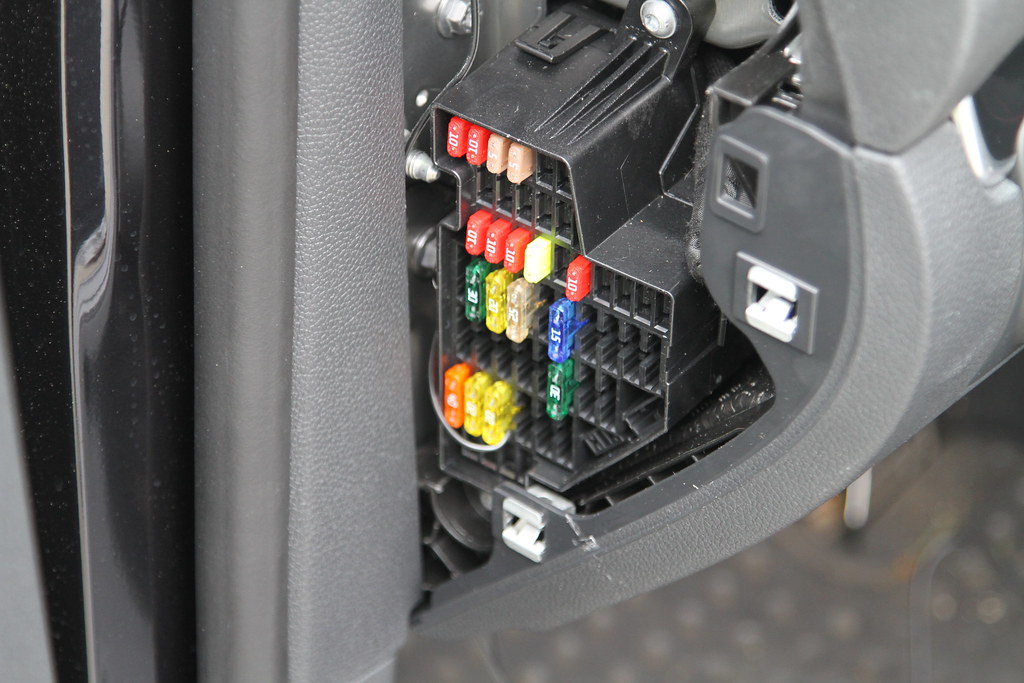
There is also a grounding wire for the interface module, and this one was a bit harder to find somewhere that fit well - I ended up attaching it above the fuse box as shown here.

Once you've got all the wiring set up, what I did was to cut the wiring, thread it through the paneling to come out under the dash as shown below, and then from there we spliced both ends back together. There's probably a way to do it without cutting the wires, so if you can figure it out, more power to you.
After you've got that set up, take all of the other components (radar receiver, 2x front laser shifters, rear laser shifter, GPS antenna, display module, control module, concealed alert LED, and the speaker) and plug them into the unit, and turn the car on. Make sure that the display unit powers on, and run the 9500ci through its check diagnostic to ensure that all the components are working correctly.
Once you've confirmed that, it's time to get to work.
Removal of the front bumper. You do not need to remove the headlights, but I found this writeup (http://www.golfmk6.com/forums/showthread.php?t=16059) by gunmetal5 here to be fantastic, so big ups to gunmetal5 for helping out with that DIY. That helps you get started out - there are about six or seven screws on the bottom of the bumper on either side that you will also need to remove to fully remove the bumper. This is not covered in gunmetal5's writeup, as you do not need to fully remove the bumper to replace your headlights.
Before you fully remove the front bumper, you will need to unhook the wires connecting your side marker lights as well as your fog lights on each side. Once that's done, you can fully pull away the bumper and you should see the following:
Closeup of the removed side marker light bulb and fog light connector:
The two laser shifters, like in ataman's post, are mounted by tightening the hex screws on the sides and the front-facing edge of the brackets on either side, after sliding the mounting clamps as shown below.

The front radar receiver is quite possibly the most pain in the ass item out of them all. There is no solid area to mount it like ataman did, and I have no idea how he did his setup - I ended up having to drill into the styrofoam, lining the inside of the holes with two part epoxy, and screw the bracket into the foam, using two of the supplied washers on each screw as the screw will not go in completely on account of hitting a metal frame inside the styrofoam. To make this admittedly terrible setup slightly more secure, I secured a system of interlocked zipties, one of which you can see above the styrofoam in the middle on the metal bracket, and looping down and through the bracket supporting the radar receiver.
You'll see in the image above that we ran the wires from all three units towards the passenger side of the car - we ended up changing our minds, and looping around towards the driver's side. there is a gap below the headlight that allows us to thread the wires through there and into the engine bay.
You might be able to do this next part without removing the battery, provided you have paper-thin hands and arms. Not having those attributes, I had to remove the battery as well as the two-piece side walls that surround the battery. There is a battery-securing bracket on the side closest to the engine that you will need a long extended ratchet to access before you can remove the battery (remember, remove the positive connector first!). Once you've done that, this allows you to get to the grommet that many of the engine bay cables go through to get into the cabin.
On account of the really cramped space behind the driver's footwell, I was only able to take a picture of the unwound wire coat hanger poking out from the other side. This is one of those "go by feel and have someone else spotting the other side for you" kind of things. We had to use masking tape because Onomarn misplaced his electrical tape halfway through the install - it was sitting next to his R32 parked on the street when we finally found it. :mad0259:
You'll want to thread one cable through at a time (remember, there are three, one for each receiver), making sure to tape the cable to the coat hanger wire well so that it won't pull away from the coat hanger wire when you're pulling it through.
After you've threaded the three wires through, you should be done with everything in the front at this point, so you can choose to put everything back together, in reverse order that you performed it. For reference, this is the order that I put stuff back together in.
Battery enclosure rear piece, battery enclosure front piece, battery, battery securing bracket, battery sleeve, battery cover, front bumper, then finally upper grille.
The rear sensor comes next. The rear laser shifter/receiver sensor is the perfect size to be placed right above the license plate, using the top two license plate bolts. This means you can run this right on top of your plate. To get the connector cable through into the trunk, you have to remove one of the license plate light housings and then we ended up removing everything in my trunk including the spare tire so that we could drill a hole in the spare wheel well large enough to allow us to run the connector cable and its RJ-45 (telephone) jack through. Hole drilled, once again we employed the coat hanger to pull the cable through and into the trunk. After we pulled it into the car, I decided to tape that hole shut as well as I could - with a ton of painters' tape.
After I made sure it was secured, I folded down the driver's side rear seat so I could run the cable through on the side. From there, I took a flathead screwdriver to lift the edge of the side trim at the bottom (No picture of this now, will update in the coming days) so I could tuck the wiring underneath. You'll only be able to tuck a bit a time, so take your time and take breaks if your fingers are starting to hurt. Tucking the cable from the rear laser receiver all the way along the trim from the back to the front, I had it exit towards the front of the driver's footwell, behind the pedals. Once you've run this cable, all that's left are the interior pieces and cosmetic stuff.
Last edited:

") Another tip is to put some washers between the shifter and the license plate, so you have some space to bend the mounting bracket downwards to level.
Another tip is to put some washers between the shifter and the license plate, so you have some space to bend the mounting bracket downwards to level.