So to start this off the actual towbar installation is very simple.
1. Remove outer taillights
2. Remove 4 screws in each rear wheel well
3. Remove 4 screws from underside of bumper and valence
4. Unclip bumper cover, disconnecting license plate harness, and pull away from car.
5. Remove obvious bolts holding original bumper in place
6. Slide the towbar into the only openings it fits in
7. Bolt in with included screws
Put everything back on the reverse of removal except old bumper and foam, discard those. Atleast on the Golf 6 you will not need to remove anything to reach to bolts for the towbar.
Took me about 40 mins total, but I’ve also got very good at removing the bumper cover during my parking sensor install. If you want a more detailed writeup on how to do this see my park assist install post.
http://www.golfmk6.com/forums/showthread.php?t=77564
Now this is the more difficult part… Installing the 13 pin Westfalia electrics. If you are installing the electrics do not put everything back together after the towbar install since you will need to mount and route the electrics.
You will need VW pin removal tools… There is no easy way around it. A caveat though… If you have the set from sears in a blue case like I do the bigger remover you need for the fuse block will not work. It isn’t strong enough to push the tabs on the pins to remove the one fuse needing removing (#4). I ended up cutting the connector and tying it into my amp turn on lead since all it needed was switched power.
So the first part is easy… pop the trailer plug through the hole indicated in the manual.
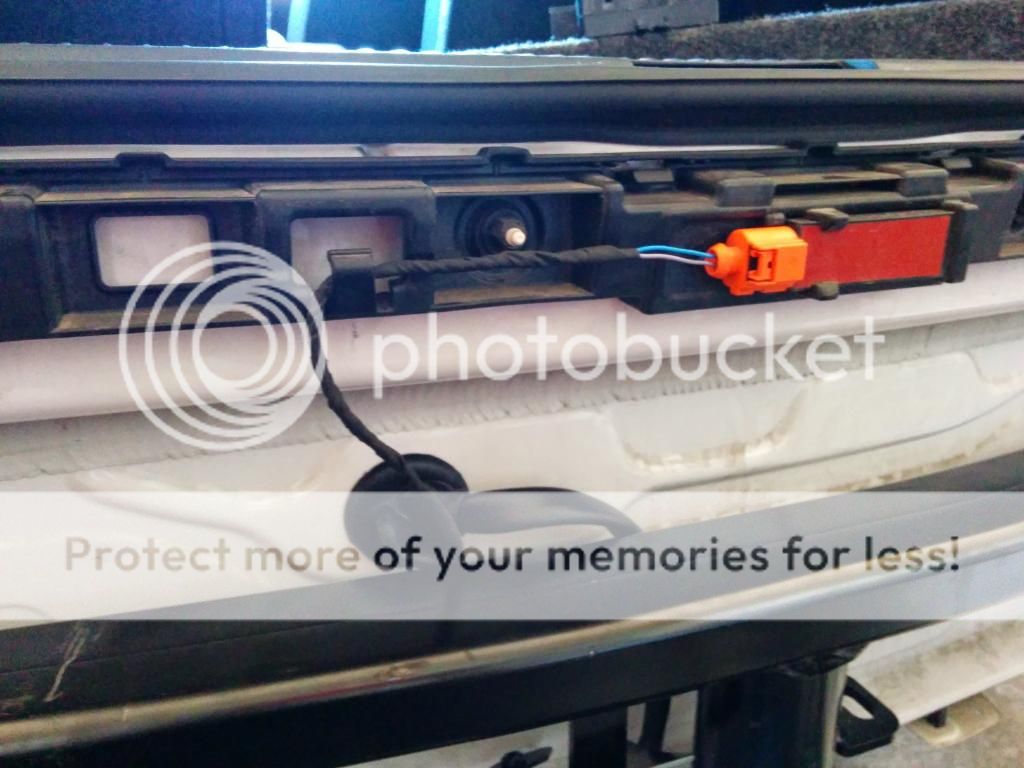

Which should look like the above. Unless you have KESSY you won’t have the little red antenna and probably won’t have anything in the hole. If you do have KESSY there is a 2nd hole in included rubber boot that will need to be cut open. You can see it in my picture.
To get the wire through this boot you will need to take apart the connector and remove the wires with a pin removal tool. Remove the purple plastic U shown out the side of the connector. Then insert your pin removal tool and remove the wires. Install is reverse of removal.


The next part I’m not ashamed to say stumped me for a bit… The westfalia manual was a bit difficult to interpret. So now you will attach the trailer socket to the towbar. Basically the weird pictures you see in the manual want you to place the rubber flap on the back of the plastic connector. So snap the plug into the cover and it should look like this.
Then push the wires down and into the channel inside and twist the rubber boot around a bit until it lines up with its channel in the cover.

Then use something to poke holes for the screws in the rubber boot once you have it fit on the plastic cover. It didn’t really come out in the picture but atleast you get an idea of how it fits on.


Now screw the connector onto the towbar using the included screws. The cover should swing up (it will be at an angle) and not down.
Should look like this when you are done and have the swan neck attached.

Now route the wires along the drivers side in the wire channel above the wheel well. It comes out under the plastic trim next to the back seat.
Attach the ground at this time. The westfalia manual has good illustrations pointing out where it is located in the hatch area.
Then get the wires to the drivers footwell and now you get to remove a bunch of trim!
First the headlight knob. Push in and turn from off till it looks like mine and it should just pull straight out.

Remove the screw behind the knob.

Remove the two screws under the dash and remove the instrument cluster. (tutorial)
Remove the one screw under the instrument cluster holding the trim piece around the headlight switch.

Now you will see a big metal bracket with a bunch of screws. Remove it.

Remove the two screws holding the fuse panel to its bracket.
PULL THE BATTERY CABLE NOW TO REMOVE POWER!
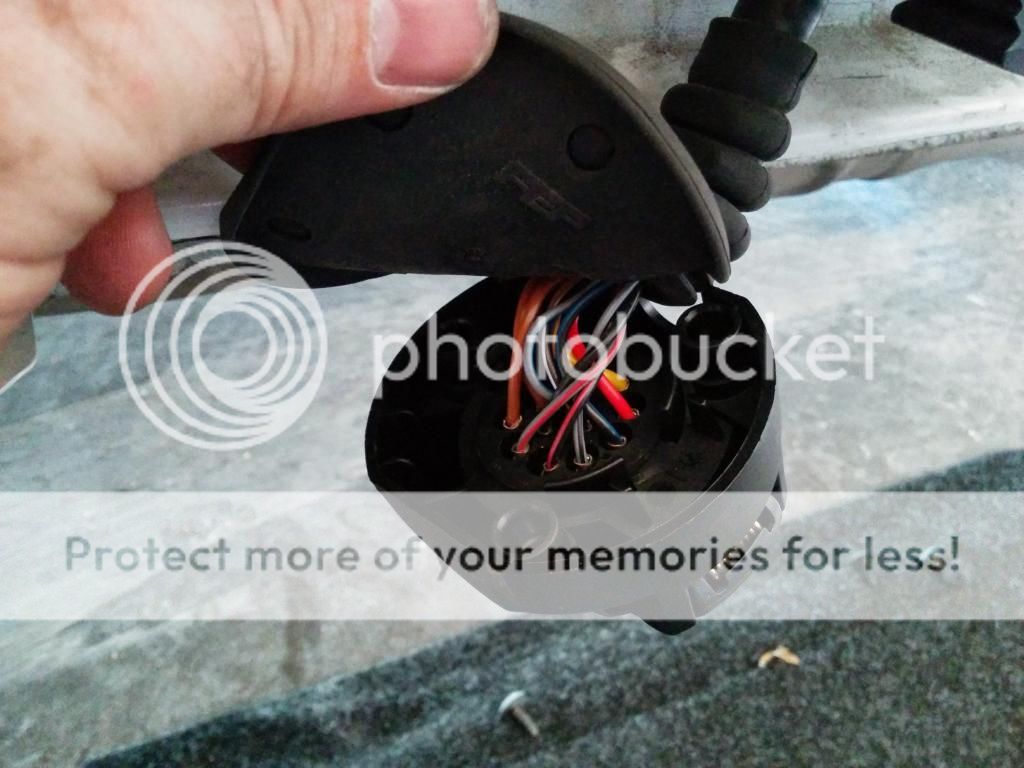
Maneuver it to where you can work on it and cut the ziptie and remove the back panel by unclipping the clips all the way around. Look at the westfalia manual and it will tell you where to connect the wire for the three fuses to be added. It also gives you a very good diagram of how to unlock the pins by sliding the purple piece.
Picture of the three wires inserted and the purple piece unlocked. The three wires are the red, red/black, and red/blue.


If you have a fuse #4 installed (Golf 6) you will need to remove the existing pin and plug in the westfalia plug. If you don’t have a #4 then just plug in the westfalia plug.
In the first part of the manual it will show wire locations and two different types of CECM…
MAKE SURE YOU FOLLOW THE INSTRUCTIONS FOR YOUR TYPE!
So if like my car you have the newer style CECM with 3 massive plugs you will only be working with the brown one. Pop off the brown one and remove the designated pins in the westfalia manual. There will be three: CAN HI, CAN LOW, and STOP. Pins 15,16,17 respectively.
If you want good illustrations of this refer to my park assist install.
http://www.golfmk6.com/forums/showthread.php?t=77564
Once this is all plugged in and wired up place the wires and ziptie to existing ones all the way back to the hatch. Coil any remaining wire into the space behind the carpet in the hatch and mount the module with the included Velcro. Then place all of your trim back reverse of removal. Bring up VCDS on your laptop after turning the car on and code the CAN Gateway > installation list > 69 Trailer and save.
Then open the new trailer module and code for North America and any other options you need. If you have park assist or park pilot code it to add the manual trailer hitch.
If you have an older car (earlier than 2009) to activate trailer stabilization you will have to code it into the ABS module. The westfalia manual tells you what to code.
If you have any questions feel free to PM me. The westfalia manual is pretty good I just illustrated a few key points I thought might be sticking points with people.
1. Remove outer taillights
2. Remove 4 screws in each rear wheel well
3. Remove 4 screws from underside of bumper and valence
4. Unclip bumper cover, disconnecting license plate harness, and pull away from car.
5. Remove obvious bolts holding original bumper in place
6. Slide the towbar into the only openings it fits in
7. Bolt in with included screws
Put everything back on the reverse of removal except old bumper and foam, discard those. Atleast on the Golf 6 you will not need to remove anything to reach to bolts for the towbar.
Took me about 40 mins total, but I’ve also got very good at removing the bumper cover during my parking sensor install. If you want a more detailed writeup on how to do this see my park assist install post.
http://www.golfmk6.com/forums/showthread.php?t=77564
Now this is the more difficult part… Installing the 13 pin Westfalia electrics. If you are installing the electrics do not put everything back together after the towbar install since you will need to mount and route the electrics.
You will need VW pin removal tools… There is no easy way around it. A caveat though… If you have the set from sears in a blue case like I do the bigger remover you need for the fuse block will not work. It isn’t strong enough to push the tabs on the pins to remove the one fuse needing removing (#4). I ended up cutting the connector and tying it into my amp turn on lead since all it needed was switched power.
So the first part is easy… pop the trailer plug through the hole indicated in the manual.
Which should look like the above. Unless you have KESSY you won’t have the little red antenna and probably won’t have anything in the hole. If you do have KESSY there is a 2nd hole in included rubber boot that will need to be cut open. You can see it in my picture.
To get the wire through this boot you will need to take apart the connector and remove the wires with a pin removal tool. Remove the purple plastic U shown out the side of the connector. Then insert your pin removal tool and remove the wires. Install is reverse of removal.
The next part I’m not ashamed to say stumped me for a bit… The westfalia manual was a bit difficult to interpret. So now you will attach the trailer socket to the towbar. Basically the weird pictures you see in the manual want you to place the rubber flap on the back of the plastic connector. So snap the plug into the cover and it should look like this.
Then push the wires down and into the channel inside and twist the rubber boot around a bit until it lines up with its channel in the cover.
Then use something to poke holes for the screws in the rubber boot once you have it fit on the plastic cover. It didn’t really come out in the picture but atleast you get an idea of how it fits on.
Now screw the connector onto the towbar using the included screws. The cover should swing up (it will be at an angle) and not down.
Should look like this when you are done and have the swan neck attached.
Now route the wires along the drivers side in the wire channel above the wheel well. It comes out under the plastic trim next to the back seat.
Attach the ground at this time. The westfalia manual has good illustrations pointing out where it is located in the hatch area.
Then get the wires to the drivers footwell and now you get to remove a bunch of trim!
First the headlight knob. Push in and turn from off till it looks like mine and it should just pull straight out.
Remove the screw behind the knob.
Remove the two screws under the dash and remove the instrument cluster. (tutorial)
Remove the one screw under the instrument cluster holding the trim piece around the headlight switch.
Now you will see a big metal bracket with a bunch of screws. Remove it.
Remove the two screws holding the fuse panel to its bracket.
PULL THE BATTERY CABLE NOW TO REMOVE POWER!
Maneuver it to where you can work on it and cut the ziptie and remove the back panel by unclipping the clips all the way around. Look at the westfalia manual and it will tell you where to connect the wire for the three fuses to be added. It also gives you a very good diagram of how to unlock the pins by sliding the purple piece.
Picture of the three wires inserted and the purple piece unlocked. The three wires are the red, red/black, and red/blue.
If you have a fuse #4 installed (Golf 6) you will need to remove the existing pin and plug in the westfalia plug. If you don’t have a #4 then just plug in the westfalia plug.
In the first part of the manual it will show wire locations and two different types of CECM…
MAKE SURE YOU FOLLOW THE INSTRUCTIONS FOR YOUR TYPE!
So if like my car you have the newer style CECM with 3 massive plugs you will only be working with the brown one. Pop off the brown one and remove the designated pins in the westfalia manual. There will be three: CAN HI, CAN LOW, and STOP. Pins 15,16,17 respectively.
If you want good illustrations of this refer to my park assist install.
http://www.golfmk6.com/forums/showthread.php?t=77564
Once this is all plugged in and wired up place the wires and ziptie to existing ones all the way back to the hatch. Coil any remaining wire into the space behind the carpet in the hatch and mount the module with the included Velcro. Then place all of your trim back reverse of removal. Bring up VCDS on your laptop after turning the car on and code the CAN Gateway > installation list > 69 Trailer and save.
Then open the new trailer module and code for North America and any other options you need. If you have park assist or park pilot code it to add the manual trailer hitch.
If you have an older car (earlier than 2009) to activate trailer stabilization you will have to code it into the ABS module. The westfalia manual tells you what to code.
If you have any questions feel free to PM me. The westfalia manual is pretty good I just illustrated a few key points I thought might be sticking points with people.


