How to: True Metallics w/ Glossifier Plastidip wheel centers
So I wanted to share how I dipped the centers of my wheels. I bought the Alzor 881 last spring before the other colors and fitments were released. I wish I had of waited because I always thought the centers looked like primer compared to the machined lip. My plan for the spring: plastidip the centers dark grey and add spacers on the rear.
After browsing dipyourcar.com I settled on anthracite grey in the True Metallics line. I liked the natural painted look with added shine from the Glossifier. Once I decided on the color I then had to figure out how best to mask and dip the centers. I watched a few videos and trolled some forums for the best solutions.
My main problem was this: you have to remove any masking while the dip is wet but the Glossifier has to be sprayed over dry dip. I experimented with light/thick coats of dip followed by Glossifier on wet/dry dip and when to remove the mask. The best result was to remove the masking when the dip is wet, allow to dry, re-mask, apply Glossifier and remove masking when wet.
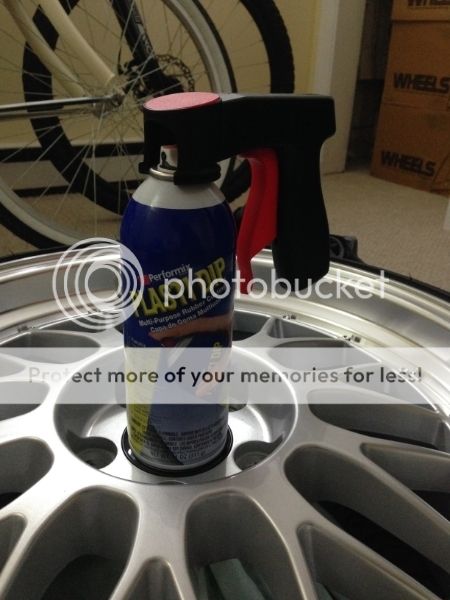
I bought a spray trigger to help with application and made some lug hole covers by hot gluing match sticks to quarters:

Test panel:

Wheel partially masked:

The first two coats I applied at 50-75% transparency. Using the valve as a top reference, coat one went top to bottom spraying side to side. The can was always angled 90 degrees perpendicular to the wheel but I would angle it slightly when going side to side to get better coverage.
After coat one:


The third and fourth coats were applied at about 80-90% transparency; enough to give enough coverage but not enough for the dip to drip. Coat three I went clockwise around the wheel to get coverage on one side of the spokes and coat four went anti clockwise to get coverage on the other side. I obviously had to shoot at an angle and not perpendicular to the face of the wheel. I also shot the flat faces of the spokes and the inside the center circle after coats three and four.
After coat three:

I probably could and should have stopped after four coats, but I went with a fifth. Once I shot the fourth wheel I began unmasking the first. This didn’t go great to begin with as the dip began to rip. After a while I took a utility blade and ran it along the edge as I was peeling to get a cleaner edge. Once the dip had fully dried (24 hours), I re-masked the bad areas and touched them up with a small artist’s brush. Un-masked with utility blade again, wait to dry… again. Re-mask ready for Glossifier. Apply Glossifier same as coats three and four of plastidip. Unmask with utility blade to get clean edge.
Final result:

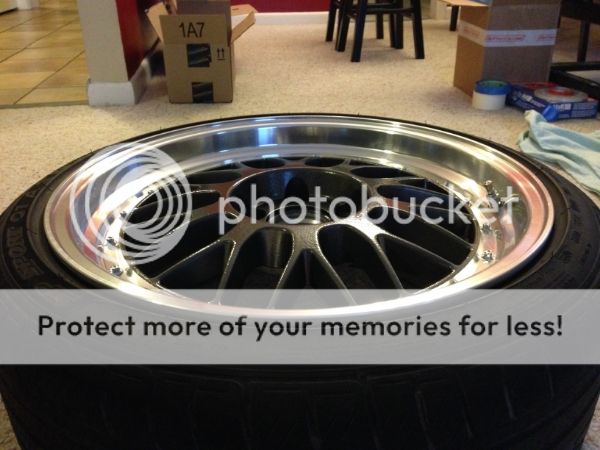
For a DIY, and by my own standards, I would give these a 7/10. As you can see there is a bit of orange peel/pixelation. This was because shooting coats three and four at different angles causes some dip to land on the wheel at 4-6 inches while some travels 8-10 inches. Coat five didn’t help.
What I learned:
Try and always shoot perpendicular to the face of the wheel! This will reduce the chance of getting orange peel. It was quite cold when I did this and the nozzle would start to clog, not sure if the two are related.
When you get to a nice looking finish, stop. No need for any more coats as the color does not ‘build’ like normal paint. Masking was a PITA and I ended up unmasking when the dip was drier with a utility blade… the opposite of my test panel. I will write up more details about masking if requested. I will say this though, if you’re dipping a flat surface, apply 2 or 3 heavy coats of dip and unmask while wet. If you’re masking up to an edge like I did, allow dip to dry and run a utility blade along the edge as you peel back the masking tape.
Will post pics of them on the car when ECS get around to shipping me a spacer/hub ring combo that works.
So I wanted to share how I dipped the centers of my wheels. I bought the Alzor 881 last spring before the other colors and fitments were released. I wish I had of waited because I always thought the centers looked like primer compared to the machined lip. My plan for the spring: plastidip the centers dark grey and add spacers on the rear.
After browsing dipyourcar.com I settled on anthracite grey in the True Metallics line. I liked the natural painted look with added shine from the Glossifier. Once I decided on the color I then had to figure out how best to mask and dip the centers. I watched a few videos and trolled some forums for the best solutions.
My main problem was this: you have to remove any masking while the dip is wet but the Glossifier has to be sprayed over dry dip. I experimented with light/thick coats of dip followed by Glossifier on wet/dry dip and when to remove the mask. The best result was to remove the masking when the dip is wet, allow to dry, re-mask, apply Glossifier and remove masking when wet.
I bought a spray trigger to help with application and made some lug hole covers by hot gluing match sticks to quarters:
Test panel:
Wheel partially masked:
The first two coats I applied at 50-75% transparency. Using the valve as a top reference, coat one went top to bottom spraying side to side. The can was always angled 90 degrees perpendicular to the wheel but I would angle it slightly when going side to side to get better coverage.
After coat one:
The third and fourth coats were applied at about 80-90% transparency; enough to give enough coverage but not enough for the dip to drip. Coat three I went clockwise around the wheel to get coverage on one side of the spokes and coat four went anti clockwise to get coverage on the other side. I obviously had to shoot at an angle and not perpendicular to the face of the wheel. I also shot the flat faces of the spokes and the inside the center circle after coats three and four.
After coat three:
I probably could and should have stopped after four coats, but I went with a fifth. Once I shot the fourth wheel I began unmasking the first. This didn’t go great to begin with as the dip began to rip. After a while I took a utility blade and ran it along the edge as I was peeling to get a cleaner edge. Once the dip had fully dried (24 hours), I re-masked the bad areas and touched them up with a small artist’s brush. Un-masked with utility blade again, wait to dry… again. Re-mask ready for Glossifier. Apply Glossifier same as coats three and four of plastidip. Unmask with utility blade to get clean edge.
Final result:
For a DIY, and by my own standards, I would give these a 7/10. As you can see there is a bit of orange peel/pixelation. This was because shooting coats three and four at different angles causes some dip to land on the wheel at 4-6 inches while some travels 8-10 inches. Coat five didn’t help.
What I learned:
Try and always shoot perpendicular to the face of the wheel! This will reduce the chance of getting orange peel. It was quite cold when I did this and the nozzle would start to clog, not sure if the two are related.
When you get to a nice looking finish, stop. No need for any more coats as the color does not ‘build’ like normal paint. Masking was a PITA and I ended up unmasking when the dip was drier with a utility blade… the opposite of my test panel. I will write up more details about masking if requested. I will say this though, if you’re dipping a flat surface, apply 2 or 3 heavy coats of dip and unmask while wet. If you’re masking up to an edge like I did, allow dip to dry and run a utility blade along the edge as you peel back the masking tape.
Will post pics of them on the car when ECS get around to shipping me a spacer/hub ring combo that works.
Last edited:
