GOLFMK8
GOLFMK7
GOLFMK6
GOLFMKV

TimNeedsCoffee10's Build Thread -

timneedscoffee10

Go Kart Champion
Thought I'd start one of these... I fully expect this thread to be a place just for me to talk to myself and keep notes about what I'm doing, and where i've been, with my MKVI GTI - but if any of you guys are interested or have comments / criticisms - I'd love to hear those too!

I bought my 2011 GTI in July 2010, and took delivery in September 2010. I drove her stock through the first winter, but then got bit by the mod bug. Over the past few years, here's where I've wound up. There was no clear direction through most of this... just enjoyed working on the car, learning by doing, and participating here on the forum.

As the years went on and I learned more and more, the build started to take shape. Now that I'm nearing 100k miles, I'm looking to turn her into a beastly DD, and plan to keep her running through the 200k mile marker.

Here's the current list of mods and parts, which I'll keep current as work continues:

Engine & Transmission
  • COBB ProTune by Freektune
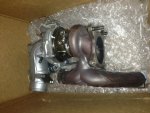
  • FrankenTurbo F23T Turbo
  • FrankenTurbo Outlet Pipe (FrankenTOP)
  • Neuspeed FMIC
  • Ultimate Racing Turbo-Back (metal cat, resonated DP, resonated mid-pipe)
  • Integrated Engineering Intake
  • GoFast Bits DV+
  • Bosch 3-bar MAP
  • Black Forest Industries Stage 1 Engine and Transmission mounts
  • HPA 75a Red Core Interlock subframe mount
  • Diesel Geek Sigma 6 Short Shifter
  • SouthBend Stage 2 Daily Silent with SMFW
  • ECS Tuning Bleeder Block
  • APR Catch Can

Suspension, Braking and Handling
  • SPM Lowering Springs
  • TT strut mounts
  • Koni FSDs
  • Unibrace UB, XB and RB
  • H&R 28mm Front and 24mm rear sway bars
  • Tyrol Sport SubFrame Dead Set Kit
  • Michelin Pilot Super Sport tires
  • Tyrol Sport Caliper Stiffening Kit
  • Stainless steel brake lines
  • Stoptech Cryogenic Slotted rotors
  • Stoptech Sport brake pads
  • ESP Defeated

Aesthetics
  • Sukanas' HID Retrofits
  • Golf R LED Tails (smoked, with fog)
  • Selector shaft trim
  • BFI Shift knob
  • deAutoKey Interior LED kit with red footwells
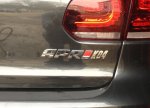
  • APR K04 badged
  • APR steering wheel insert

Fluids
  • Motul X-Cess 8100 engine oil
  • Motul Gear 300 transmission oil
  • Motul RBF600 Brake Fluid
  • OEM G13 coolant

Dyno run showing the protune "before" (eTune) and "after" (full custom tune on the dyno) by Justin at Freektune:


Here's a couple pictures. This first two were on different drives through the Adirondack Park in Keene Valley, NY - near Lake Placid - gorgeous, fun, windy drive!

With my halogen headlamps
IMG_0241.jpg

With my HID retrofits
IMG_0838.jpg

My retrofits by forum member Sukanas -- despite some issues some folks had with him, the lights are very nice.

IMG_0017.jpg

My APR badge (first put it on at Stage 1, the + was because it looked better that way, and +5hp) and Golf R LED tails

IMG_0726.jpg

Here's some photos after my strut and spring install on June 23 -- they're posted later in this thread too, but if you're just skimming for pics, I'll save you the scrolling :)

IMG_0863.jpg
IMG_0864.jpg

Since I got my car - I've been an on-again/off-again presence here on golfmk6.com; I lurk a bit through the winters - but I live in a cold climate without a heated garage, and it makes me sad to be here, haha. I pop back on in the Spring and stay through the Fall while I can play too. Hopefully this thread will give me a place to organize notes and pictures for my projects through this summer, and hopefully beyond!
 
Last edited:

timneedscoffee10

Go Kart Champion
Moved the K04 install log that was here down to post #3, so I could keep #2 reserved for the current state of the car.

The car is just now entering it's fourth "Stage" of my build - and a direction is just starting to settle in. Here's where she's been, and where I am now:

Phase One (experimenting):
Completed Summer 2011
  • (done) APR Stage 1
  • (done) Carbonio Intake (Stage 1)
  • (done) BFI Stage 1 - full engine side mount, transmission insert, torque arm insert
  • (done) Diesel Geek Sigma 6 Short Shifter
  • (done) Sukanas' HID Retrofits

Phase Two (getting serious):
Completed Spring/Summer 2012
  • (done) APR Stage 2
  • (done) Ultimate Racing metal-cat, resonated down pipe
  • (done) Unibrace UB, Unibrace XB
  • (done) Stainless steel brake lines, StopTech pads
  • (done) Bridgestone Potenza RE970AS Pole Position tires
  • (done) Golf R LED Tails (smoked, with fog)
  • (done) Thule Aero Bars
  • (done) APR Badged

Phase Three (power + handling)
Completed Spring/Summer 2013
  • (done) APR K04
  • (done) SPM Full Mount Kit
  • (done) SouthBend Stage 3 Daily Silent with SMFW (will be installed by my tuner)
  • (done) Unibrace RB (damn you, group buy!!)
  • (done) SPM Lowering Springs
  • (done) TT strut mounts
  • (done) Koni FSDs
  • (done) Adam's Rotors - black/black AR Track pattern (and replacement stop tech pads)
  • (postponed) Maybe an intercooler... leaning towards SPM
  • (cancelled) Whiteline Anti Lift Kit
  • (cancelled) Whiteline front-position poly control arm bushings

Phase 'Oooh! Good deal on the forums!'
Summer 2014
  • (done) Ultimate Racing cat-back exhaust

Phase 'WTF!'
Fall 2014
  • (done) APR K04 v3.1 reflash
  • (done) Carbon cleaning
  • (done) Replaced fuel injectors
Spring 2015
  • (done) South Bend Stage 2 Daily clutch kit installed, after Stage 3 Daily failure

Phase Four (fine tuning)
Spring/Summer 2015
  • (done) ECS Tuning Bleeder Block
  • (done) Selector shaft trim
  • (done) BFI Shift knob
  • (done) BFI Stage 1 Mounts
  • (done) HPA Subframe Puck
  • (done) Neuspeed Front Mount Intercooler
  • (done) Whiteline LCA bushings (front and ALK)
  • (done) Tyrol Sport Dead Set Rigid Subframe Collar kit
  • (done) H&R 28mm Front and 24mm rear sway bars
  • (done) Tyrol Sport Caliper Stiffening Kit

Phase Five (fine tuning and forced maintenance)
Spring/Summer 2015
  • (done) FrankenTurbo F23T
  • (done) FrankenTurbo Outlet Pipe
  • (done) APR Catch Can
  • (done) Integrated Engineering intake
  • Freektune with COBB AP

Wish List Items
  • Water/Meth Injection
  • Accusump
 
Last edited:

timneedscoffee10

Go Kart Champion
K04 came in today from Bruh Man! Very exciting. I'm sending my ECM into APR first thing tomorrow, and then getting started on the DIY. Will be a couple days of work for me, here's the plan:

Thursday: ECM overnighted to APR, car goes up in the air, prep and get through removing the down pipe.

Friday: Real work in the morning, then Remove IHI

Saturday: Perform timing chain tensioner DIY in the AM. Afternoon off - Saturday is family time :)

Sunday: Install K04, clean engine bay, reassemble. Install W.ALK.

Monday: ECM received back from APR. Happiness ensues.

aprk04.jpg

With the new mounts I installed last weekend, I've become very aware of the clutch slipping too. I have a Southbend Stage 3 Daily with SMFW getting installed by INA Engineering in 3 weeks. Will feel like a whole new car soon!

K04 Install Log ...

K04 Install Update - Thursday Apr 04
Today is going swimmingly. I'm 100% through the prep work. It took me maybe 4 hours of solid work to get all the prep done and remove the down pipe. Add a couple extra on there for runs back and forth to the hardware store because I lost my metric allen keys, then needed an inspection mirror, and a third time for something else just because I was taking a break.

I'll update with a couple pictures later. Thanks to Grambles for the *outstanding* DIY. This really is quite simple. The only challenge was removing that heat shield, but once I had the inspection mirror and my allen keys, all it took was a little patience.

Update - Friday Apr 05
Only had 2 hours to work today, but I got the IHI out of the car. Tomorrow morning I'll do my timing chain tension DIY to keep this project on schedule.

Here's some pictures!

Engine bay after IHI removal (didn't take any before this, because it was too frustrating removing this damn thing to stop and grab my camera -- good riddance!)
CIMG2166.jpeg

IHI Removed!
CIMG2171.jpeg

K04 out of the box, and side by side
CIMG2172.jpeg
CIMG2173.jpeg

See those exhaust studs sticking out of my K04? Yup, seized on and cut-off by the original owner. Nothing a little PB Blaster and elbow grease couldn't solve
CIMG2174.jpeg

So from here on out - it's all putting things back together! I spent some time cleaning up the garage, re-organizing all my tools so I'd be able to find them, and now I'm going to wash up.

Update - Saturday Apr 06
Short day today. Started to do the Timing Chain Tensioner DIY, but as I was removing the engine-side mount, I started to think that with the turbo + DP out of the car, there'd be nothing holding the engine vertical except the transmission... wasn't sure if that would be good or not - so I started work on installing the K04 instead.

Setting up the DV and swapping the lines to the K04 required a trip to the hardware store for an M6x1.0.x30mm hex bolt (since I bought used, I didn't have the elongated bolt APR includes in their kit), and some hose clamps (the ones I ordered were a bit too big, as grambles warned. Opted for a smaller worm-gear clamp for the vacuum line).

Dropping the K04 into place was by far the easiest part of this install so far. Here she is ladies and gentlemen!
CIMG2197.jpg

I have the lines reattached. Tomorrow I'll finish the install, and do my timing chain tensioner and WALK install. ECU comes back on Monday!

Update - Sunday Apr 07
Completed the K04 install today, and am wheels-down after a very fun few days! I got all the lines buttoned up, placed each and every bolt back where I got it, torqued to spec (if available), and cleaned the engine a good bit as I went.

Started off on a high note, this morning, though - when I dropped the large washer for the firewall side coolant line into what I am now calling "the abyss" in my garage:
CIMG2199.jpeg

It's not that deep, but it was dead center under my car, and it's near impossible to shine my shop light in there while simultaneously looking and reaching. So that took about an hour.

Also, I need to be better at following directions. I thought I was very careful to align my DV the same as it was oriented on my IHI - but apparently that wasn't correct. Wound up with my DV electrical connector facing the ground; and had I read APRs notes better, I would have realized the elongated bolt was in the wrong position before it got this far.
CIMG2201.jpeg

Fortunately, the DV is very easy access, so no problem correcting that before I buttoned things up. The give-away was that the electrical connector was blocking me from securing one of the lines' brackets.

Hit my UR resonator with some Nevr-Dull before reinstalling my down pipe, so there's one more shiny bit no one can see... but it makes me happy knowing it's so clean
CIMG2204.jpeg

And here she is: wheels-down and all buttoned up!
CIMG2207.jpeg

My ECU is back from APR tomorrow (it's sitting in a UPS warehouse about 150 miles from me right now...) So all that's left to do is reinstall that, put back the trim bits, make sure nothing's leaking, and take her for a drive!! Oh, and re-badge her to K04, of course.

Total time to install was just over 14 hours - and that was taking my time with everything, and completely solo. Not a single bit of this was rushed. And every single step was double checked against the DIY. If I had to do it again, I think I could be wheels-up to wheels-down in about half the time; maybe faster if I had a buddy helping me out.

For reference, I did my own downpipe installation last summer, which was about as "advanced" as I've gotten with my DIYs. Anyone who's done that is more than capable of getting through this project. Not too complicated, just time consuming.

With the K04 done, the wheel spin is pretty nuts! The SPM mounts have eliminated most, if not all, of the wheel hop already. So I may just do springs, and strut mounts to tighten it up. On the extreme end I may look into sway bars, but my Unibrace has stiffened things up quite a bit, so I may just add the RB and call it good there. Suspension got bumped up in the schedule, so I merged it with "phase 3" which is now "Power + Handling" for this spring/summer modding season :).
 

Attachments

  • ImageUploadedByTapatalk 21365035225.771703.jpg
    ImageUploadedByTapatalk 21365035225.771703.jpg
    207.6 KB · Views: 436
Last edited:

timneedscoffee10

Go Kart Champion
You may want to book more time for the WALK especially if you bought the front bushings. They are rather difficult to.get in.

I just have the WALK. I can always bump it to Monday if needed. Packages don't get to my place until late afternoon anyway, so the car will just be sitting there all day.
 

timneedscoffee10

Go Kart Champion
Updated with a couple pictures. Just printed my APR Software Order form... going to grab a coffee, then pull the ECU and get it in the mail. The fun begins! I'll post some pictures in my reserved 2nd post along the way.

If I can get through this install - I'm sure most any of you could too. My opinion is always to spend the money on tools, rather than on labor. I'm a weekend mechanic, but certainly still learning - so I'll post my thoughts on the job. Hopefully it'll benefit some of you.
 

timneedscoffee10

Go Kart Champion
Updated with pictures removing the turbo, and updated my agenda in post 3 to reflect actual progress (bumped timing chain tensioner to saturday morning).

Total time spent so far: about 6 hours.
Progress made: IHI is removed!

Physically removing the IHI from the engine bay was the worst part. My car is lifted too high, and I regret it, despite the warnings in the DIY. It's just high enough so I can roll under there on my creeper. I think the couple inches and careful-planning about what tools to bring under there with you would have been better, and just crawl in on your back instead.

Plus, I hadn't removed the rubber coupling hose for the stage-2 piping, which was very much in the way, so I had to stop and fight with that (still has the stock clamp on it... read an intake DIY if you don't know what a PITA that is). Once I got that off, I got very hung up on the hard-lines above the block. I think I may have bent them out of position pulling the IHI past, but we'll see as I reassemble over the next two days.

All in all, this is the most fun I've had with my car in a long time -- and yet, I'm afraid she'll never run again. Haha :).

EDIT: and oh yeah - called APR to order the K04 badge, which they're going to toss in the box with my ECM when they ship it back to me today. Sweet! I think Bronson@APR is doing my flash, the guy I talked to grabbed Bronson to ask him a question about my forms.
 

Bruh Man

Go Kart Champion
Nice to see the studs didn't give you any trouble! Let me know when the DV arrives, was told it would be there today. I'm doing the tensioner tomorrow too haha. Have you figured out how to use the counter hold tool without a lift? Would rather not remove the front bumper/radiator support...
 
Last edited:

timneedscoffee10

Go Kart Champion
Nice to see the studs didn't give you any trouble! Let me know when the DV arrives, was told it would be there today. I'm doing the tensioner tomorrow too haha. Have you figured out how to use the counter hold tool without a lift? Would rather not remove the front bumper/radiator support...

I wouldn't say they didn't give me "any" trouble, haha. And yes, the DV came in Friday on schedule, thanks!

I don't think the counter hold needs to be exactly vertical, but I haven't tried to position it myself yet, no. The tech at HSTuning I spoke to said putting the engine in TDC really isn't needed for this job, and in fact that you could turn it over a couple hundred times and still not be in TDC anyway, so the chances that lining up that notch add any safety to the job are pretty slim. The only way to guarantee you're at TDC is to pull the upper cover. And since the pulley is keyed, and can't go back on "wrong," I think lining up that notch isn't needed at all.

So short version, just position the pulley so you can place the counter hold tool. The only critical step is keeping tension on the chain while you replace the tensioner (zip ties!)
 

Bruh Man

Go Kart Champion
I wouldn't say they didn't give me "any" trouble, haha. And yes, the DV came in Friday on schedule, thanks!

I don't think the counter hold needs to be exactly vertical, but I haven't tried to position it myself yet, no. The tech at HSTuning I spoke to said putting the engine in TDC really isn't needed for this job, and in fact that you could turn it over a couple hundred times and still not be in TDC anyway, so the chances that lining up that notch add any safety to the job are pretty slim. The only way to guarantee you're at TDC is to pull the upper cover. And since the pulley is keyed, and can't go back on "wrong," I think lining up that notch isn't needed at all.

So short version, just position the pulley so you can place the counter hold tool. The only critical step is keeping tension on the chain while you replace the tensioner (zip ties!)

Nice, thanks for the heads up.
 

timneedscoffee10

Go Kart Champion
Took a quick run outside today while my daughter was napping to polish my very badly neglected tail pipes... details here: http://golfmk6.com/forums/showthread.php?t=57473

But I started with this:
CIMG2176.jpeg

Used this:
CIMG2191.jpeg

And got this:
CIMG2182.jpeg

In a very well spent 15 minutes. I'm going to hit them again, and use a dremmel polishing cloth, and hopefully have them looking new before I'm wheels-down again in a couple days

The rest of her will be washed, clayed, polished, and waxed, very soon as well!
 

timneedscoffee10

Go Kart Champion
Completed the K04 install today, and updated my second post with pics! While it would have been really simple to have my tuner the install for me... man, there's a great sense of pride and accomplishment that goes along with having done all that myself.

I had to abandon the timing chain tensioner DIY again - which sucks. I got the engine mount bracket off, but could NOT get the engine cover bolt behind the serpentine belt tensioner. Without a second pair of hands or a lift, it just wasn't happening. So that is definitely a job for INA Engineering when he does my clutch.

I spent so much time trying to figure that out, that I'm also postponing my WALK install. I'll do that in a few weeks, and just enjoy my new mounts, and K04!
 

timneedscoffee10

Go Kart Champion
Got my ECU back today *just* at the start of a two hour conference call for work. Longest two hour presentation I've ever given... just staring at my ECU, wondering...

Once I got free, though, and installed the ECU - it was game on. Took a quick spin around the block in stock-program, and saw no leaks. There was a bit of smoke coming out of the engine bay, which was a little concerning; but it was just the PB Blaster and some residue from the cleaners I used burning off. So I put her in 93, found a windy road, and let her have it!

The Pièce de résistance
k04 badge.jpg

Once I was back, I buttoned the last few bits up - had to replace the underbody panels I left off so I could check for leaks, and rebadge her for her new rank in life.

Of course, my stock clutch is having a LOT of trouble with this much power - so I know I'm not getting the full effect just yet - but even still, the power delivery is pretty incredible! Can't wait to get my clutch in a couple weeks and get through the break in period, so I can really get her a bit and see what she can do.

Edit: fixed the huge picture
 

Attachments

  • ImageUploadedByTapatalk 21365457824.099767.jpg
    ImageUploadedByTapatalk 21365457824.099767.jpg
    127.7 KB · Views: 395
Last edited:

timneedscoffee10

Go Kart Champion
Updated first post to show progression of the build, rather than just a list of all the mods. You can get that from my signature :). It's been a steady increase in power over the past three years...
 
Top