Will do! Yes, it took forever for them to restock the LED tails.Fronts have been out of stock since the beginning of time. They're super official. Be sure to post a vid!
6
You are using an out of date browser. It may not display this or other websites correctly.
You should upgrade or use an alternative browser.
You should upgrade or use an alternative browser.
What did you do to your MK6 today?
- Thread starter LightningRhod
- Start date
Cole2999
Autocross Champion
After my promising (but inadequate) battery welding, I bought a stick welder to hopefully get a better bead on the bolt. And I did! I used my angle grinder and polished up both the flywheel bolt and the socket (I found a 6mm that sits snug inside the stripped bolt) completely, then I welded it on. Gave it 30 minutes to cool, and when I tried to remove it it had enough strength to hold and was strong enough to rotate the engine in its ratchet strap cradle. Secured the engine and tried again... Snapped the weld.
I don't know what to do anymore. Tried drilling it out but the bolt is incredibly hard. 5 minutes of drilling got me maybe 1.5mm, and I was cooling the bit. Bit extractor didn't work either. 10mm Allen fits snug, but starts skipping when I apply force.
My only option left is finding some local welder to try to unfuck my shit. If that doesn't, I'm cutting that bitch off and getting a new flywheel.
Last edited:
GolNat
Autocross Champion
After my promising (but inadequate) battery welding, I bought a stick welder to hopefully get a better bead on the bolt. And I did! I used my angle grinder and polished up both the flywheel bolt and the socket (I found a 6mm that sits snug inside the stripped bolt) completely, then I welded it on. Gave it 30 minutes to cool, and when I tried to remove it it had enough strength to hold and was strong enough to rotate the engine in its ratchet strap cradle. Secured the engine and tried again... Snapped the weld.
I don't know what to do anymore. Tried drilling it out but the bolt is incredibly hard. 5 minutes of drilling got me maybe 1.5mm, and I was cooling the bit. Bit extractor didn't work either. 10mm Allen fits snug, but starts skipping when I apply force.
My only option left is finding some local welder to try to unfuck my shit. If that doesn't, I'm cutting that bitch off and getting a new flywheel.
Don’t use a drill bit use an end mill to drill a hole for an extractor. As big of an extractor as you can fit.


Cole2999
Autocross Champion
Thanks for the suggestion. Gotta love Project FarmDon’t use a drill bit use an end mill to drill a hole for an extractor. As big of an extractor as you can fit.
smanierre
Autocross Champion
Got some stuff done on the car but didn't have time to post about it so here it all is. Tested out the fuel pump with water and it seemed to work fine. Didn't see any sparking on the solder joints, and no leaking from the fuel line from the pump to the top of the basket. I may need to change the tube out for a longer one if I cant compress it down into the tank but i'll figure that out when I go to install it. My FCP order came in today so I got the oil pan back on with the oil pump chain installed this time. The VW manual calls for 8NM + 45 degrees. One of the bolts stripped out some of the threads on the 45 degrees and I felt another starting to go during the turn. I left the one that started to go as it was and was able to get a bolt into the one that stripped and tightened it as much as I felt comfortable. I'm hoping with the sealant and all the other bolts it will hold, but i'll definitely be monitoring it closely once it's running.

I also got a new sleeve for the exhaust balance shaft and it slid right in which was a relief since I couldn't get it in beforehand.
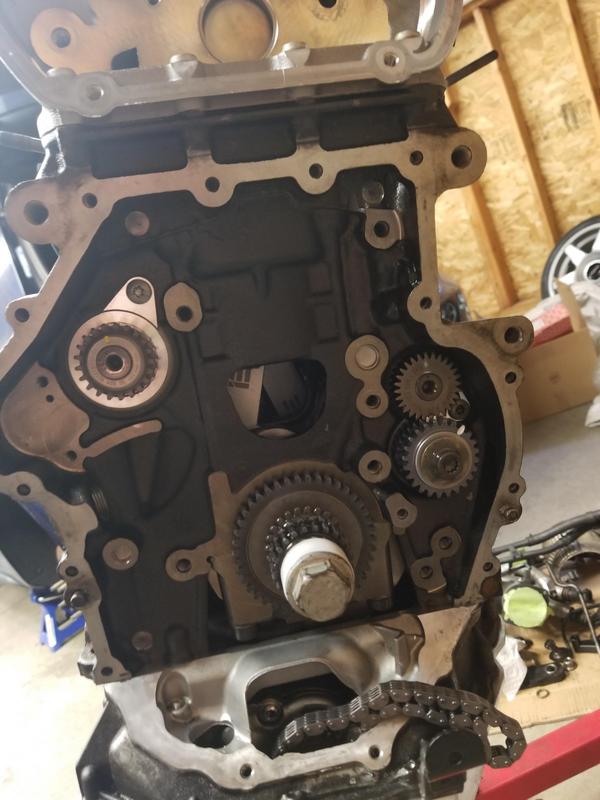
Started to time it up but I need some more bolts to hold the guide rails in so here it is as it sits now. I'm hoping they come in friday since i'm leaving saturday for 2 weeks, but I don't think they will since FCP didn't have them so I had to order from DAP.

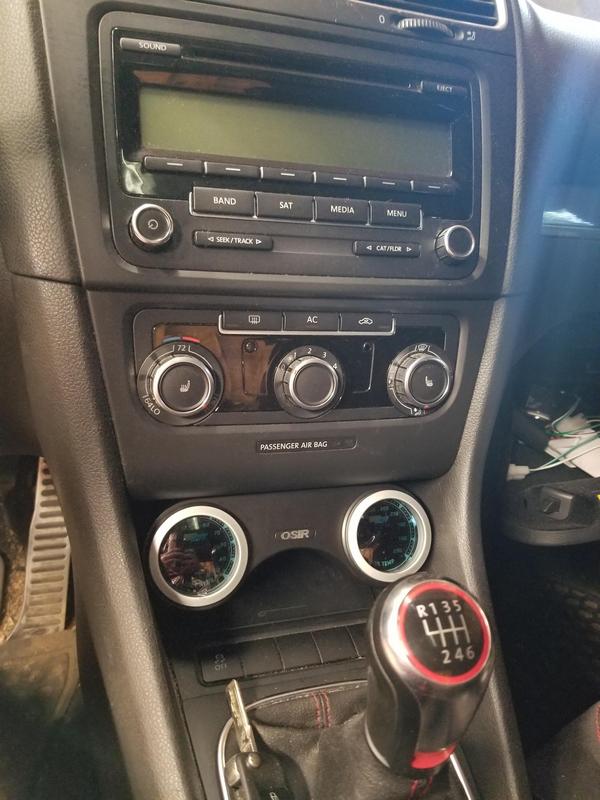
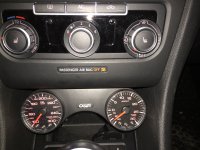
My OSIR gauge pod came in for my oil pressure and temp gauges, it allegedly gets held in place by friction, but does have the option to screw it into the plastic above, which i'll do since I don't want it popping out if I hit a hard bump on the track. Going to work on getting the wires run friday if the timing parts don't come in time. The gauges are tinted and have a protective screen on here, but once they are lit up and the screen is off they'll be easier to see.


I also got a new sleeve for the exhaust balance shaft and it slid right in which was a relief since I couldn't get it in beforehand.
Started to time it up but I need some more bolts to hold the guide rails in so here it is as it sits now. I'm hoping they come in friday since i'm leaving saturday for 2 weeks, but I don't think they will since FCP didn't have them so I had to order from DAP.
My OSIR gauge pod came in for my oil pressure and temp gauges, it allegedly gets held in place by friction, but does have the option to screw it into the plastic above, which i'll do since I don't want it popping out if I hit a hard bump on the track. Going to work on getting the wires run friday if the timing parts don't come in time. The gauges are tinted and have a protective screen on here, but once they are lit up and the screen is off they'll be easier to see.
tdream1
Autocross Newbie
I have the same OSIR gauge pod and we used a little 3M on the top of it to keep it in place. I have an oil temp and boost gauge mounted in it. It‘s never come loose in over 6+ years.Got some stuff done on the car but didn't have time to post about it so here it all is. Tested out the fuel pump with water and it seemed to work fine. Didn't see any sparking on the solder joints, and no leaking from the fuel line from the pump to the top of the basket. I may need to change the tube out for a longer one if I cant compress it down into the tank but i'll figure that out when I go to install it. My FCP order came in today so I got the oil pan back on with the oil pump chain installed this time. The VW manual calls for 8NM + 45 degrees. One of the bolts stripped out some of the threads on the 45 degrees and I felt another starting to go during the turn. I left the one that started to go as it was and was able to get a bolt into the one that stripped and tightened it as much as I felt comfortable. I'm hoping with the sealant and all the other bolts it will hold, but i'll definitely be monitoring it closely once it's running.
I also got a new sleeve for the exhaust balance shaft and it slid right in which was a relief since I couldn't get it in beforehand.
Started to time it up but I need some more bolts to hold the guide rails in so here it is as it sits now. I'm hoping they come in friday since i'm leaving saturday for 2 weeks, but I don't think they will since FCP didn't have them so I had to order from DAP.
My OSIR gauge pod came in for my oil pressure and temp gauges, it allegedly gets held in place by friction, but does have the option to screw it into the plastic above, which i'll do since I don't want it popping out if I hit a hard bump on the track. Going to work on getting the wires run friday if the timing parts don't come in time. The gauges are tinted and have a protective screen on here, but once they are lit up and the screen is off they'll be easier to see.
Attachments
-
 IMG_3506.JPG1 MB · Views: 40
 -
 IMG_3507.JPG817.3 KB · Views: 46
smanierre
Autocross Champion
I didn't even think of 3m but I got the plastic piece out already so might as well just use some screwsI have the same OSIR gauge pod and we used a little 3M on the top of it to keep it in place. I have an oil temp and boost gauge mounted in it. It‘s never come loose in over 6+ years.
uglybastard
Autocross Champion
hear me out. find a way to put in nutserts so you can cleanly remove and put back on as needed.I didn't even think of 3m but I got the plastic piece out already so might as well just use some screws
tdream1
Autocross Newbie
Yeah, the only problem with screws is if you need to get to behind the pod quickly for some reason.I didn't even think of 3m but I got the plastic piece out already so might as well just use some screws
smanierre
Autocross Champion
Yeah that is true, although getting that piece out should only take 15 or 20 min topsYeah, the only problem with screws is if you need to get to behind the pod quickly for some reason.
MrFancypants
Autocross Champion
For $250 total (hardware, auto post adapters, the battery itself) this rates as one of the best bang for the buck upgrades I think I’ve done. Pulling ~40 lbs off the car as far forward and high up on the car as the battery sits has a noticeable impact on how the car drives. I was already very happy with how my car handles, but it just feels a full step more nimble now.
Nevermind the ghetto piece of styrofoam. I didn’t like how my bracing was nearly touching the + wire and I wanted something squishy between the plastic and metal. It’s only 3 lbs so my mounting setup is overkill anyway.

Nevermind the ghetto piece of styrofoam. I didn’t like how my bracing was nearly touching the + wire and I wanted something squishy between the plastic and metal. It’s only 3 lbs so my mounting setup is overkill anyway.
uglybastard
Autocross Champion
Which battery is this againFor $250 total (hardware, auto post adapters, the battery itself) this rates as one of the best bang for the buck upgrades I think I’ve done. Pulling ~40 lbs off the car as far forward and high up on the car as the battery sits has a noticeable impact on how the car drives. I was already very happy with how my car handles, but it just feels a full step more nimble now.
Nevermind the ghetto piece of styrofoam. I didn’t like how my bracing was nearly touching the + wire and I wanted something squishy between the plastic and metal. It’s only 3 lbs so my mounting setup is overkill anyway.View attachment 251933
MrFancypants
Autocross Champion
Antigravity ATX12-HDWhich battery is this again
No perceptible difference in cranking power between this and the Duralast Gold I pulled out.
https://www.amazon.com/dp/B07B9NPYRN?psc=1&ref=ppx_yo2ov_dt_b_product_details
Cole2999
Autocross Champion
AutoX events typically require metal battery brackets and not straps, right? If I go this route I would probably choose straps but I wouldn't want to have to modify it down the road y'know?For $250 total (hardware, auto post adapters, the battery itself) this rates as one of the best bang for the buck upgrades I think I’ve done. Pulling ~40 lbs off the car as far forward and high up on the car as the battery sits has a noticeable impact on how the car drives. I was already very happy with how my car handles, but it just feels a full step more nimble now.
Nevermind the ghetto piece of styrofoam. I didn’t like how my bracing was nearly touching the + wire and I wanted something squishy between the plastic and metal. It’s only 3 lbs so my mounting setup is overkill anyway.View attachment 251933