GOLFMK8
GOLFMK7
GOLFMK6
GOLFMKV

What did you do to your MK6 today?

Cole2999

Autocross Champion
added a zero performance, strictly noise making DV spacer. even though i know everyone immediately will say, "don't do that. no performance value. just get dv+. just get intake. etc. etc." While that may be true. I wanted more whoosh noises because even though I'm in my 30s, I'm still a child at heart and I want my car to go vroom and whoosh, lol.

That being said, man, the DV is hard to access! I got 2 of the 3 screws off pretty easily, but man.. that third screw had me struggling! I have big arms/hands and i just couldn't get leverage on the allen key i was using. Too bad we don't have it as easily accessible as the mk7s do.
You can't beat the whoosh man. I went with the Turbosmart EM Kompact unit, which is a variable DV/BOV.
And yeah, that 3rd bolt sucks. No matter what I use it's not easy to access.
 

Chisel_86

Go Kart Champion
I'd recommend going for the cam if there's any doubt about the original one. After going back into the motor this morning I'm sure the noise is the cam all chewed up. Misfire was fixed with a plug wire.

It's really not too bad a job, just hard on your back if you're doing it in the truck. I split it into 6 days, 3 for disassembly and 3 for assembly, working about 3 hours a day.

I'd strongly recommend getting genuine GM lifter trays, the aftermarket ones are sloppy and the rotation risks both the cam and lifter. Also, exhaust studs are a good idea especially if you're leaving the headers connected to the rest of the exhaust

Finally got the head swap done. New heads and gaskets. Was waiting forever for gaskets to come in, plus I broke a couple parts during disassembly and reassembly (like ya do…) Ended up reusing the lifters. The ticking I heard was from a broken exhaust manifold bolt :rolleyes: Other reason why I did the heads was because I found coolant in the rocker area. I suspected a cracked head. Drove it to work today while crossing my fingers.


spacecity.gti

Sortaflush
Get some socket Allen’s. Much better then L-keys.

I actually did have that, but they were the long socket set and it was too long. The wrench kept hitting the and I couldn't quite seat it. If I hadn't finally been able to leverage the allen key with a another tool I would've gone to the store to get a better one. I was about 10 minutes from giving up and trying again the next day since all the stores were closed.
 

spacecity.gti

Sortaflush
You can't beat the whoosh man. I went with the Turbosmart EM Kompact unit, which is a variable DV/BOV.
And yeah, that 3rd bolt sucks. No matter what I use it's not easy to access.

ECS had a sale on their DV spacer and I just went for it! So far so good. Only the first day in, so we'll see how it holds up. :)
 

Knotical

Drag Racing Champion
Finally got the head swap done. New heads and gaskets. Was waiting forever for gaskets to come in, plus I broke a couple parts during disassembly and reassembly (like ya do…) Ended up reusing the lifters. The ticking I heard was from a broken exhaust manifold bolt :rolleyes: Other reason why I did the heads was because I found coolant in the rocker area. I suspected a cracked head. Drove it to work today while crossing my fingers.

Those GM exhaust studs are just terrible. The rearmost stud on both sides mine had broken :/
 

Knotical

Drag Racing Champion
Transmission is back in. Not going to lie, that was a struggle. Should be (relatively) smooth sailing from here on out though. You know... Just reassembling the entire front suspension haha
 

smanierre

Autocross Champion
Busy busy day. Went out to make sure I had all the stuff needed for when it goes to the shop for the exhaust manifold. I noticed I forgot to attach the swaybar endlinks so I got those on quick. The drivers side is almost fully extended while the passenger side is probably closer to half way. I'll see how it is when the car is on the ground to see if I need longer ones based on the swaybar position.
Drivers side:

Passenger side:

After that I said fuck it and put in the motor, hopefully I didn't forget anything:

Took about 20 minutes of adjusting to get the motor and trans mounts lined up right and everything torqued down. Then I realized I forgot the pendulum mount. Thanks to my brace I have there which is lined up EXACTLY with the bolt hole, I had to undo all of the mounts and wrestle with the engine and trans for about an hour and a half to get that thing in, then another 30 minutes of wrestling with the engine to get the mounts to line up again. 0/10 fuck that brace but at least it's in there.

Trans mount:

Engine mount:

I was starting to hook stuff up after I finished getting it in but realized I was so exhausted I was going to end up making a mistake. Tomorrow i'll try and get the axles bolted up and then as much of the wiring harness as possible installed. I still gotta finish my fuel pump setup and my oil cooler, and drain the trans and refill. Besides that it should be all good to head to the shop hopefully next week. I'd try this weekend but going to Watkins Glen to watch a GT America race.
 

uglybastard

Autocross Champion
Was playing around with something I installed in the cabin (review pending), and noticed that my drivers side floor was damp. I knew what it was right away. I pulled the a pillar just to confirm things were connected and inadvertently disconnected the hose in the lower corner of the windshield area. Fucked with it for a bit and then had my GF use her smaller hands to reconnect it.

Tried pulling the cowl and hit a snag getting the cowl off because my wiper arms were stubbornly on there. Will try again this weekend so I can snip the tip of the nipple and clear things out. Gonna do both sides while I'm in there.

Got the carpet as dry as I could using microfiber towels to sop up moisture.
 

Chisel_86

Go Kart Champion
Was playing around and noticed that my floor was damp. I knew what it was right away. I pulled the hose in the area. Fucked with my GF use to it.

Tried pulling off because my arms were stubbornly on there. Will try again this weekend so I can snip the tip of the nipple and clear things out. Gonna do both sides while I'm in there.

Got the carpet as dry as I could using microfiber towels to sop up moisture.

Just the tip...
 

king1138

Go Kart Champion
added a zero performance, strictly noise making DV spacer. even though i know everyone immediately will say, "don't do that. no performance value. just get dv+. just get intake. etc. etc." While that may be true. I wanted more whoosh noises because even though I'm in my 30s, I'm still a child at heart and I want my car to go vroom and whoosh, lol.

That being said, man, the DV is hard to access! I got 2 of the 3 screws off pretty easily, but man.. that third screw had me struggling! I have big arms/hands and i just couldn't get leverage on the allen key i was using. Too bad we don't have it as easily accessible as the mk7s do.
I have one and I love my stupid DV spacer. But, I am a 37 year old child. Until it causes a rich code or I get tired of cleaning oil off my undercarriage I'll keep it. That third bolt is crazy easy if you have a lift, haha, I'm spoiled that way...
 

uglybastard

Autocross Champion
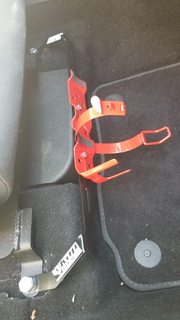
Since I mounted my small extinguisher in the rear I really wanted to have something in the forward cabin for mor immediate emergencies. Since I am vehemently anti-ECS, I stayed away from the extinguisher mount from Rennline since they are exclusively an ECS product line now. I stumbled across KAP Industries out of Australia, and their mount looked pretty sturdy and essentially equivalent to competition previously mentioned. Plus the pricetag was more attractive.

KAP Industries

The brace showed up and I confirmed it would potentially fit the daily which has stock seats. After that I immediately installed:


I ordered this extinguisher from amazon, any 2.5kg extinguisher should fit fine, I bought this one because it came with a bracket and a quick release. Bolting that up was a piece of cake.


Depending on the extinguisher and placement you'll need to bend the bar so it sits properly for access and seat sliding. But I am happy with the look and function here! The KAP website has an install DIY video, real easy to follow. But for the love of god do not use a torque wrench as a ratchet/breaker bar, as they did.

But here's some links for you all..
KAP Industries
Extinguisher
 

Knotical

Drag Racing Champion
Anyone here have tips for installing the Anti-lift kit on the front LCAs? I feel like I'm struggling with this more than the transmission haha

There's like air getting trapped in the bushing or something and it's pushing the bushing out. All my strength and I can't get the bolt holes quite lined up
 

jay745

What Would Glenn Danzig Do
Anyone here have tips for installing the Anti-lift kit on the front LCAs? I feel like I'm struggling with this more than the transmission haha

There's like air getting trapped in the bushing or something and it's pushing the bushing out. All my strength and I can't get the bolt holes quite lined up
Use a pry bar
 

Knotical

Drag Racing Champion
Use a pry bar
I'll take another look but I can't really find anything to pry against... Probably going to make a run here to HF and pick up a bigger pry bar and some ratchet straps

As far as I can tell, the front bushing needs to be installed first (had to use the jack to kinda press it up and in) then the rear comes in. Is this about right?
 

jay745

What Would Glenn Danzig Do
I'll take another look but I can't really find anything to pry against... Probably going to make a run here to HF and pick up a bigger pry bar and some ratchet straps

As far as I can tell, the front bushing needs to be installed first (had to use the jack to kinda press it up and in) then the rear comes in. Is this about right?
Yeah, mount your pry bar against the control arm and you should be able to use that to line up the holes
 
Top