GOLFMK8
GOLFMK7
GOLFMK6
GOLFMKV

Tony's Black GTI

BringerOdeath

Ready to race!
I swapped the ECS downpipe on last night. Since this is my second time putting a downpipe on and I now have access to a lift it took me less than 30 minutes to get the downpipe off the car :thumbup: (also, ratcheting wrenches are suuuuuuuch a luxury).

I swapped the OEM catback in for the Magnaflow so I can take some time and restore it. the 409 stainless is pretty rusty so I'll wire wheel it all down and give it a nice coat of hi-temp paint. The car sure is whisper-quiet without an aftermarket catback on. I actually kind of like it.

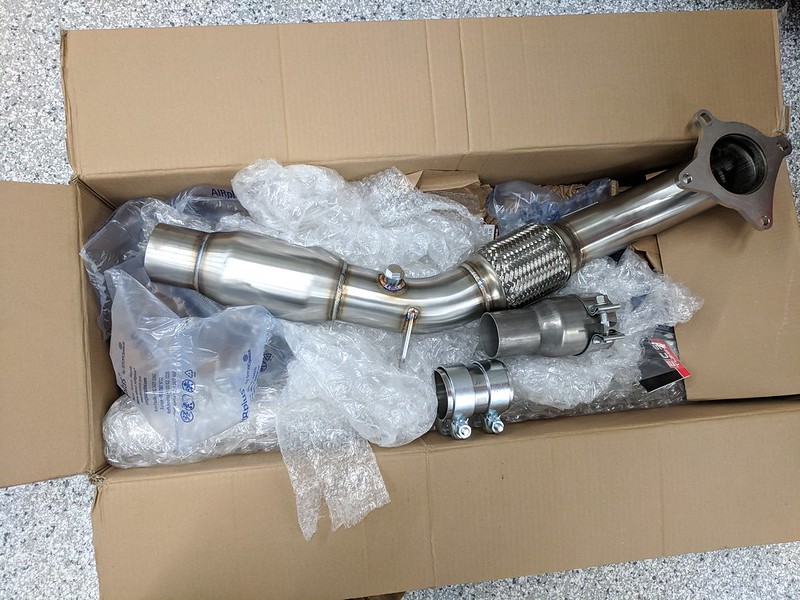
First, some pics of the old and new downpipes. The build quality of the ECS downpipe really impressed me and I like that it's 304 stainless so I should never have the issue of downpipe rusting apart again:


Took the Magnaflow catback off and had a hell of a time separating the pieces. Required a torch, lots of PB blaster, and a couple hammers/mallets.


My garage walls are looking quite bare...I need to find some VW/Euro performance brand banners and art to put up.


Had a local exhaust shop that specializes in custom VW exhaust cut the 2.5" reducer off the catback and weld on a section of 3" stainless. Check em out, they're called S&R Customs and do some crazy looking pie cut exhausts. I'll cut the 3" extension to length once I'm done refurbing and test fit the catback to the downpipe.


The beginning of the refurb...before and after wire wheel. All parts will also get a light sand blast before paint.


Man! All this work you have been doing, outside of the cracked wheel, is awesome! Nice to see you picked up some of those passat control arms. You will have to use passat ball joint on those I believe, I don't remember if the gti ones were too close to the control arm. I have a TT/passat subframe sitiint around I am thinking of swapping in since it's a one piece subframe vs the 3 piece one that is stock on our cars. I will have to use the non offset TT subframe bushing bracket to do so.

Also, if you are still wanting that reverse dip, I can sell you just the door module and mirror motor with the cable.
 

Tony48

Go Kart Champion
Got the catback & hardware sandblasted and painted with VHT flameproof black and added a clear coat of the same stuff. Turned out pretty good. I have to give it a week to fully dry before I put it on the car and heat cure it.

Sandblasting:


Hardware before/after:


Hanging to paint:


Gave them awhile to dry outside and then brought them in to hang for a week. It looks a million times better than before but I'll have to wait and see how it holds up under the car.


My downpipe got nice and golden in the few days it's been on the car:


In other news I recently received a GFB DV+ as a thank you from a fellow forum member. I answered some questions for him on timing chain replacement and shipped him my set of timing tools to borrow. Yesterday he told me he got everything replaced and the car started right up and is running great! There's not much to photograph when installing a Diverter Valve but here it is. I noticed a bit better throttle response when transitioning on/off/on throttle under boost.


Tony48

Go Kart Champion
Huge fan of this build/thread. So much information :clap:
Thanks man! Glad you're enjoying it


I reinstalled the painted catback last night. Everything went well. I executed the cure procedure recommended by VHT (involved alternating between letting the car idle and cool down for various intervals) but I'm not confident the exhaust got quite hot enough to cure correctly. Hopefully it works well. I'll update this post in the future with a note about how the paint is holding up.

UPDATE (3/8/19): 7 months, 9k miles, and one winter later the paint is holding up just fine. No chips/cracks/peeling/chalkiness.

A quick tip to anyone removing/installing a catback: buy some silicone spray (like this or similar) and hit all the rubber hangers. It makes them a breeze to get apart.

Install was straight forward using a new, stainless steel 3" band clamp between catback and mid-pipe. It feels good to have a true 3" turbo-back without any neck downs :thumbsup:


Unfortunately I still have the issue that all MK6 GTI Magnaflow catback's have....the right exhaust tip pokes out about 1" more than the left tip. It's really not that noticable (I don't think anyone would ever notice) but it's annoying to my OCD. It's something I'll just have to live with though since there's no simple fix.
 
Last edited:

Tony48

Go Kart Champion
Quick update on downpipe spacer setup. I was able to eliminate the post-cat o2 code using the Vibrant J spacer (Vibrant p/n 11619) with the medium insert. I used a spacer only on the post-cat o2 sensor. After a few days of driving readiness set! Still good after ~250 miles of driving. I'm glad I found a solution for getting through emissions. Pic of the medium insert in the spacer:


I've also set up an appointment with a local VW dealership because it sounds like they may be able to replace my radiator under warranty due to a faulty G611 sensor. It's been causing constant soft codes U102F and U1030 along with the occasional CEL for a few months now. Unfortunately the sensor is tamper proof and cannot be purchased separately from the radiator.

Right about now I'm really wishing I owned a CCTA car! CBFA is a headache.
 

BringerOdeath

Ready to race!
Quick update on downpipe spacer setup. I was able to eliminate the post-cat o2 code using the Vibrant J spacer (Vibrant p/n 11619) with the medium insert. I used a spacer only on the post-cat o2 sensor. After a few days of driving readiness set! Still good after ~250 miles of driving. I'm glad I found a solution for getting through emissions. Pic of the medium insert in the spacer:


I've also set up an appointment with a local VW dealership because it sounds like they may be able to replace my radiator under warranty due to a faulty G611 sensor. It's been causing constant soft codes U102F and U1030 along with the occasional CEL for a few months now. Unfortunately the sensor is tamper proof and cannot be purchased separately from the radiator.

Right about now I'm really wishing I owned a CCTA car! CBFA is a headache.

Man, I have CBFA as well and I had a hell of a time getting the CEL light off and it still comes on every once in a while even with a pre and post cat spacer. The ECS downpipe looks like the post cat bung is already spaced a little, so that may have helped a bit. My 42DD downpipe did not. The only DP that guarantees no CEL on cbfa is the AWE one.
 

Tony48

Go Kart Champion
Man, I have CBFA as well and I had a hell of a time getting the CEL light off and it still comes on every once in a while even with a pre and post cat spacer. The ECS downpipe looks like the post cat bung is already spaced a little, so that may have helped a bit. My 42DD downpipe did not. The only DP that guarantees no CEL on cbfa is the AWE one.
Yup CBFA is a real bear. I never managed to get readiness set with my previous catted downpipe. I fully expect to pop a CEL at some point but the fact that I can even set readiness is already an improvement.

Now I'm deep into the battle with the radiator identification sensor and trying to get that issue resolved short of buying an OEM CBFA radiator for $300.
 

GoodTimesIndeed

Go Kart Champion
Yup CBFA is a real bear. I never managed to get readiness set with my previous catted downpipe. I fully expect to pop a CEL at some point but the fact that I can even set readiness is already an improvement.

Now I'm deep into the battle with the radiator identification sensor and trying to get that issue resolved short of buying an OEM CBFA radiator for $300.

This is strange. I was able to pass 3 inspections (2 PA, 1 MD) with that downpipe. I used a straight spacer from RAI with med jet and had no issues. Hoping I can do the same with my Eurojet setup as I'm due for emissions in a few months.
 

Tony48

Go Kart Champion
This is strange. I was able to pass 3 inspections (2 PA, 1 MD) with that downpipe. I used a straight spacer from RAI with med jet and had no issues. Hoping I can do the same with my Eurojet setup as I'm due for emissions in a few months.
To be honest I didn't mess with the spacer setup too much since I wasn't due for emissions while I had the old downpipe on the car. The only setup I used was the Vibrant J spacer with the small insert.

I assumed if I could keep the CEL off for a reasonable amount of time then readiness would set...apparently that's not the case since I went months and thousands of miles on that setup without popping a CEL (it only popped a few times in the 1.5yrs I used that downpipe) yet readiness wouldn't set.

Oh well, I'm all set now :D
 
Last edited:

Tony48

Go Kart Champion
Really enjoyed reading through this. So nice to see other people tackling their own work too. Cheers!
Much appreciated sir. I've benefited from a lot of your advice and wisdom posted on this forum.

In other news, I had the opportunity to ride in a coworker's brand new A4 today at lunch. No doubt an amazing car, particularly the magnetic suspension, but I don't think I would ever want one. I didn't particularly like all the electrical gizmos, screens, and nannies. Most importantly it was missing a pedal :23:

The only car work I have planned right now is working on dad's MK7. Got a TTRS clutch, poly control arm bushings, and lowering springs all sitting in boxes ready for him. Should be a piece of cake since I've done all those on my car already :thumbsup:. Maybe I'll take a few pics and throw them up here.
 
Last edited:

Tony48

Go Kart Champion
Haven't posted in awhile because I've only done a few small things to the car:

-OEM Jack Point Adapters. These will make it a lot easier to get the car on the 2 post lift and I won't have to use the rubber pinch weld adapters.
-ECS Tuning Hatch Pop kit
-DeAutoKey LED rear blinkers
-Black Coolant & Washer Fluid Caps
-Removed rear mud flaps. They've been rubbing pretty bad since I installed my coilovers

Don't have any pics of the jack adapters on the car but here's what they look like. There's 4 pairs of these pieces and they push up into holes in the underbody.

IMG_20180925_190836 by tonyg37, on Flickr
IMG_20180925_190901 by tonyg37, on Flickr

A pic I stole off the interwebz of what one pair looks like installed.
IMG_0539.0 by tonyg37, on Flickr

And some other random pics:

IMG_20180926_181308 by tonyg37, on Flickr

IMG_20180829_190242 by tonyg37, on Flickr
IMG_20180829_190450 by tonyg37, on Flickr
 
Top