GOLFMK8
GOLFMK7
GOLFMK6
GOLFMKV

Tony's Black GTI

BringerOdeath

Ready to race!
Finished up the coilover install. My kit didn't ship with rear dust boots or bump stops. KW was kind enough to ship them to me 2 day. So I got the rears installed which wraps up installation of everything. Then I took the car out for a test drive and 2 mins later a deer jumped out at me. I swerved around it (thanks powerflex bushings for the great steering response :thumbsup:) but it managed to slightly swipe my right rear door. You can see a clean mark from the center of the door to the wheel where he got me, and a small scratch. Oh well, it could have been much worse--just one more thing to fix before I wrap my car. In the meantime I'll give the springs a little more time to settle and fine tune my ride height before I get an alignment.


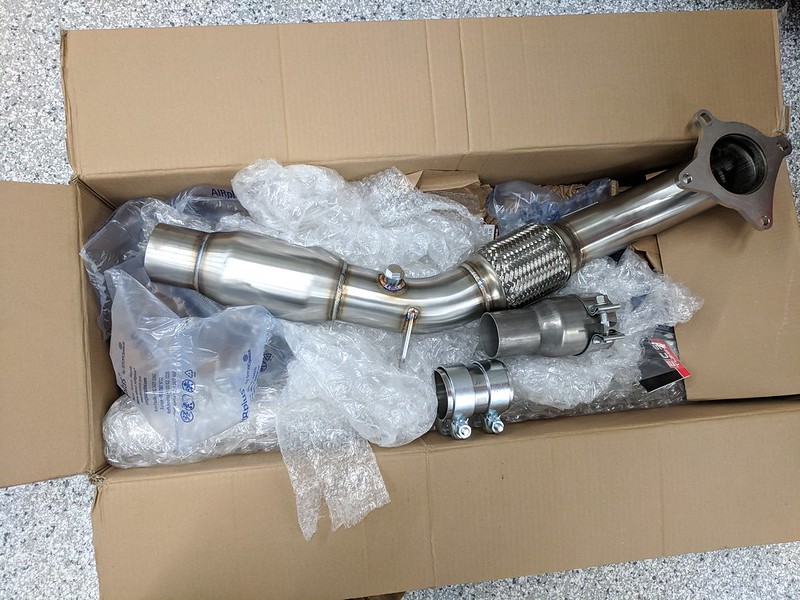
*SOME* of the hardware that was replaced during this work:


Thanks! They seem pretty fantastic so far. Steering has completely changed and no consequential NVH or anything. What an under rated modification.


I'll look into aluminum control arms, but unless I can find some cheap I'll probably go the powder coat route. The main reason being I'm set up to do powder coat in my garage so it's virtually free. Can I run the passat control arms without upgrading to passat spindles? I had no idea about the single piece subframe from a passat/TT & the aluminum rear subframe from an A3 though. I'm gonna have to look into that. I assume it bolts right up? Do you happen to have part numbers?

Also, PM incoming about the mirrors.

The passat parts are super cheap from the junkyard. I got all 4 spindles and control arms for $150. You can run the passat control arms without the spindles, no probs. The control arms are like $40 for both. There is a b6 passat and a tiguan with alum control arms at the jy near me. I have to go by there on mon or tuesday, so I can pull them for you. The subframe part numbers I can find for you. The alum rear subframe is from the quattro a3. The alum spindles drop quite a bit of weight, it's totally worth it.
 

Tony48

Go Kart Champion
The passat parts are super cheap from the junkyard. I got all 4 spindles and control arms for $150. You can run the passat control arms without the spindles, no probs. The control arms are like $40 for both. There is a b6 passat and a tiguan with alum control arms at the jy near me. I have to go by there on mon or tuesday, so I can pull them for you. The subframe part numbers I can find for you. The alum rear subframe is from the quattro a3. The alum spindles drop quite a bit of weight, it's totally worth it.

Thanks for the info!

I believe the aluminum rear subframe from the a3 quattro p/n is 1K0505235L.
And the passat single piece front subframe p/n is 3C0199313BB.

I haven't found any pics from people that have swapped them on an mk6 GTI though.

As for the passat control arms and spindles: I definitely want to get a pair of passat control arms but I can't run passat spindles. My Boxster brake caliper adapters mount on the inboard side of the spindle (stock mounts on the outboard side). The inboard side of the passat spindle is thicker than the OEM GTI spindles so it will change my caliper spacing (See pic below, excuse my crude work in paint haha). Oh well :(. I'm sure it would be possible if you had a machine shop mill the face down but I can't do that myself and am not willing to pay for it. Guys running TT-RS brakes and 18z/17z won't have an issue though because they mount up to the stock location (outboard).

If you see a pair of control arms in good shape and don't mind picking them for me I'd definitely appreciate it! Otherwise I'll find the time to make it to a junkyard myself. I checked local inventory and there are a few B6 passats around. I won't be able to powder coat them for a few months so I'm in no rush.

Passat Alloy / OEM GTI Spindle comparison by Tony G, on Flickr

Apikol Boxster S Caliper Adapter by Tony G, on Flickr
 

Tony48

Go Kart Champion
Nice Sv650 in the back!!!!

Thanks! I spend lots of time wrenching on it as well! Recently put on new handlebars/throttle tube/grips & a nice LED headlight. It's a fun bike that's easy and cheap to work on. I don't have pics of everything installed but you can see the Renthal bars & Morimoto LED headlight. Plus an older pic of the bike.

IMG_20180316_211151 by Tony G, on Flickr
IMG_20170416_164509 by Tony G, on Flickr
 
Last edited:

BringerOdeath

Ready to race!
Thanks for the info!

I believe the aluminum rear subframe from the a3 quattro p/n is 1K0505235L.
And the passat single piece front subframe p/n is 3C0199313BB.

I haven't found any pics from people that have swapped them on an mk6 GTI though.

As for the passat control arms and spindles: I definitely want to get a pair of passat control arms but I can't run passat spindles. My Boxster brake caliper adapters mount on the inboard side of the spindle (stock mounts on the outboard side). The inboard side of the passat spindle is thicker than the OEM GTI spindles so it will change my caliper spacing (See pic below, excuse my crude work in paint haha). Oh well :(. I'm sure it would be possible if you had a machine shop mill the face down but I can't do that myself and am not willing to pay for it. Guys running TT-RS brakes and 18z/17z won't have an issue though because they mount up to the stock location (outboard).

If you see a pair of control arms in good shape and don't mind picking them for me I'd definitely appreciate it! Otherwise I'll find the time to make it to a junkyard myself. I checked local inventory and there are a few B6 passats around. I won't be able to powder coat them for a few months so I'm in no rush.

Passat Alloy / OEM GTI Spindle comparison by Tony G, on Flickr

Apikol Boxster S Caliper Adapter by Tony G, on Flickr

Yeah, I had the same issue! Actually, 17Z and 18Z are rear mount as well and don't work with the Passat spindles. That's why I switched to the TTRS calipers. I also felt that TTRS caliper better suited to the platform with the TTRS master cylinder and cayenne 4 piston rears.

The TT front spindles have thinner alum in the rear of the spindle and it looks like they need minimal machining to fit rear mount calipers, but they push the wheel out a TON, so you would need wide fenders. They also lower the front end of the car as the control arms with the TT spindles are parallel to the ground.

The CC/passat/TT subframe is part number: 3C0199369H I should be able to tell you how the rear subframe will fit sometime this summer when I do an AWD conversion on my car. For now my GF has banned me from projects, mods, etc. They have been sucking all my time up. I mod my PC, modding games boys and old school game consoles, and my car of course. My quest for everything being EXACTLY how I want has become an obsession! Ha! I still have to put in new strut mounts and track down some noise in my front suspension steering. I am leaning to my steering rack bolts, but we won't know until we tear into it. I was going to go with camber plates, but I decided on the ecs heavy duty strut mounts and use that money for the AWD parts I need. They are actually the same as the 34 MS versions. So, when I am down there, we are going to switch the subframes and I will post some pics.

I have to hit the junkyard for a couple of things and we actually have a set already pulled floating around my buddies garage.... I am thinking of pulling the couple of set's out there at the JY while I am there.

Also, not sure if you have an aftermarket TOP, I have a brand new AWE S3 style TOP for sale without the leaky coupler!
 

Tony48

Go Kart Champion
Yeah, I had the same issue! Actually, 17Z and 18Z are rear mount as well and don't work with the Passat spindles. That's why I switched to the TTRS calipers. I also felt that TTRS caliper better suited to the platform with the TTRS master cylinder and cayenne 4 piston rears.

The TT front spindles have thinner alum in the rear of the spindle and it looks like they need minimal machining to fit rear mount calipers, but they push the wheel out a TON, so you would need wide fenders. They also lower the front end of the car as the control arms with the TT spindles are parallel to the ground.

The CC/passat/TT subframe is part number: 3C0199369H I should be able to tell you how the rear subframe will fit sometime this summer when I do an AWD conversion on my car. For now my GF has banned me from projects, mods, etc. They have been sucking all my time up. I mod my PC, modding games boys and old school game consoles, and my car of course. My quest for everything being EXACTLY how I want has become an obsession! Ha! I still have to put in new strut mounts and track down some noise in my front suspension steering. I am leaning to my steering rack bolts, but we won't know until we tear into it. I was going to go with camber plates, but I decided on the ecs heavy duty strut mounts and use that money for the AWD parts I need. They are actually the same as the 34 MS versions. So, when I am down there, we are going to switch the subframes and I will post some pics.

I have to hit the junkyard for a couple of things and we actually have a set already pulled floating around my buddies garage.... I am thinking of pulling the couple of set's out there at the JY while I am there.

Also, not sure if you have an aftermarket TOP, I have a brand new AWE S3 style TOP for sale without the leaky coupler!

Please do let me know how the front & rear subframe swaps go. I'll keep an eye on your build thread. Also check and see if you only have 3 steering rack mounting bolts like I do--I'm interested to see if that's normal or not.

As far as the TOP goes, I'll wait and pick one up when (if) I go k04. Thanks for the offer! I think I'm done with big mods for a few months. Summer is always super busy for me and I have a lot of other projects to work on. I understand the obsession of making everything just how you want it!
 

MLue1

Drag Racing Champion
Big maintenance update. I completed the timing system replacement.
New chains/guides/tensioners for the camshaft timing system and the balancer shaft timing system. Wasn't too bad since I did my research, had all of the correct tools, and followed the service manual. Took me about a day and a half taking my time and taking lots of breaks. Also upgraded my diverter valve to a Rev. D since the old one (Rev. C) was whistling under boost. The chains/guides/tensioners were actually in great shape but I'll rest easier knowing the old-style tensioner has been replaced. When I had everything back together I had a weird misfire issue that took me a long time to diagnose but I believe it was a stuck N205 valve or camshaft adjuster magnet, or some other issue in the camshaft timing system. Either way, it went away after I disassembled, cleaned, and reassembled the cam bridge, N205 valve, and camshaft adjustment magnet.

Here's some info that I think will help people in the future doing this job:

  1. You will need a short m12 triple square bit to get 2 of 3 bolts out of the the engine mount bracket (connects engine mount to the block). I bought a cheap set of triple square bits and cut them down then used a 1/2" wrench on the end.
  2. I bought the Schwaben timing service tool kit for the job. It was pricey but goes on sale for 25% off pretty often. Well worth it for the correct tools.
  3. The timing system will not all line up when you line up the crank pulley notch with the 4 o'clock mark on the lower timing cover. Apparently it can take up to 160 rotations of the crank pulley to get everything lined up perfectly (all camshaft and balancer shaft marks). Instead, I turned the system a dozen or so times by hand (spark plugs out) until I had the balancer shaft system lined up and the camshaft system off by a single link so I could verify I had not skipped a tooth.
  4. Check your cam bridge for screen blowout. Mine was fully intact so I left it as-is. If it's blown out then check the immediate area to see if there are any debris you can fish out.
  5. Taking off the turbo outlet elbow and N75 valve was a huge pain because of the limited access and vacuum lines in the way. It has to be done for access to the lower timing cover.
  6. To remove/reinstall one of the lower timing cover bolts you must get behind the accessory belt tensioner. Instead of removing the entire accessory belt tensioner assembly I removed the pulley only and held the spring loaded arm up when necessary.
  7. If you plan on replacing the balancer shaft tensioner you need a standard depth 27mm socket. A deep socket wouldn't have fit.
References that helped me:


Here's the Flickr album with all of my pictures and below are a few embedded pictures for your enjoyment (click for full size).


Thanks for these pics very helpful.

Everyone talks about it but you are the only one to ever show a PIC of what a Cam Bridge Screen looks like.:thumbsup:
 

Tony48

Go Kart Champion
Updates:

  • Front ECS Sway Bar Endlinks
  • Aluminum Control arms
  • Motorsport Tech Custom Wheel Spacers
It's been awhile without any updates but I finally had some time to work on the car. After installing my ST coilovers I noticed a little bit of knocking noise from what I believed to be the front sway bar endlinks. I went ahead and ordered/installed a set of ECS sway bar endlinks. They seem like quality hardware. I do have a few gripes with their design:

  1. The threaded studs are just too long. It takes forever to run the nylock nuts down.
  2. There isn't a hex/torx/triple square counterhold at the end of the stud. Instead there's a slim area between the ball and the sway bar to fit a 16mm wrench. The problem is I don't own a thin profile 16mm wrench and didn't really want to grind a wrench flat. Instead I used a cutoff wheel to cut a slot at the end of each stud to counterhold with a flathead screwdriver. This worked fine but it meant I couldn't torque to spec with a socket. instead I used my calibrated torque arm and a box end wrench :rolleyes:. Maybe I'll buy a crow's foot and torque to spec one day.
  3. The OEM end link nuts are 18mm. The ECS nuts are 19mm. Not a big deal but it always peeves me when replacement parts don't use the same size hardware.
Other than that, install went well. It took a torch, breaker bar, and some penetrating oil to get the lower nut off of the driver's side end link. Even with the car being lowered I was able to reach under the car and adjust the end link with the car on the ground. I did use some blue loctite on the jam nuts since I've seen people complain about them coming loose.

The new end links got rid of the slight knock I was hearing. It may be placebo effect but it sure seems like the front end is a little less harsh and feels more balanced on turn in.


Here's the slot I cut to use as a counterhold:


Next thing, I picked up a pair of aluminum control arms from a b6 Passat at a junkyard. Once I get my powder coating setup up and running these will get cleaned up, coated, and installed. Still deciding on a color but I think a metallic gunmetal will look nice.


Lastly, I finally got my 6mm front wheel spacers from Motorsport Tech installed. I'm really frustrated with Motorsport Tech. After waiting a few weeks for my first set of custom spacers they arrived and were drilled to 5x120 instead of 5x112 :bonk:. They sent me a second set and the hub bore on one of the spacers was a few thousandths too large. How they managed to make one of the two too large is a mystery to me. Luckily I have a wood lathe so I chucked it up and hit the bore with some emery cloth until it fit the wheel correctly. What a pain in the ass to have to do after I paid for custom spacers and waited over a month for the correct ones to get to me. At least they were able to finally get them to me and I could get them on the car. Anyway, here they are and here's a picture of my caliper clearance.

Specs: 57.1 (hub) to 75mm (OZ wheels), 6mm thick, 5x112


Last edited:

Tony48

Go Kart Champion
Bad news, got a flat tire over the weekend. There was no shoulder where I was so I had to drive a few hundred yards before I could stop. The consequence is I have a small crack on the inner lip :cry:

For the meantime I put the Detroit's back on. Luckily I had a pair 15mm spacers on hand which let the wheels JUST clear the Boxster S calipers. It's scary close but I don't have a great choice right now other than running the 3 remaining OZ's with 1 Detroit on the rear axle (which I REALLLLLY don't want to do).

Trying to figure out how much it'll cost to get the crack welded up. I have no experience with this but have made a phone call to one reputable wheel repair place I know. While I'm at it I figure I might as well powder coat the wheels and go for 4 new tires. Trying to figure out if it's worth going through all this for a set of wheels that has a few small rash spots and at least 1 tiny bend (all from previous owner). Guess I'll start researching wheel repair. Ugh.


Wheel/caliper clearance :eek:
 

Tony48

Go Kart Champion
Last edited:

Tony48

Go Kart Champion
I haven't updated for awhile so here we go.

  • The cracked OZ wheel still hasn't been fixed because I decided I want to strip and powder coat them myself. That's more of a long term project (hopefully it gets done over the winter). Looking into colors now but I'm leaning towards something dark yet more interesting than straight black.

  • I recently heard an exhaust leak and went under the car to find a giant crack on my downpipe :mad0259:. Since it's along a weld I think it's at least partly caused by a poor weld or improper filler that rusted (the exhaust is stainless steel). The heat wrap also seemed to speed up rusting. I've ordered a replacement catted downpipe and will be installing shortly.

  • I've also been experiencing an intermittent CEL and the codes U102F & U1030. Research leads me to believe it's a failed Direct Ozone Reduction Catalyst Temperature Sensor. Basically some BS sensor on CBFA cars that ensures you only use an OEM radiator for emissions related reasons. I was all ready to bite the $350 bullet and replace the radiator but called the VW dealer to see what they would say. Turns out it may be covered under 15yr/150k mile PZEV warranty. Once I get my exhaust fixed I'll schedule a service appointment and see if they take care of it. I'd much rather replace it myself than let the dealership touch my car, but $350 is $350 :iono:

  • The mounting tab on the "stage 2" portion of my IE intake broke off. IE shipped me out a new, revised piece with beefier bracket really quickly. Great customer service!


Last edited:

Tony48

Go Kart Champion
I swapped the ECS downpipe on last night. Since this is my second time putting a downpipe on and I now have access to a lift it took me less than 30 minutes to get the downpipe off the car :thumbup: (also, ratcheting wrenches are suuuuuuuch a luxury).

I swapped the OEM catback in for the Magnaflow so I can take some time and restore it. the 409 stainless is pretty rusty so I'll wire wheel it all down and give it a nice coat of hi-temp paint. The car sure is whisper-quiet without an aftermarket catback on. I actually kind of like it.

First, some pics of the old and new downpipes. The build quality of the ECS downpipe really impressed me and I like that it's 304 stainless so I should never have the issue of downpipe rusting apart again:


Took the Magnaflow catback off and had a hell of a time separating the pieces. Required a torch, lots of PB blaster, and a couple hammers/mallets.


My garage walls are looking quite bare...I need to find some VW/Euro performance brand banners and art to put up.


Had a local exhaust shop that specializes in custom VW exhaust cut the 2.5" reducer off the catback and weld on a section of 3" stainless. Check em out, they're called S&R Customs and do some crazy looking pie cut exhausts. I'll cut the 3" extension to length once I'm done refurbing and test fit the catback to the downpipe.


The beginning of the refurb...before and after wire wheel. All parts will also get a light sand blast before paint.


Last edited:
Top