GOLFMK8
GOLFMK7
GOLFMK6
GOLFMKV

DIY: TSI Water Pump Replacement

Steve Lai

New member
Reviving this thread but how the hell did you get the new belt on without loosening the tensioner? Ive been at it for hours trying to get that new belt on and it WILL NOT fit between that crease on the bottom crank.

Sent from my HTC 10 evo using Tapatalk
Its a 12 mm nut bolt in the bottom. It should be loosen in opposite direction.
:)
 

TheRickestRick

New member
I've done this job 20x times on various customer cars, my own car and many, MANY more A4's with the EA888 motor. Few things to clarify;

-You DO NOT need to remove the IM to do this, remove the TB, TB hose and front elbow pipe. I'd suggest tucking some of the wiring up and out of the way.

-The 12mm bolt is a REVERSE thread and really only needs to be loosened 3-4 turns to relieve tension on the belt. I usually cut the old belt off and and break the the 12mm loose with the old pump out. USE a 6-POINT socket. Use a 12 point and you will destroy your knuckles, or strip the head of the bolt.

-The connector piece should be replaced with the updated (black) part.

-Replace the 2 shorter bolts that join the pump near the ECT sensor - they usually get corroded and are hard to re-thread.

-Replace the o-ring to the coolant pipe that goes into the front of the engine. VW also has an updated part the superceeds and replaces the pipe with the thicker version to prevent stress-induced cracks. It's $30-40 and worth the insurance.

A lot of people shit on flat-rate techs and dealer techs for no reason. There are a lot of hacks out there, but there are also plenty of shade-tree mechanics that don't do much better. Not trusting someone to do their job because of how they get paid does not seem fair if you have not had work done before. I'm a flat-rate tech and while there are plenty of short cuts taken to save time - doing the job incorrectly wastes more time than doing it right in my experience. Time is made by knowing what to do, how to do it and where to do it correctly.


Don't know if anyone is still checking this thread. What kind of socket can you get on that 12mm bolt? I know I can't get a 3/8" 12mm socket in there, not enough room. I tried a box wrench, but it only grabs the very end of the bolt and slips off. Maybe an offset box wrench would get a better hold. Is there a special low profile 1/4" 12mm socket I need to get? Thanks.
 

bigtim3727

New member
Reviving this thread but how the hell did you get the new belt on without loosening the tensioner? Ive been at it for hours trying to get that new belt on and it WILL NOT fit between that crease on the bottom crank.

Sent from my HTC 10 evo using Tapatalk

I'm wondering about this myself, as I'm in the process of installing a new pump right now. Removing the old belt from the pump was pretty simple, and in my head, I don't think I need to loosen the 12mm reverse-thread to install the new belt, but it might not work out that way.

I'll report back if it works as I'm thinking it will, but it prob won't :iono:
 

zrickety

The Fixer
I was able to slip the belt off and then on when I did it.
 

avs

Passed Driver's Ed
We apparently have an inherent water pump issue with our motors. I'm almost at 90k and I'm only now needing to replace it for the first time. I also know of people that have had several replaced before their warranty period was over, so it's hit or miss. Either way, this replacement can be as cheap as $70 if you DIY.

Option #1

Water Pump with Housing: 06H121026CQ or 06H121026CF
Water Pump Belt: 06H121605E

Option #2 (Not verified but could work)

Water Pump: 06H121026BA (should be $70-$80)
Water Pump Belt: 06H121605E
Water Pump Gasket: 06J121119

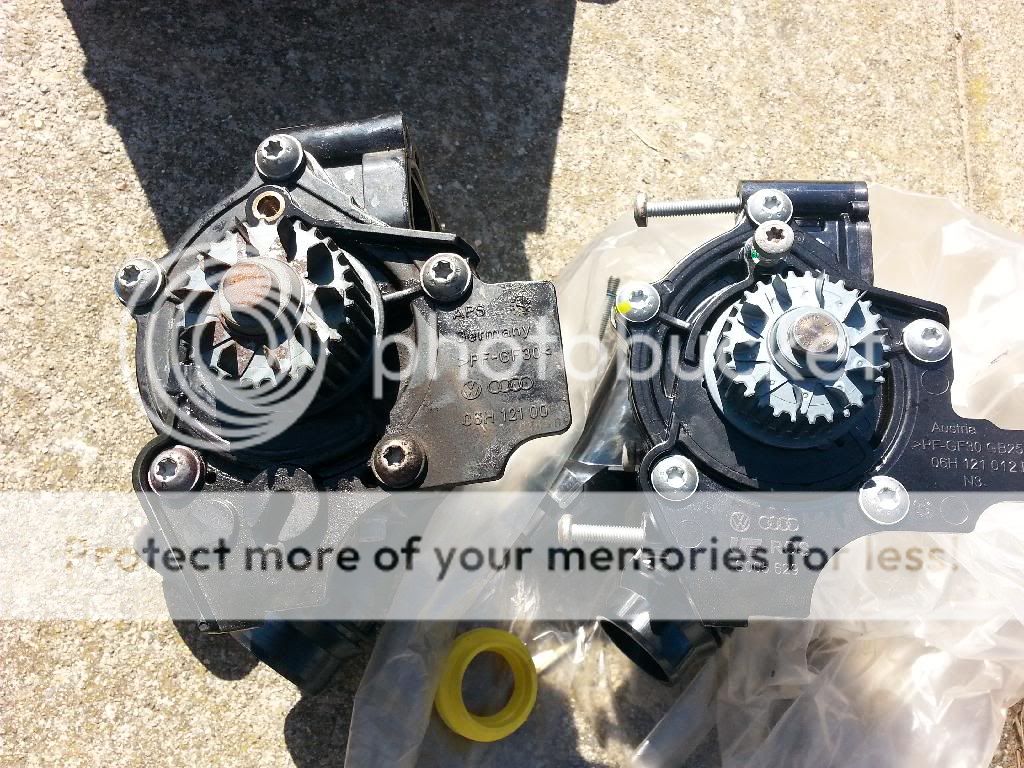
These are just the part numbers I used. Verify it fits your vehicle before buying. You can see in the picture below that the new pump doesn't look exactly like the one I pulled off my car (2009 model year). I went with Option #1 because I thought the housing was cracked, but technically you could go with Option #2 if just the pump itself is bad. I didn't really know what I was doing either so I got the whole thing to be safe. Also, it's recommended that you replace the belt while you're in there. If you buy the whole housing it comes with a replacement gasket, otherwise replace that as well. The last thing you want is to fix one coolant leak and cause another. Last but not least, have a few injector seal replacement kits in case your injector o-rings are damaged while removing/installing the intake manifold. It happened to me, it could happen to you.

Warning: Coolant may come out during any of these steps so be smart and don't put your face right underneath a loose hose. Be sure to have some G12 and distilled water ready to top off the system again after you're done.

Step #1: Jack up the front end of you car and put it on jackstands. Remove the lower radiator hose to drain coolant. Removing your overflow tank cap will help it flow faster. I removed the silicone hose that connects the intercooler to the throttle body pipe for more accessibility.

Step #2: Remove Intake Manifold
I followed THIS DIY the first time I replaced it. I've done it several times now so it only takes me an hour or 2.

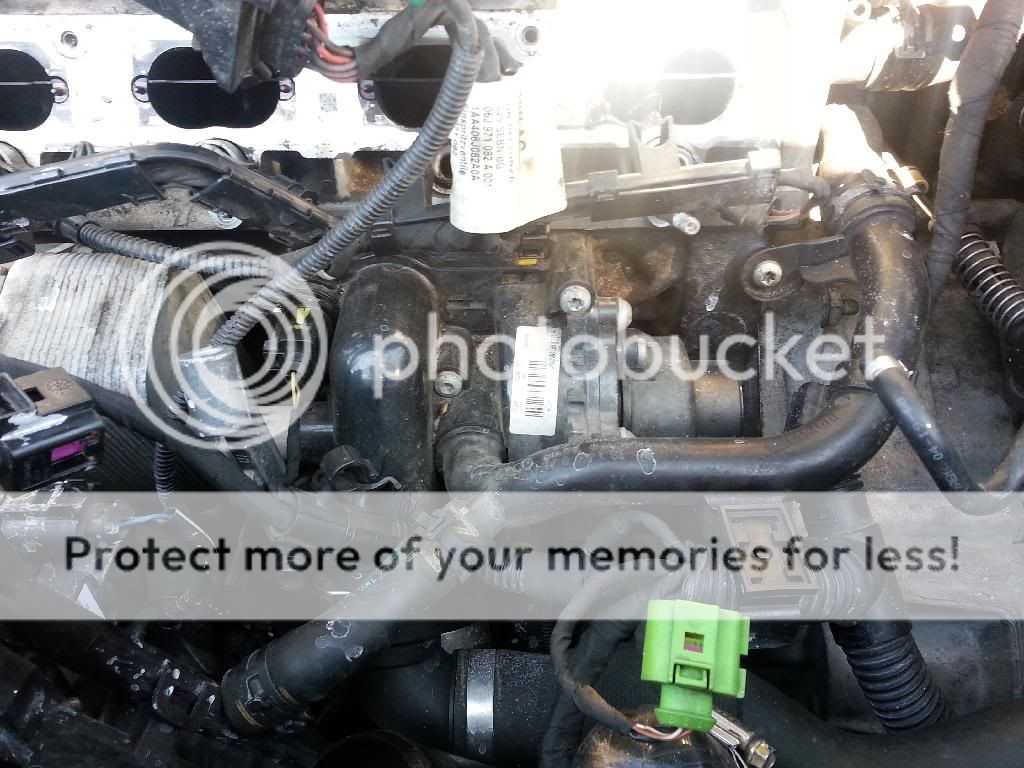
After removal the Water Pump is visible underneath the #3 injector (mine came out with the manifold).


Remove anything that may be in your way. I was pretty liberal with moving things out of the way because I wanted easy access and better pictures. Just make sure you remember what connector goes where, or mark them if necessary. I also removed the coupler that connects the throttle body pipe to the throttle body.


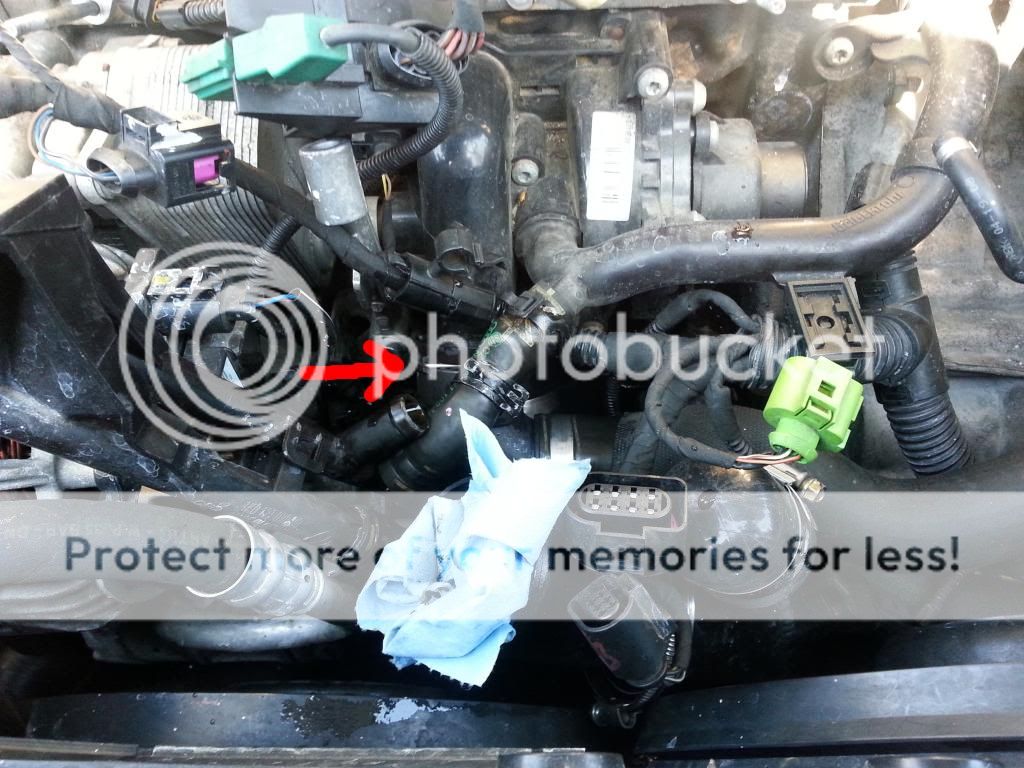
Step #3: Remove the clamp and pull off the indicated coolant line. i stuffed a shop towel in my throttle body pipe to prevent coolant from going in it just in case.


Step #4: Pry off this clip with a flathead screwdriver and pull off the coolant hose. It will take some effort and some coolant may come out, so be ready.


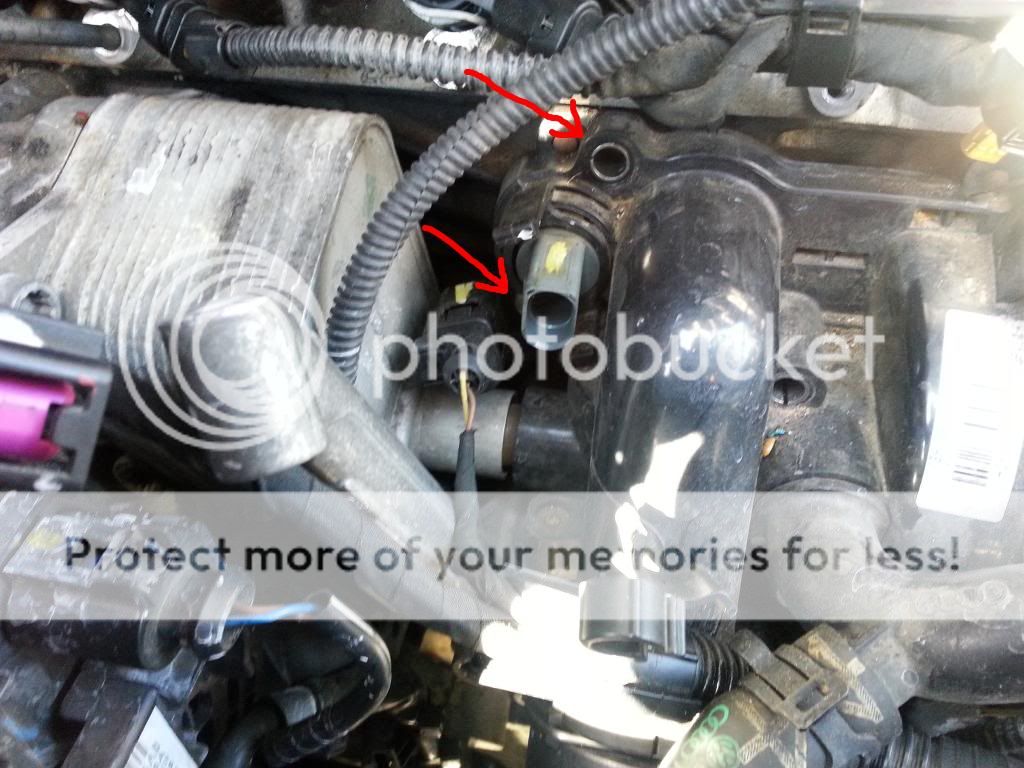
Step #5: There's a t30 bolt under this hose. Remove it and pull the hose off. More engine blood comes out.


Step #6: There's a 2nd coolant hose at the bottom of the pump housing. It has the same c-clip that needs to be removed. It may be easier to access from under the car.


Step #7: There are (2) bolts holding the belt cover to the pump housing and (5) bolts holding the pump housing to the block. (2) of those are by the temp sensor and are shorter, the other (3) are longer. Remember to remove the temp sensor connector before removing the pump assembly.

Belt cover bolts. One of the bolts is behind the coolant line. At this point the coolant line is removed from the housing so you can move it out of the way.


3 longer bolts. The 3rd lower bolt behind the coolant line can be seen better in the pic above on step #6. It's right by the arrow.


Temp sensor and 2 shorter bolts, one on top and one below


Step #8: Here's where I kind of wing it. The manual states that you need to remove the belt by loosening the balance shaft pulley down below the pump. I believe that was a 12mm bolt. You counter hold it by putting a socket wrench on the crank pulley bolt. That's a 2 person job, I couldn't figure out which way to turn it ,and my wrench kept slipping off, sooo I just slid the belt off of the water pump. It came off pretty easily. You can also see where the lower belt cover bolt goes in this pic, to the right of the balance shaft pulley.


Step #9: The housing should come off at this point. There is a connector to the oil cooler that needs to be slid off. It's orange with a black o-ring gasket on either end, and it can move radially. The manual says it should stay in the oil cooler, but when we pulled the pump off, it came off with it. We took it off the pump and put it back in the oil cooler, no problems with it.


Old Pump vs New. You can see some of the exterior differences. At this point, if you bought the cheaper option you'll need to take the 5 bolts off around the face plate and replace it. I took my old one apart but couldn't really find anything wrong with it, so I'm not sure where the leak came from. there is a thin rubber gasket sort of thing along the bottom of the pump gear that you can see it bubbled up in the 7:30 position. That's the general area where coolant was coming out, so maybe it was that. Also you can see where it was leaking past the belt cover in the close up pic of the belt above. It was coming out to the left of the numbers that are printed on the belt.=. On the new pump it's all hard plastic.


Step #10+: Install is the reverse of assembly. Getting the belt on and the oil cooler connector on will take some finesse. Also there are some dowels on top that locate the water pump, but they were covered in rust and would not go in readily. i lined up the pump bolts and tightened them down starting with the middle bolt, then the 2 by the temp sensor, then the other 2. Take your time and it should seal up.


Reattach all coolant and radiator hoses. Reinstall your intake manifold. Top off your coolant with 50/50 coolant/distilled water. Run the car up to temp, and add coolant as necessary. Check to make sure there are no leaks. Monitor for 24 hours and rejoice when coolant levels stay steady.

Does anyone have the pictures? Images in photobucket aren't working.
 

avs

Passed Driver's Ed
If you're using google chrome or firefox you can install one of the various "photobucket embed fix" type extensions. It will automatically fix the embedded photos for you. I have one installed and can view all photos in the original post
Thanks! Google chrome did the trick. My ‘17 mk7 is having coolant seepage near the oil pan. Currently at 70k miles.
 

Bluesy

Ready to race!
Doing this myself and everything has been very straight forward up until I try to get the new belt on. Does anyone have any answers to this? I can’t seem to loosen the nut, definitely can’t fit a socket on it, and I can’t just slide the belt between the gap, the belt is too thick. What am I missing?
 

Bluesy

Ready to race!
Also, is it possible to replace the thermostat while doing this without removing the manifold?

edit: nvrm I think I realized the thermostat already is in the water pump. The one I bought has it installed.
 
Last edited:

Allchokedup

Autocross Champion
Doing this myself and everything has been very straight forward up until I try to get the new belt on. Does anyone have any answers to this? I can’t seem to loosen the nut, definitely can’t fit a socket on it, and I can’t just slide the belt between the gap, the belt is too thick. What am I missing?
If I recall there is a nut and it has reversed threads. I assume this is the one you cannot get off
Edit: yes, the drive pulley has reversed threads. Meaning turn it right to loosen it
 

Bluesy

Ready to race!
If I recall there is a nut and it has reversed threads. I assume this is the one you cannot get off
Edit: yes, the drive pulley has reversed threads. Meaning turn it right to loosen it

thanks but I decided to just leave the old belt on. It looked ok.

One other question regarding flushing the system - how are we supposed to do a flush with these cars as there doesn’t seem to be a way to completely drain the system? Removing the rad hose only drains a portion of the coolant. How are we supposed to get the rest out when doing regular flushes?
 

jay745

What Would Glenn Danzig Do
thanks but I decided to just leave the old belt on. It looked ok.

One other question regarding flushing the system - how are we supposed to do a flush with these cars as there doesn’t seem to be a way to completely drain the system? Removing the rad hose only drains a portion of the coolant. How are we supposed to get the rest out when doing regular flushes?
Basically run some water through it, drain, repeat.
 

Bluesy

Ready to race!
Basically run some water through it, drain, repeat.

any concerns with the final mixture being too diluted if you’re not able to drain all the water out? Guess you just have to guess and dilute the coolant a bit less when you’re finished flushing everything.

I’m surprised there’s not some special tool for this. Can’t imagine vw techs run water through it multiple times, seems very inefficient.
 
Last edited:

jay745

What Would Glenn Danzig Do
any concerns with the final mixture being too diluted if you’re not able to drain all the water out? Guess you just have to guess and dilute the coolant a bit less when you’re finished flushing everything.

I’m surprised there’s not some special tool for this. Can’t imagine vw techs run water through it multiple times, seems very inefficient.
There is a special tool, it creates a vacuum on the system and gets it all out. Expensive and you need a compressor, not very home garage guy friendly

Getting the mixture perfect isn't too important. In summer I run straight water
 

brat_burner

Autocross Champion
any concerns with the final mixture being too diluted if you’re not able to drain all the water out? Guess you just have to guess and dilute the coolant a bit less when you’re finished flushing everything.

I’m surprised there’s not some special tool for this. Can’t imagine vw techs run water through it multiple times, seems very inefficient.

You mean one of these bad boys?
Screen Shot 2020-06-11 at 6.29.06 PM.png
I have a vacuum tool like Jay mentioned but it's only for filling coolant. Puts the system under vacuum before filling to avoid air pockets. Critical on low temp coolant circuits for blower/turbskie systems. Also, yea ratio isn't really that important unless your in extreme cold. Good to have some type of additive for lubrication/protection if you're running mostly water.
 
Top