GOLFMK8
GOLFMK7
GOLFMK6
GOLFMKV

APR K04 TSI DIY Install

grambles423

Automotive Engineer
Figured another DIY would help.

Another good reference, but its an FSI engine: http://www.stasisengineering.com/si...l_pdfs/STaSIS MTF turbo install Mk V rev9.pdf

TOOLS NEEDED

Prep Work

  1. Jack the Car Up: Not too high or otherwise you will not establish a good ergonomic standard and will experience back pain, etc. etc.
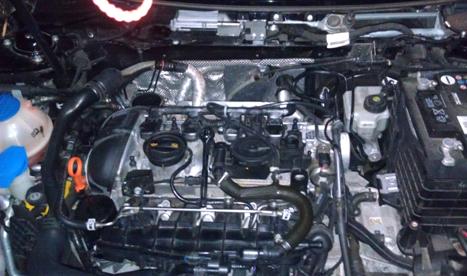
  2. Remove Engine Cover


  3. Drain Oil (ONLY if you need to. I was up for a service at this point so I went ahead and did it. Go ahead and swap filters too)
  4. Remove Passenger Front Wheel: I went ahead and just removed both


  5. Remove the Intake: I cannot give accurate pictures of the stock uninstall because I purchased the vehicle with a BSH stage 1 and 2.


  6. Remove Passenger Splash Shield (T25): Make sure you bag these up and label them.
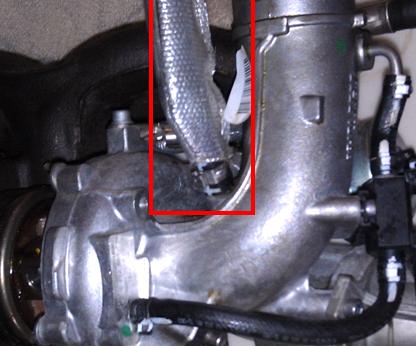

  7. Remove Heat Shield
    1. Remove (6mm Allen) Plug located towards the bottom driver’s side. I used a regular Allen key with a 6mm socket screwdriver attachment as a breaker bar


    2. Remove (2 x M10 XZN) Bolts holding heat shield to block (Seems that some MK6's have a 6mm Allen for these)


    3. Remove (M8 XZN) bolt on top of heat shield that holds various lines and intake tubing mount. (Watch out, there is a nut underneath [Some MK6's have this nut welded on])
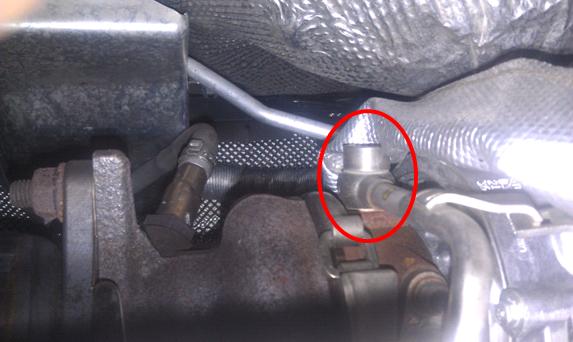
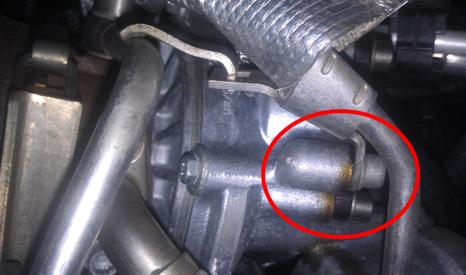
    4. Remove (2 x T30) bolts holding the multiple lines to the block. One is located on the driver’s side by the fuel pump and the other by the turbo inlet on the block.


    5. Unclip Vaccum line and remove from block


    6. Move lines up and away from the heat shield onto the top of the block. I used a zip tie to hold these back. Remove Heat Shield
  8. Remove Downpipe (Honestly, you dont really have to remove the entire thing, just the first portion of the flex pipe: Seeing as though there are many threads for this, I will still include the steps. Please refer to this thread made by Plac: http://www.golfmk6.com/forums/showthread.php?t=25392
    1. Remove Passenger Side underbody tray (T25)
    2. Pull O2 Sensor off of underbody stud bracket
    3. Unplug Harness from bracket (This will help later for uninstall/install)
    4. Remove Cross Member support brackets (13mm)
    5. Loosen Sleeve Clamp to CBE (16mm)
    6. Remove CV Heat Shield (16mm open end)
    7. Remove DP Flange Nuts: Tricky, but doable. (16mm and PB Blaster) However, your kit includes studs and nuts, so you shouldn’t have to worry about ease of uninstall
    8. Remove Downpipe Bracket (13mm)
    9. Remove DP
  9. Swap O2 Sensors at this time to your new OEM DP (Or not, if you’re using stock hardware) (22mm or 7/8” Combination Wrench)


  10. Remove Pancake Pipe (2 x T30) Undo Hose Clamps and the two bolts holding it to the block


  11. Disconnect DV and N75 Connectors. Its best to push IN the connector then pull the tab, that way the pressure can be lifted off the tab.
  12. Cover Front Sub-frame with towel. I managed to drop a few washers and tool bits in there and had to fish them out with my magnetic hook. Pain in the ass.

Time: 2.25 Hours
 
Last edited:

grambles423

Automotive Engineer
Turbo Removal

Time to remove the turbo and all of its components. It would probably be a good time to take a small break and grab a coke. This next part is tricky and time consuming. Having a friend would help, but I did it by myself so it wasn’t impossible. Plus, there is really only room for one hand

  1. Remove the Turbo Support bracket: (2 x M10 XZN) Rear bolt is EXTREMELY close to the axle, you might need to have short (M10 XZN) to access this. I used the XZN bits from AutoZone cut off and (1/2” Combination Wrench)


  2. Remove upper section of turbo support bracket: (6mm Allen) Place bracket to the side. Nut is welded on, so don’t worry about it falling.


  3. Remove Coolant Return at the Turbo: (Short M12 XZN + 1/2” Combination Wrench) Just like the turbo support bracket, you should have plenty of clearance.


  4. Disconnect Oil Return on the bottom of the turbo: (2 x M8 XZN) The picture isn’t very good, but you WILL be able to reach it. It might benefit to have a longer M8 XZN. The view is looking UP from underneath on your back after you have rolled in from the front of the car.


  5. Remove Oil Supply Line Bracket Under DV: (M8 XZN)


  6. Disconnect Coil Packs and route harness to the other side of the engine bay


  7. Disconnect Oil Supply Line on top of the turbo (M12 XZN): Push to the back and out of the way


  8. Disconnect Coolant Supply Hose (Channel Locks or Vice Grips): Just undo the clip and pull the hose off the hard piping. Route it out of the way.


  9. Remove Turbo (5 x 13mm) Nuts: Some studs might come out, just be sure to chuck these up and remove the nuts and place them back into the block. None of my studs came out and I have around 40K on my vehicle. Picture is from the backside of the manifold


  10. To lift the turbo out, pull manifold away from block studs and angle the turbine side upward and wiggle it out of the top. It took me a little bit, but I found the compressor outlet was hitting the block. Once I got it free from the block, the turbo was MUCH easier pulling out from the top.


Time: 1.5 Hours​
 
Last edited:

grambles423

Automotive Engineer
Bench Work: Swapping IHI to K04

Awesome Job. Now that you have the turbo out, pat yourself on the back and take another break, or continue on. The rest is simple, but you must make sure you are aware of what you’re doing, because you could be in for a headache if you mess something up.

  1. Assemble DV (Purchase a REV D valve!) to K04 per APR’s instructions (3 x 5mm allen + lock washers). Make sure they’re snug
  2. Swap (6mm Allen) Coolant Plug per APR’s instructions. Torque to 38-40ft-lbs. Plug Location was triple confirmed by APR’s service department


  3. Swap Coolant Supply line from IHI to K04. BE SURE to follow APR’s instructions for washer placement. DO NOT put the thicker washer on the coolant line you are currently swapping. This washer is for the firewall side line. I made the mistake and reinstalled everything and had to pull the turbo a second time to swap them out. Torque to 20NM (18.5ft-lbs) + 45* (You will not be using the 8XZN bolt from the bracket.)


  4. Swap Vacuum Line from IHI to K04. Be sure to use Oetiker clamps provided. (I used a small pair of nippers to clamp). The line had a little play in it so I wrapped some high temp electrical tape around it to provide adequate clamping force. That might not be needed for other installs.


  5. Install Downpipe Studs provided in the kit. Be sure the smaller end is installed into the flange. Don’t destroy the threads, but make sure they’re snug. You will torque these later
  6. Install APR Supplier Silicone Connector at the same angle as the Stock Turbo’s compressor outlet. This will help later.


Time: 45mins
 
Last edited:

grambles423

Automotive Engineer
Re-installation

Now you’re ready for the full install. Make sure the engine bay is free from wires, connectors, lines, etc. etc. You’ll need as much clearance as you can and plenty of hand room. I have smaller hands and I don’t know the variation between big hands and small hands when installing the turbo. No pictures will be provided for reinstallation of everything.
  1. Install K04. It would be wise to angle the compressor down first for easier fitment. Make sure you’re aware of the silicone adapter. You might need to go underneath and guide it away from the block. Once that is situated the turbo should just slide into place. Make sure you place the turbo into the Vblocks on the engine. Basically when I was aligning the holes to their studs, the manifold sort of slipped into the blocks naturally. Be sure in install the gasket the same orientation as the IHI (Tab faces driver’s side)
  2. Hand tighten manifold nuts on the studs
  3. Taken from GolfMKV: “When torque-ing the turbo to the head, there is a very specific sequence to follow. Let's label the nuts 1 thru 5, starting from the passenger side. The sequence to tighten them is: 1, 3, 5, 4, 2. You have to make five passes in that exact sequence. The first four passes will increase torque each time, starting with 5 Nm, 12 Nm, 16 Nm, and then 25 Nm. The fifth pass should be made at 25 Nm again, to verify nothing has changed. If you get any rotation on the fifth pass, make another at 25 Nm until the nuts don't rotate.” I believe this is the Service Manual process. (13mm)
  4. Install Oil Feed line to the top of the turbo. Don’t forget to use new washers on either side of the banjo bolt. (M12 XZN) (20NM + 45*)
  5. Install Oil Return Line. Don’t forget to use the new gasket. (2 x M8 XZN) (Torque: 9NM)
  6. Install Coolant Return Line. Don’t forget to use new ashers on either side of the banjo bolt. (Short M12 XZN + 1/2” Combination Wrench) Tighten the bolt well.
  7. Install Coolant Feed Line onto the hard piping to the left of the block. I would make sure the clip is facing in a convenient location
  8. Install Turbo Support Bracket
  9. Install Pancake Pipe
  10. Reinstall Heat shield
  11. Install vacuum line to block
  12. Install lines onto heat shield
  13. Connect DV and N75 connectors
  14. DO NOT CONNECT COIL PACKS YET
  15. Install downpipe per APR’s directions (or other vendor)
  16. Install splash shield
  17. Install battery
  18. Install Intake
  19. Install Battery (tie down and connectors)
  20. Install Passenger Fender liner
  21. Install Passenger Wheel (90ft-lbs)
  22. Check work and make sure everything is snugged up
  23. Fill Oil
  24. Check EVERYTHING again
  25. With the coil packs still unset, turn the engine over to allow the oil to recirculate into the turbo and throughout the system for about 30secs. Since the coil packs aren’t connected, no spark will be delivered to the chamber and the system will not turn over.
  26. Connect coil packs
  27. Leave ECU in stock mode and crank the car up. Let the car idle and run for a few minutes
  28. Check for Leaks
  29. Shut the car off and fill 50/50 Mix of coolant to appropriate level.
  30. Go for a test drive. Do not go crazy. You’re basically just checking whether or not you broke something or you missed installing a part.
  31. Check for leaks again
  32. Troubleshoot if needed
  33. Reinstall engine cover
  34. Place your ECU in tune mode and go have fun!!

TIME: 3.5 Hours

Ideal FULL PROJECT TIME: 9 Hours

Realistic FULL PROJECT TIME: 2 x 12 Hour days. I ran into some issues but would suggest 2 full days for this.

DISCLAIMER: I’m in no way responsible for any issues you run into modding your car. Work on your car at your own RISK. PM if needed. I will be happy to answer questions. Also, for a second DIY to look at, check: http://www.golfmkv.com/forums/showthread.php?t=140633
 
Last edited:

Banshee1

Go Kart Champion
Amazing work. Now the only reason not to get a K04 is my lease.:23:
 
Last edited:

grambles423

Automotive Engineer
When are you installing? I thought you already started it...?

I did. I'm trying to pull it from the Word Doc onto here with all the nifty bolded tools you'll need and listed step by step. It's going to take me a while.
 

Banshee1

Go Kart Champion
Guess I coulda checked out your build thread before asking. Duh!
 
P

plac

Guest
Remove Passenger Side underbody tray (T25)

Is yours really T-25? All mine were 10mm nuts.
 

grambles423

Automotive Engineer
Remove Passenger Side underbody tray (T25)

Is yours really T-25? All mine were 10mm nuts.

Yep T25. They might have changed them over the MK5>MK6 model change.

Soooooo.... do you like it :)

Cant saay, I'm having Engine faults. Its at APR HQ right now getting sorted out. Check out my build thread.
 

Charlie22911

Ready to race!
Something is wrong with this computer, can't see the pics!

:hitcomputer:
 

grambles423

Automotive Engineer
Top