GOLFMK8
GOLFMK7
GOLFMK6
GOLFMKV

INA oil cooler install

The front bar is your protection in case of frontal accident... So I'm not sure that cuting 30cm in it is a great idea..


I got my kit from Issam through my Spanish dealer.

This is what comes with the kit:


The radiator itself, you can now choose a black Setrab core, but the Mocal is just as good:


Prior to the install I wrapped each fitting with tape to avoid any scratch:


In addition I bought some aluminium hose separators on eBay for a cleaner look, no indications or instructions are included in the kit.

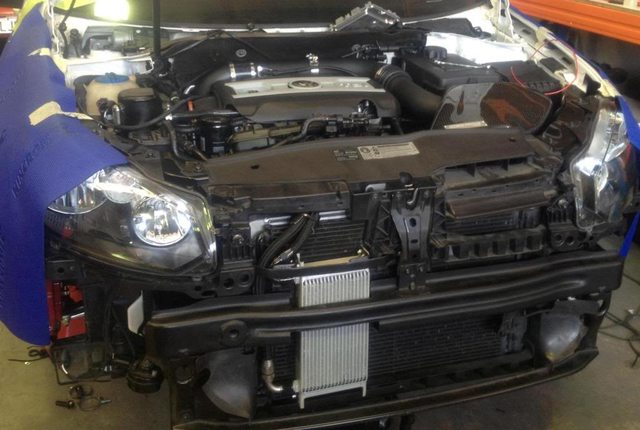
Because I am not running a FMIC and I don´t plan to install one I thought that the best place for the cooler was behind the front lower grill where it receives a huge air flow.

A friend of me designed a U-shaped bracket, which wasn´t included in the kit, that we powdercoated later in black.


It was a tight fit for the cooler, but we wanted that, also on each support from the cooler to the bracket we added rubber to dampen any possible vibration and used nylon nuts to avoid any loosening problems in the future. ANY of this hardware was included, remind this.

Some modifications to the front bar behind the bumper were needed:


And the first test fit, this was just to measure the length of the lines, I didn´t get much left from the lines included, take this into account when thinking about where to place the cooler:


The sandwich plate torqued at 30Nm:


The lines attached to the sandwich plate and the new oil filter installed:


Because of the sandwich plate 1.8 20VT filters are required since they are female type and not male type like the stock 2.0 TSI filters, the good part is that they are cheaper, the part number is Mahle 719/30, this filter WASN´T included in the kit.

Another shot:


Because of the lines touching the frame on some places you will get some kind of whining noise, I got used to it, but at first it was annoying for sure.

Some trimming was required on the engine cover to accomodate the new filter:


And the final pic with it installed:


Hope this helps to any user that is considering this kit and a DIY, there A LOT of things that need to get considered and planned before the install so it all goes smooth and trouble free.

I don´t regret of buying and installing this, the oil temperatures now are perfect and I am much more comfortable pushing the car hard in the summer months. I just wish someone had written a post like this to know all the details of the install before I started mine, hopefully this will help some of you.

Any question please ask :thumbup:
 

speedster

Go Kart Champion
The front bar is your protection in case of frontal accident... So I'm not sure that cuting 30cm in it is a great idea..

Yeah. I agree. Talking to Issam the best way to mount it is like this:


Haven't quite found where to attach it just yet.
 

mg_90

Newbie
The front bar is your protection in case of frontal accident... So I'm not sure that cuting 30cm in it is a great idea..

The bar my car came with form the factory isn´t like the one you can see in Sammy´s car. Mine is made with some kind of very thin metal and looks much weaker than his, I could even bend it with just pushing.

So let me doubt if it would make any difference if I ever hit anything with my car...

And as far as draining problems due to the fittings facing the ground I don´t think it will never be a problem since the sandwich plate is higher than the radiator and the hoses are always with oil pressure even with the thermostat closed.
 

speedster

Go Kart Champion
May be there is some difference between European and Australian models.
 
From the top to answer some of your questions:
  1. Could we make the kit to be completely bolt on? We have in the past and supplied the brackets and duct work but when we supplied the kits like that and the customers received it , they usually rebutted with "I could source the parts and make the brackets myself" so we stopped.
  2. Could the kit be sourced else using the same components for cheaper? Doubtful. The Mocal A1910 235 Matrix Oil Cooler core is $185 & thermostatic sandwhich plate is $90. That is $275 right alone for the 2 main components. We use XRP nylon braided hoses and fittings (not Earl's) and each of those 10-AN swivel head fittings (4) included are $17 each. Then you need the XRP line @$11/foot x 8 feet = $88 = $431. That does not include the fittings needed for the thermostatic plate or the fitting needed for the EA888 oil filter housing. This kit is quality and a reason why it is the best product on the market priced reasonably well. Could you do it cheaper sourcing components from Jegs , Summit etc? Sure but I dislike SS braided line and blue/red fittings in my engine bay.
  3. The only component in the kit is the yellow zinc plated adapter that is made here that adapts from EA888 to Mocal to then use your OEM oil filter. We can and have supplied these separately in the past to customers that have wanted to piece together there own kit.
  4. When we first started making the kit , EA888 replacement oil filters were costly which is why we recommended using the cheaper 719/30 unit. Now that the price between the 719/30 and 719/45 are the same , we simply supply them with the kit.
  5. The 2.0 TFSI (timing belt motor) uses a plastic oil filter housing (not aluminum like the EA888) . The oil filter housing has an oring channel for a seal that goes between it and the heat exchanger (far right of the image below). Our plate (far left) bolts to the OEM oil filter housing and is supplied with a new seal. No sealant has ever been used or recommended with this kit as it is not needed. The Stage 2 TFSI oil cooler kits that used our aluminum oil filter housings we only sold 6 of and they either went to Australia or stayed in the USA for custom projects. All plate surfaces used o-rings and gaskets ...never sealant. :iono:


  6. We always recommend mounting the Oil Cooler core vertically. I do not recommend mounting it horizontally but the choice is yours.

Raphael,
If you or anyone should have anymore questions please do not hesitate to ask.
- Issam
 

speedster

Go Kart Champion
Just wanted to chime in here. I've had a lot of questions about this install as its really pretty advanced compared to the type of stuff I'm used to doing e.g. installing a cold air intake or deleting the noise maker.

Issam has given me continuous support and guidance. That in itself is worth this small extra price (less than $50 I'm sure) of this kit versus buying individual parts yourself.
 

xHeartcoreboyx

IceCream GTI
Now if only someone could fix my oil cooler whine...

It whines and whines at low speeds and idle.


Sent from my iPhone using Tapatalk
 
From the top to answer some of your questions:
  1. Could we make the kit to be completely bolt on? We have in the past and supplied the brackets and duct work but when we supplied the kits like that and the customers received it , they usually rebutted with "I could source the parts and make the brackets myself" so we stopped.
  2. Could the kit be sourced else using the same components for cheaper? Doubtful. The Mocal A1910 235 Matrix Oil Cooler core is $185 & thermostatic sandwhich plate is $90. That is $275 right alone for the 2 main components. We use XRP nylon braided hoses and fittings (not Earl's) and each of those 10-AN swivel head fittings (4) included are $17 each. Then you need the XRP line @$11/foot x 8 feet = $88 = $431. That does not include the fittings needed for the thermostatic plate or the fitting needed for the EA888 oil filter housing. This kit is quality and a reason why it is the best product on the market priced reasonably well. Could you do it cheaper sourcing components from Jegs , Summit etc? Sure but I dislike SS braided line and blue/red fittings in my engine bay.
  3. The only component in the kit is the yellow zinc plated adapter that is made here that adapts from EA888 to Mocal to then use your OEM oil filter. We can and have supplied these separately in the past to customers that have wanted to piece together there own kit.
  4. When we first started making the kit , EA888 replacement oil filters were costly which is why we recommended using the cheaper 719/30 unit. Now that the price between the 719/30 and 719/45 are the same , we simply supply them with the kit.
  5. The 2.0 TFSI (timing belt motor) uses a plastic oil filter housing (not aluminum like the EA888) . The oil filter housing has an oring channel for a seal that goes between it and the heat exchanger (far right of the image below). Our plate (far left) bolts to the OEM oil filter housing and is supplied with a new seal. No sealant has ever been used or recommended with this kit as it is not needed. The Stage 2 TFSI oil cooler kits that used our aluminum oil filter housings we only sold 6 of and they either went to Australia or stayed in the USA for custom projects. All plate surfaces used o-rings and gaskets ...never sealant. :iono:


  6. We always recommend mounting the Oil Cooler core vertically. I do not recommend mounting it horizontally but the choice is yours.

Raphael,
If you or anyone should have anymore questions please do not hesitate to ask.
- Issam


Great I look forward to receive mine.. Is the current kit with the Mocal or Setrab?
 

Rotaryknight

Go Kart Champion
Wonder if there is enough space to install it on the passenger side under the headlight. I could drill out the honeycomb by the fog light for an air passage. Sadly I can't install it in the recommended location due to my FMIC.
 

speedster

Go Kart Champion
Wonder if there is enough space to install it on the passenger side under the headlight. I could drill out the honeycomb by the fog light for an air passage. Sadly I can't install it in the recommended location due to my FMIC.

Install it sideways. Its the best way for oil flow and will avoid issues with your FMIC.
 

speedster

Go Kart Champion
Looks awesome! I see you installed it where the FMIC would go. Do your oil lines go up out of the cooler? Is it mounted both on the top and the bottom?
 

xHeartcoreboyx

IceCream GTI
Looks awesome! I see you installed it where the FMIC would go. Do your oil lines go up out of the cooler? Is it mounted both on the top and the bottom?


Thanks. The lines are from the top yes, they go through the thin metal piece and come into in the engine bay from under the driver side headlight.

Holes were drilled in the metal piece and cutting was needed to mount it from both top and bottom with bolts.


Sent from my iPhone using Tapatalk
 
Top