GOLFMK8
GOLFMK7
GOLFMK6
GOLFMKV

UBER-STEALTH Under Floor Sub Install

veedoubleme

Go Kart Champion
I hope you didn't come here looking for instant gratification, because you won't see the sub box actually get installed for probably 2-3 weeks. I ordered it just 2 days ago, so I'm getting everything ready by mounting the amp and running wires. I'm starting the thread now, because I know Nik sold at least 20 sub boxes during his sale, so there are probably some people out there looking for install ideas. I'm adding this sub to my Dynaudio system, and I'll document all of the wires I tap and where/how I run everything.

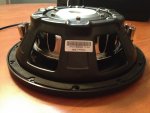
For the sub I'll be using the MB Quart RLP254. It's handles 300W RMS. I got it off Amazon for $71, and I'm hoping it sounds great, because it's hard to find any real reviews. It also specifies an internal box volume of exactly what the UBER-STEALTH under the floor box is, so that works out well.

EDIT 2/22/2013: Regarding the sub, there have been some people who have blown theirs. See the thread here: Two blown MB Quart subs... ideas?. The OP finally replaced it with the Pioneer SW-2501 and said it sounds at least as good as the MB Quart. Just something to consider. My MB Quart also just blew out yesterday. Will replace with the pioneer.

For the amp, I wanted a good quality compact (roughly 7"x7" or less) class D subwoofer amp, of which there are very few to choose from. I chose the JL Audio XD300/1. The amp will push 300W RMS @ 2Ω, so it should be a perfect match for the RLP254, since it can be wired for 2Ω. I got the amp online through Car Audio Dealers on Amazon for $202. That's only $33 more than the more popular Rockford Fosgate PBR300X2, but this is class D and pushes 2x as much power at 2Ω. A bargain if you ask me. It's 6.85" x 7.09", so it's a little bigger than the RF amp, but it will fit where I need it.

I'm putting the amp in the hatch under the trunk mat in the lower right hand corner. I didn't want the foam to look like a hack job, and I still wanted a little storage bin, but I also needed an amp rack. I very carefully cut out a section of it and shortened it by about 8.5" or so. It's adhered with PL400 construction adhesive, so it's never going to come apart. The bond is probably stronger than the foam itself.


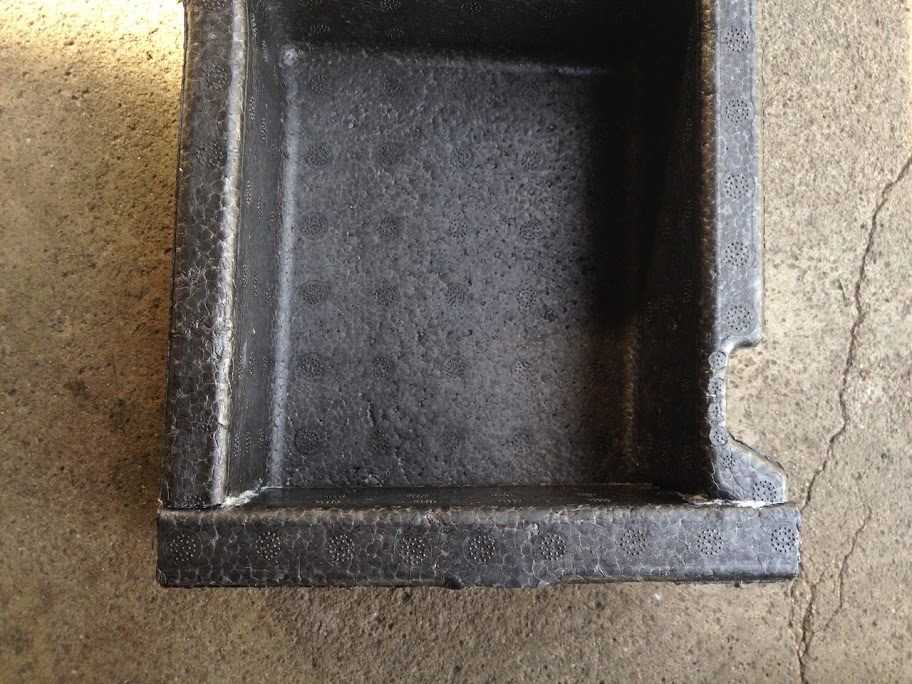
Next I put it back in place and very carefully made an outline of the leftover space where I could mount the amp. I then transposed that space along with the foam onto a piece of 1/2" MDF and cut out the whole area. Next, I coated it with plasti-dip, and soon the foam will be attached back onto the MDF which will solve 2 issues for me: (1) I now have a stable platform to mount my amp that doesn't involve screwing into my car, and (2) I have also raised the foam up by 1/2" so it should be very close to the height of the UBER-STEALTH sub box.

First coat of plastic dip:


Foam + MDF = Solution:


Put in place, with just enough room for the amp:


The amp and sub show up early next week, but I'm going to pre-wire everything tomorrow. I think I'm also going to need some type of structure to support the floor in the corner over the amp. I'll probably dig into that tomorrow as well.

I'll update this thread as I make progress. :thumbsup:
 
Last edited:

farcyde11gti

Ready to race!
Nice. Great work on the center caps, now working a good setup for sub. It's flattery if I copy you right?
 

veedoubleme

Go Kart Champion
Update: All pre-wiring is complete!

When adding an amp, you obviously have to wire directly to the battery due to the amount of juice required. Luckily the fuse box next to the battery has open spots just waiting for you to hook up to. I hooked up to block F. From there I have a fuse about 1' back from where it connects to the terminal.


From the battery, it's a short drop down to the rubber grommet that's located up and behind the brake pedal. I just poked a hole trough both the rubber grommet and the foam that covers it.


From there I ran it over to the plastic covering next to the dead pedal and dropped down to the floor.


I removed the big trim piece along the floor that runs all the way to the back seat. I continued running the power under the metal and behind the insulation where the factory wiring harness runs.


When I got to the back door, I took a turn and headed across the vehicle under the rear seat.


On the other side, I just poked the wire through the same hole the factory wires use to get back into the hatch area.


For the ground wire, I removed the carpet in the hatch along the passenger side. I sanded away a small part of paint and drilled in a new self tapping bolt to hold the ground in there solid.


Next up for power was the remote power wire. I decided to tap off the 12v power outlet in the hatch since it's right there, and I already had it open. The striped wire is the + wire, so that's the one to tap. I solder and shrink tube all of my connections. I don't use wire taps, even though they are pretty good and save time. I just like to solder stuff and do it right the first time.


I decided to tap off the rear speakers to feed the amp a source. I found the easiest place for me in my 4-door was where the wiring harness runs up the B pillar that holds the seat belt. The speaker wires run right up there before going into the rear door. There is about a 6" long velcro wrap around the wires where it runs into the B pillar. I removed the velcro, tapped there, and then velcro's back over my work. I tapped these wires for the right rear woofer: (+) Red/Purple and (-) Brown/Purple. This is me soldering the connections on the passenger side.


Here it is all sealed up with shrink tubing, and a little electrical tape to food measure. The route to the hatch was easy, since it was a straight shot back under the trim.


Exact same drill on the drivers side, except I tapped (+) Red/White and (-) Brown/White for the left rear woofer. From the drivers side, I just followed the same path to the hatch that I used for the power cable.


Here are all the wires now, all spooled up in the trunk waiting for hook up.


I get the amp early next week, and I have another 10" JL sub in an enclosure that I can use to test with.

One note about length for the power wire. The wiring kit I picked up had 16.5' of power wire. That was the absolute minimum. All I have sticking out in the hatch is what you see in the pic above, and there is not much for slack anywhere. If it was 16' it would have been too close, and maybe too short. If you are locating your amp in the same corner of your hatch, this is definitely a thing to be aware of since many kits have 16' of power wire.

Overall, it's not that bad of job. The worst part was getting at the speaker wires to tap them.
 
Last edited:

veedoubleme

Go Kart Champion
I ran the last wire today. I had also ordered the JL Audio Remote Level Control so I can adjust the sub volume on the fly. I realized I forgot to run an RJ-11 phone line from the blank switch panels in front of the shifter to the back where the amp goes.

A 15' phone line was long enough with about 1-2' to spare. I ran it from the switch panel and cut across under/behind the glove box, and then followed the trim along the floor again to the back of the car.

The sub is already at my work, so I'll have that tomorrow. The tracking number on the amp says it's due in on Tuesday. I should be able to wire it up for testing then! :thumbsup:
 

bshappy

Ready to race!
So because you tapped into the 12v outlet in the trunk will the sub go on and off with the car, or do you manually have to switch it on and off?
 

vdubstep59

Ready to race!
curious to see this progress! i wanted to do something similar but my skills are weak, props for tryin it out!
 

veedoubleme

Go Kart Champion
So because you tapped into the 12v outlet in the trunk will the sub go on and off with the car, or do you manually have to switch it on and off?

The 12v outlet in the trunk goes off with the car. :thumbsup:

curious to see this progress! i wanted to do something similar but my skills are weak, props for tryin it out!

It's not as hard as you think. Just give yourself lots of time and go slow. It really helped me that I didn't have the amp/sub to play with. It's easy to get antsy and start rushing because you want to hear it. It was nice to not be in any sort of rush and to just do everything right.

I installed this in my Corvette with my HD900/5 and highly recommend it, makes life much easier. :thumbsup:

I agree. I've never used one before until I upgraded there stereo in my F150, and now I don't think I'd ever do it any other way.
 

veedoubleme

Go Kart Champion
As I had hoped, this was waiting for me at work. Label on the box seems fitting for a German engineered GTI. Quality appears to be very good, as expected. Can't try it out for a couple of weeks though — waiting for Nik to build my box. :D
 

Attachments

  • IMG_0864.jpg
    IMG_0864.jpg
    308.7 KB · Views: 1,297
  • IMG_0865.jpg
    IMG_0865.jpg
    364 KB · Views: 1,347
  • IMG_0867.jpg
    IMG_0867.jpg
    381.7 KB · Views: 1,328

Credit

Ready to race!
How did you remove the trim pieces running along the door sill? I tried removing them but I was using so much force I was afraid I'd break it.
 

veedoubleme

Go Kart Champion
How did you remove the trim pieces running along the door sill? I tried removing them but I was using so much force I was afraid I'd break it.

Yeah, it definitely feels that way. To top it off, there are metal tabs that make really nasty creaking noises as you put it all up. It sounds like you are breaking it. Just go slow, straight up, and it will take some good force. Some of the metal clips may stay stuck in the car body, so if that happens you'll have to pop them out with a screwdriver/pliers.

It's once piece all the way to the back seat, so when you get to the B pillar, it pulls out toward the opposite side of the car. When you get to the trim on the back door sill, you have to pull up again, slowly.
 

veedoubleme

Go Kart Champion
Today I installed the JL Audio Remote Level Control knob. I suspected it would be a little tricky, and it was. I really wanted it to be on the far right switch blank in front of the shifter. As I looked around, it would be the most natural for me to reach to, and it would look good there.

It's easy to get in there too. Just pull up on the leather around the shifter and the trim surrounding the shifter pops loose with little effort. Just in front there are two torx screws to undo, and then you slowly lift out the coin tray while unplugging the traction control button and the 12v outlet.


If you look at the pic of the knob in the above link, it's attached to a small black box that holds the electronics and wiring. That small black box will not fit behind a switch plate. I decided to perform liposuction on it. There are two small screws on the to bottom. If you undo the screws, you can pull the circuitry out, and it looks like this (the VW switch blank is behind it).


The next trick was to get it to be centered. I would not accept it being off to one side, or for/aft the center. I drilled a hole smack dab in the middle, knowing it wouldn't actually fit there without help. I had to cut the inner wall of the switch plate a little bit with a razor to allow the circuit board to wedge into it. I couldn't it square to the plate, because then I'd have to cut in and remove one or two of the 4 clips that holds the blank in place. At this angle, it fits perfectly, and you can see the clip is just under the board, still functional and in place.


Next in line for trimming was the actual coin tray piece that holds the switch blanks. Since the little JL circuit board sticks out, it hits the tray and won't let the switch blank be installed. I only had to trim out a tiny bit with a razor. I outlined it below in red.


Flipped it over, and SUCCESS! It looks perfect!


Put in place, it looks like it's supposed to be there, and not like I installed some stupid knob. It has a nice finish to it that really matches the OEM plastic. When I stuck the knob on, I made sure to orient it so the little hash mark is sitting at 0 in the pic. All the way up is in the same position on the other side.


The amp comes tomorrow, and I have a sub to test it all with! :happyanim:
 
Last edited:
Top