TRBODSL
New member
Hey guys, new to the forum here! I'll start by saying thanks to all the users who gave me the info I needed to piece together my complete speaker upgrade. Thought I'd put it all together and share my experience for anyone who is looking to do do the same.
I love my 2011 TDI, but like a lot of you, felt that the stock speakers were terrible. I kept the RCD-510 head unit, but ditched the rest. I replaced all of the speakers and added a sub, complete with underfloor enclosure I built from scratch (twice). I installed Infinity Reference 6030cs 6-1/2"/6-3/4" 2-Way Component speakers in all 4 doors (on sale buy one, get one free on Crutchfield), with the crossovers in the sub/amp enclosure. I read that installing the crossovers in the doors is not ideal, due to moisture problems, and knocking circuitry loose from constantly closing the door. I used the Rockford Fosgate PBR300X1 for the sub. This took me about 3 solid weekends, not including building the box - so prepare yourself! (I started this install at the end of last year, but just now got around to posting)
I'll start with the sub box, since I did that first. I really liked the Uber-Stealth underfloor box, but I wanted to integrate everything, including the amp into one box, AND use a 10" sub AND keep the spare tire! This was extremely challenging - so much so that I had to throw the first one away because by the time I got it to fit in the hatch, there wasn't enough room for the sub! Anyway, through much trial and error, I made it work, but it is an extremely tight fit!

IMG_1089 by trbodsl, on Flickr
I started by using the foam piece as a template, but as you can see, there is a lot of wasted space around the tire. I made a new template with a hole just big enough to get the tire in and out to maximize the box area. I also had to add some width to the sides in order to fit the speaker in the upper right corner where the jack is (there is more room here for the sub).
IMG_1139 by trbodsl, on Flickr
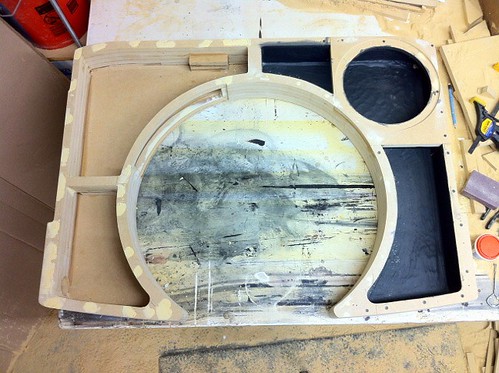
Box in progress with 2 coats of eDead. I modeled the this in 3D and the sub portion is right around 0.5 cubic feet - just what is needed for the sub. The top left section is for the amp (I had to build up a section at the top to make the notch for the seat hinge bracket). The bottom left is for the jack and tools.

IMG_1140 by trbodsl, on Flickr
Rectangular hole in tire well for ventilation of the amp.
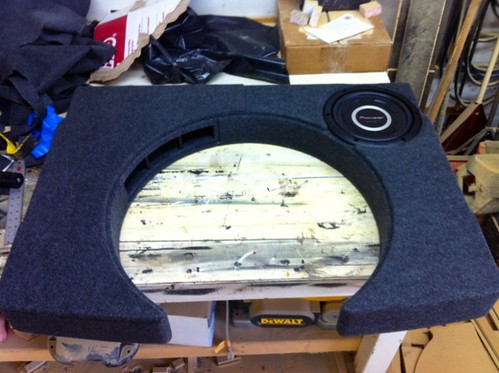
IMG_1150 by trbodsl, on Flickr
Almost finished with sub installed. I chose the Pioneer TS-SW2501S2 sub because it was the ONLY 10" sub that would fit, and the 2 ohm impedance maximizes the tiny amp's power.

IMG_1152 by trbodsl, on Flickr
Seat bracket recess on underside.
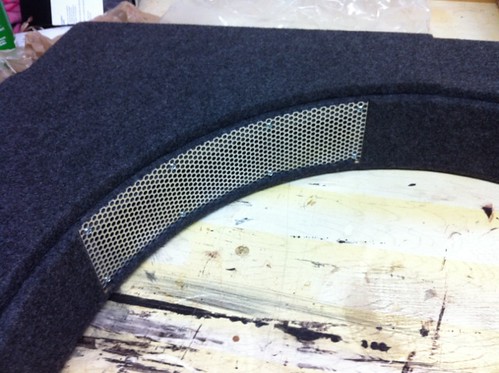
IMG_1160 by trbodsl, on Flickr
Perforated aluminum grille for ventilation. (I decided to paint it black, which you will see later)
Finally, the install...I started with the head unit and worked my way back. I purchased the Skoda VW MERC BMW Parrot Bluetooth ISO lead SOT-976 (200683222461) to bypass the factory speaker harness without tapping or damaging any of the stock wiring. I bought one on ebay for about $15. Using a trim removal tool, or if a small putty knife you can carefully pry off the trim bezel around the head unit. Then loosen the 4 bolts that hold it in. Pull the head unit out, and flip the lever back that holds the wiring harness in. There are several individual harnesses within the large holder. This makes it very convenient to pop out just the speaker wire harness section and replace it with the one from the Parrot set (this is really all you need from it). This way, If for some reason you ever want to go back to stock, you can just put the old one back in.

IMG_1175 by trbodsl, on Flickr
Parrot wiring harness

IMG_1177 by trbodsl, on Flickr
Remove speaker wire harness (the one with the green, purple, white and gray wires).

IMG_1181 by trbodsl, on Flickr
Speaker harness removed (throw away the rest if you'd like).

IMG_1183 by trbodsl, on Flickr
Remove speaker wire harness from stock harness (the orange one).

IMG_1184 by trbodsl, on Flickr
Replace it with the new harness, making sure it is oriented properly to match up with the correct speaker channels.
I installed the Rockford Fosgate PEQ Amp Remote Control in one of the dead buttons in the center console.

IMG_1215 by trbodsl, on Flickr
I could not center the knob because it's such a tight fit.

IMG_1214 copy by trbodsl, on Flickr
Had to notch out the side to make room for protruding solder points
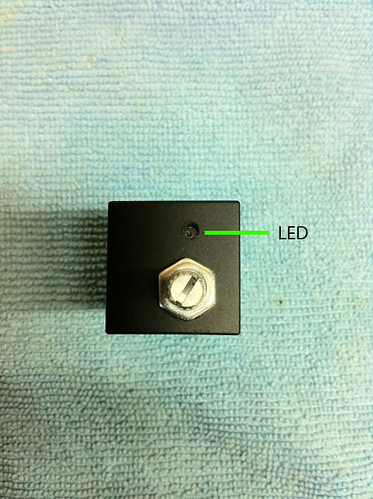
IMG_1218 copy by trbodsl, on Flickr
Drilled hole for knob and LED. (In hindsight, I think I would have removed the LED and not drilled the hole for it. All it does is tell you the AMP is "on" - which it always is if the head unit is on, and the blue color clashes with the stock red lighting.)

IMG_1228 by trbodsl, on Flickr
Installed
I purchased the Streetwires "super cable", which has all 4 channels plus a turn on wire in one tube, to run all the way to the back to the crossovers. This will also make it easy to add an amp to the speakers later if I decide to. I ran the speaker wire down the right side of the car under the carpet, and the amp power wire down the left side to avoid interference.

IMG_1187 by trbodsl, on Flickr
Speaker wire. This 20' long, which is BARELY long enough to reach the back of the car.
I purchased 2-channel 16 ga. "in-wall" speaker wire from The Home Depot to run back from the crossovers to the speakers. This wire has 4 wires in one sheath - a pair for the tweeter and a pair for the woofer. It took almost 80 FEET of wiring to reach all 4 doors!

IMG_1189 by trbodsl, on Flickr
Speaker wire running to front passenger door. Removed door harness and fished wire through with an unfolded wire coat hanger.
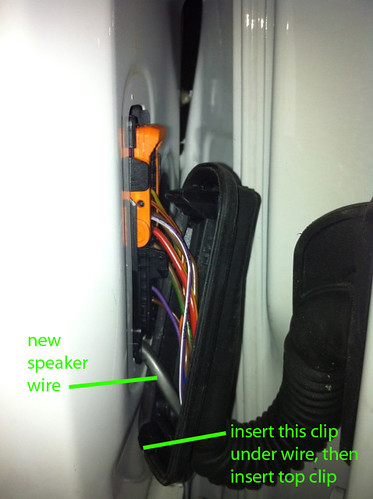
IMG_1190 copy by trbodsl, on Flickr
I have seen some photos where people actually drilled a hole through the door harness to run the speaker wire through. I found that there is actually just enough of a gap at the bottom to fit the wire through, but it takes quite a bit of effort to get the cover to snap back on.
After running the wiring, and installing the woofers, I replaced the tweeters in the factory housing.

IMG_1191 copy by trbodsl, on Flickr
The factory tweeters are "riveted" on to the plastic grille with plastic "rivets". I carefully drilled them out and cut them off with a knife. Unfortunately, this leaves no good way to mount the new tweeters in. The Infinity tweeters come with a variety of mounts, one of which has 3 tabs that are meant to be surface mounted, or snapped off. Using this mount, I bent the tabs forward just enough to wedge it into the foam baffle. This actually worked quite well, surprisingly (they are still intact 10 months later).

IMG_1194 by trbodsl, on Flickr
View of door with woofer and tweeter installed.
Now on to the sub enclosure....
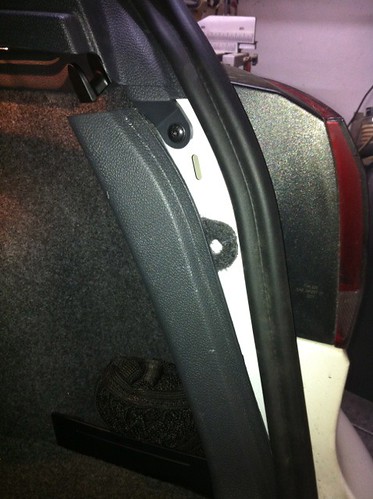
Carefully pry off door sill trim, starting at the top and working down. There are about a million clips holding this thing on!
IMG_1225 by trbodsl, on Flickr

IMG_1212 copy by trbodsl, on Flickr
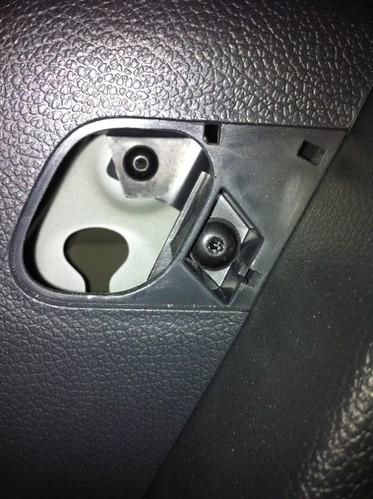
Be extra careful when you get to the bottom part near the latch - you can see where I broke one of the clips

IMG_1224 copy by trbodsl, on Flickr
To remove the trim, you have to fold down the rear seat, and pry off the cover in the center of the photo - this is the passenger side by the way.
IMG_1223 by trbodsl, on Flickr
Here you can see the 2 screws you have to remove.
After trim is removed, you can fold back felt carpeting on the sides. In order to get the new box in, I had to remove the tie-down hook on the left side (this is why the foam insert is in 2 pieces).

IMG_1207 copy by trbodsl, on Flickr
Remove left hook. (This is actually how I reinstalled it after installing the box)
IMG_1196 by trbodsl, on Flickr
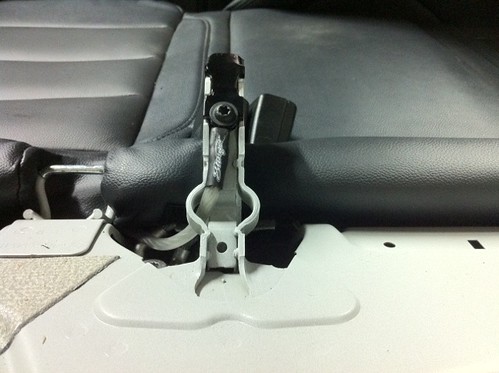
This is the seat mounting bracket (with cover removed) that I had to make the recessed notch for. I used this to attach my amp ground wire before installing the box.
Now just install components!

_DSC0166 by trbodsl, on Flickr
Crossovers and amp installed. Jack and tools stored.

_DSC0161 by trbodsl, on Flickr
Finished!
Note: If you want to be REALLY stealth, the factory trunk "floor" can be installed on top of the box with little to no distortion of the sub, unless you are really cranking it up. I planned to install a grill over the sub, but the Pioneer grille is 2" tall! I worried about things sitting directly on top of the sub, but many grocery items have ended up on top of it and not caused any damage. Fortunately, the woofer cone is made of rigid polycarbonate so it is pretty tough!
I couldn't be happier with the sub and amp, the pack a huge punch for such a small package! The Infinity speakers are much better than the stock speakers, but still leave a bit to be desired. Highs are good, almost too "bright", and midrange is lacking. I found that setting the EQ on the head unit to "flat" provides the best sound.
I love my 2011 TDI, but like a lot of you, felt that the stock speakers were terrible. I kept the RCD-510 head unit, but ditched the rest. I replaced all of the speakers and added a sub, complete with underfloor enclosure I built from scratch (twice). I installed Infinity Reference 6030cs 6-1/2"/6-3/4" 2-Way Component speakers in all 4 doors (on sale buy one, get one free on Crutchfield), with the crossovers in the sub/amp enclosure. I read that installing the crossovers in the doors is not ideal, due to moisture problems, and knocking circuitry loose from constantly closing the door. I used the Rockford Fosgate PBR300X1 for the sub. This took me about 3 solid weekends, not including building the box - so prepare yourself! (I started this install at the end of last year, but just now got around to posting)
I'll start with the sub box, since I did that first. I really liked the Uber-Stealth underfloor box, but I wanted to integrate everything, including the amp into one box, AND use a 10" sub AND keep the spare tire! This was extremely challenging - so much so that I had to throw the first one away because by the time I got it to fit in the hatch, there wasn't enough room for the sub! Anyway, through much trial and error, I made it work, but it is an extremely tight fit!
IMG_1089 by trbodsl, on Flickr
I started by using the foam piece as a template, but as you can see, there is a lot of wasted space around the tire. I made a new template with a hole just big enough to get the tire in and out to maximize the box area. I also had to add some width to the sides in order to fit the speaker in the upper right corner where the jack is (there is more room here for the sub).
IMG_1139 by trbodsl, on Flickr
Box in progress with 2 coats of eDead. I modeled the this in 3D and the sub portion is right around 0.5 cubic feet - just what is needed for the sub. The top left section is for the amp (I had to build up a section at the top to make the notch for the seat hinge bracket). The bottom left is for the jack and tools.
IMG_1140 by trbodsl, on Flickr
Rectangular hole in tire well for ventilation of the amp.
IMG_1150 by trbodsl, on Flickr
Almost finished with sub installed. I chose the Pioneer TS-SW2501S2 sub because it was the ONLY 10" sub that would fit, and the 2 ohm impedance maximizes the tiny amp's power.
IMG_1152 by trbodsl, on Flickr
Seat bracket recess on underside.
IMG_1160 by trbodsl, on Flickr
Perforated aluminum grille for ventilation. (I decided to paint it black, which you will see later)
Finally, the install...I started with the head unit and worked my way back. I purchased the Skoda VW MERC BMW Parrot Bluetooth ISO lead SOT-976 (200683222461) to bypass the factory speaker harness without tapping or damaging any of the stock wiring. I bought one on ebay for about $15. Using a trim removal tool, or if a small putty knife you can carefully pry off the trim bezel around the head unit. Then loosen the 4 bolts that hold it in. Pull the head unit out, and flip the lever back that holds the wiring harness in. There are several individual harnesses within the large holder. This makes it very convenient to pop out just the speaker wire harness section and replace it with the one from the Parrot set (this is really all you need from it). This way, If for some reason you ever want to go back to stock, you can just put the old one back in.
IMG_1175 by trbodsl, on Flickr
Parrot wiring harness
IMG_1177 by trbodsl, on Flickr
Remove speaker wire harness (the one with the green, purple, white and gray wires).
IMG_1181 by trbodsl, on Flickr
Speaker harness removed (throw away the rest if you'd like).
IMG_1183 by trbodsl, on Flickr
Remove speaker wire harness from stock harness (the orange one).
IMG_1184 by trbodsl, on Flickr
Replace it with the new harness, making sure it is oriented properly to match up with the correct speaker channels.
I installed the Rockford Fosgate PEQ Amp Remote Control in one of the dead buttons in the center console.
IMG_1215 by trbodsl, on Flickr
I could not center the knob because it's such a tight fit.
IMG_1214 copy by trbodsl, on Flickr
Had to notch out the side to make room for protruding solder points
IMG_1218 copy by trbodsl, on Flickr
Drilled hole for knob and LED. (In hindsight, I think I would have removed the LED and not drilled the hole for it. All it does is tell you the AMP is "on" - which it always is if the head unit is on, and the blue color clashes with the stock red lighting.)
IMG_1228 by trbodsl, on Flickr
Installed
I purchased the Streetwires "super cable", which has all 4 channels plus a turn on wire in one tube, to run all the way to the back to the crossovers. This will also make it easy to add an amp to the speakers later if I decide to. I ran the speaker wire down the right side of the car under the carpet, and the amp power wire down the left side to avoid interference.
IMG_1187 by trbodsl, on Flickr
Speaker wire. This 20' long, which is BARELY long enough to reach the back of the car.
I purchased 2-channel 16 ga. "in-wall" speaker wire from The Home Depot to run back from the crossovers to the speakers. This wire has 4 wires in one sheath - a pair for the tweeter and a pair for the woofer. It took almost 80 FEET of wiring to reach all 4 doors!
IMG_1189 by trbodsl, on Flickr
Speaker wire running to front passenger door. Removed door harness and fished wire through with an unfolded wire coat hanger.
IMG_1190 copy by trbodsl, on Flickr
I have seen some photos where people actually drilled a hole through the door harness to run the speaker wire through. I found that there is actually just enough of a gap at the bottom to fit the wire through, but it takes quite a bit of effort to get the cover to snap back on.
After running the wiring, and installing the woofers, I replaced the tweeters in the factory housing.
IMG_1191 copy by trbodsl, on Flickr
The factory tweeters are "riveted" on to the plastic grille with plastic "rivets". I carefully drilled them out and cut them off with a knife. Unfortunately, this leaves no good way to mount the new tweeters in. The Infinity tweeters come with a variety of mounts, one of which has 3 tabs that are meant to be surface mounted, or snapped off. Using this mount, I bent the tabs forward just enough to wedge it into the foam baffle. This actually worked quite well, surprisingly (they are still intact 10 months later).
IMG_1194 by trbodsl, on Flickr
View of door with woofer and tweeter installed.
Now on to the sub enclosure....
Carefully pry off door sill trim, starting at the top and working down. There are about a million clips holding this thing on!
IMG_1225 by trbodsl, on Flickr
IMG_1212 copy by trbodsl, on Flickr
Be extra careful when you get to the bottom part near the latch - you can see where I broke one of the clips
IMG_1224 copy by trbodsl, on Flickr
To remove the trim, you have to fold down the rear seat, and pry off the cover in the center of the photo - this is the passenger side by the way.
IMG_1223 by trbodsl, on Flickr
Here you can see the 2 screws you have to remove.
After trim is removed, you can fold back felt carpeting on the sides. In order to get the new box in, I had to remove the tie-down hook on the left side (this is why the foam insert is in 2 pieces).
IMG_1207 copy by trbodsl, on Flickr
Remove left hook. (This is actually how I reinstalled it after installing the box)
IMG_1196 by trbodsl, on Flickr
This is the seat mounting bracket (with cover removed) that I had to make the recessed notch for. I used this to attach my amp ground wire before installing the box.
Now just install components!
_DSC0166 by trbodsl, on Flickr
Crossovers and amp installed. Jack and tools stored.
_DSC0161 by trbodsl, on Flickr
Finished!
Note: If you want to be REALLY stealth, the factory trunk "floor" can be installed on top of the box with little to no distortion of the sub, unless you are really cranking it up. I planned to install a grill over the sub, but the Pioneer grille is 2" tall! I worried about things sitting directly on top of the sub, but many grocery items have ended up on top of it and not caused any damage. Fortunately, the woofer cone is made of rigid polycarbonate so it is pretty tough!
I couldn't be happier with the sub and amp, the pack a huge punch for such a small package! The Infinity speakers are much better than the stock speakers, but still leave a bit to be desired. Highs are good, almost too "bright", and midrange is lacking. I found that setting the EQ on the head unit to "flat" provides the best sound.