mikejsmith1985
Go Kart Champion
Touareg Brake Booster and Master Cylinder in a Mark 6 GTI
Disclaimer: I’m an idiot and can’t be trusted with the safety of you, your car, or your loved ones. Anything you do as a result of reading this “tutorial” is your fault and I take no blame for of the terrible awful bad things that may come from it.
At the time of writing this my car is still on jack stands and I haven’t had an opportunity to run the VCDS bleed procedure to make sure that the performance of this modification is worth the effort/time it takes to do it. If you have any questions about this install as long as I'm an active member send me a PM and I'll help you out how I can. The TT-RS/Golf R master cylinder thread is also a great resource for this as much of this process plays out there.
Some tools you’ll need/want: These are specific to the Booster/MC portion of the project. You should be familiar with what you need to remove the battery tray and intake on your car.
•13mm socket short and long
•12mm socket short and long
•12mm open end wrench
•Various length extensions
•Swivel joints may be handy but I didn’t use any
•Brake release tool – I used this one if there is a tool that is mirror image it would work better in the foot well of the GTI but this one gets the job done https://www.amazon.com/gp/product/B00VX0C2W0/ref=oh_aui_detailpage_o09_s00?ie=UTF8&psc=1
•Terminal pin release tool – I used this one https://www.amazon.com/gp/product/B007ZOMMT6/ref=oh_aui_detailpage_o06_s00?ie=UTF8&psc=1
•Various size/length flat head screw drivers if you also struggle to release VW wiring clips by hand
•Double flare tool – not required if you buy unions that are bubble flare (this is the only tool I could rent locally though)
•Bubble flare tool – (not required if you buy an adapter to go from your brake line fitting to the MC and use double flare unions… which I did)
•Tube bender for the brake lines
•Fluid extractor
•Rags and pee pads (like for training dogs to go to the bathroom) these are absorbent on one side with a plastic liner that keeps fluid from getting all the way through I use them all the time for oil changes and what not to minimize clean up.
Parts: I used a Touareg MC and booster from a European car that was RHD in attempt to use the original brake lines… that didn’t work out so you can likely use a US Booster and MC and the only difference will be that you may have to lengthen the wires for the brake light switch instead of just re-pinning them, and you’ll route your brake lines differently than I did.
•Search the European eBay site for “7L6612101A” you should find a packaged brake booster and master cylinder with reservoir and it will likely be from a mid-2000s 2.5 TDI Touareg. All Touareg models came with the 26.99CM MC which is the sole purpose of this endeavor.
•Unions for 1/4” brake line: I used these https://www.amazon.com/gp/product/B01KNGVDUG/ref=oh_aui_detailpage_o06_s00?ie=UTF8&psc=1
•Brake line: the simplest solution: buy 2 12” sections of copper nickel 3/8” brake line. My local shops carried 8” sections only but they sell these that will thread into your 1/4” union on one side and on the other it will thread into an m10 to m12 bubble fitting. Which converts your double flare line to be compatible with your bubble flare MC. If you do this the only line you must flare is the vehicle lines which even that could be avoided depending on how clean you want your lines but this write up is about how I did it not the infinite possibilities that exist…
•Brake line: less simple, but what I did buy 30” of 3/8” copper nickel line or steal if you want to fight with getting the right bends. You’ll use some of the extra fittings that come in the next item
•Fittings: I bought these- you’ll use 2 fittings on the hard lines at the fire wall to thread you’re your unions and you’ll use two of the red fittings so that you can reduce you’re your union to the 3/8 line and you may or may not need additional fittings based on how you connect to the MC.https://www.amazon.com/gp/product/B015YGR412/ref=oh_aui_detailpage_o06_s00?ie=UTF8&psc=1
•Vacuum hose, you’ll have to bridge from 3/8” to 1/2” line I bought 2’ of each and that was plenty. I’m currently using “fuel line” but will likely upgrade in the future to a polyethylene as that’s more like what was used from the factory, plus it will allow me to add another touch of Red to my engine bay.
•Clamps for your vacuum hose
•3/8-1/2 straight barbed fitting.
Notes: The potentiometer isn’t used but does have a seal to prevent vacuum leaks, the brake pressure switch also won’t be used and for a cleaner install I would recommend removing it from the MC and plugging it before starting the install process.
You will need to modify your battery tray and move to a smaller form factor battery. I'll share pictures and details of my setup and probably a separate DIY for that process.
Useful Links:
A video of someone removing a booster and demonstrating how to use the brake release tool
https://www.youtube.com/watch?v=wGiBXD_dKSk
This link is great for cross referencing parts or looking things up like the gasket between the MC and the booster if you remove the MC and don't want to reuse the gasket (~$10 each)
http://realoem.me
Instructions: These are not all inclusive, the bulk of my work resulted in 30 mins increments with updates after nearly every working segment in the TT-RS/Golf R master cylinder thread. Start reading at post #243 if you’d like to see the entire process unfold.
1.If you want to get this done in a single day/weekend attain all the parts before you get started
2.Remove your intake, battery, battery tray so you have full access to the components you’re swapping.
3.Lay down some pee pads to catch any fluid you may spill or drip on the trans and wiring harnesses.
4.Remove the connector to the fluid reservoir cap, and if you can reach it also undo the connector from the brake light switch. I was able to take these and fold them over the firewall and use my driver’s side wiper to hold them up there.
5.Pull the reservoir cap off carefully and set it somewhere safe NOT ON YOUR PAINT
6.Use the fluid extractor to remove as much of the fluid from the MC reservoir as you can, and disconnect the hard lines coming in. prepare a zip lock bag or maybe a 12ishmm vacuum cap for each line to minimize drips.
7.You’ll notice a hard-plastic hose arching from a small vacuum manifold on your motor to the booster. You can’t save it so don’t try go ahead and cut it like you’re never looking back.
8.Connectors and hoses disconnected and fluid empty you may now remove the whole assembly, if you couldn’t remove the brake light switch connector then you’ll either need to remove the 2 nuts and pull the MC so you can easily access that or you need to use torx bit to remove the whole sensor from the MC.
9.To remove the booster, move your steering wheel as far up as the column will allow and move your driver seat as far back as you can to give you the most room to work. You’ll want a flashlight or something to maximize your ability to see while you work.
10.Use the brake release tool to pop the rod out of the back of your pedal.
11.There are 4studs with 13mm nuts coming through your firewall. The bottom two have small locking metal discs holding foam over the studs. You can use a pair of pliers or a flat head to pry/spin these off they’re a bit of a PITA but you’ll get them and if you break them you can just pick up another nut with a washer to serve the same purpose later.
12.Fold back the foam and tuck it into any nook cranny you can w/o damaging it to free up access to the 4 nuts. Use your various combination of swivels, extensions, short, and long sockets to remove these 4 nuts, and you should be able to go to the engine bay and pull the unit out.
13.I pulled both MCs off the boosters for comparison, getting the Touareg booster in place was a bear you may find that it is necessary to remove the MC to wedge this guy in. I found that removing the DSG filter housing and filter was necessary to get it in. Do make sure you cover this as you don’t want to drop anything in there!
a.You may think that you want to remove the potentiometer or the brake light switch from the booster for some reason like confirming part #s or cleaning up the appearance as the potentiometer isn’t used. Don’t do it… just don’t…
14.Once you’ve muscled the booster into place you can hop back in the car and replace the 4 13mm nuts, the foam and the little locking discs if you didn’t destroy them removing them.
15.Back to the engine bay while you could have done this a little easier with the booster and MC out you can now see how everything lines up and decide on where you want to cut the lines and add your unions. Keep in mind you need a few inches of straight line to account for the fitting and the flare you’ll have to make, don’t forget to put the fitting on before you flare!
16.With your hard lines marked you can cut your brake lines, install your fittings, flare your ends and install your unions.
17.Finish removing the hard-plastic lines from the vacuum manifold on the block, I used a utility knife with a fresh blade to carefully split the hose all the way up the length of the barbed fitting.
18.Use your 3/8” hose off that manifold with a clamp and your 1/2” hose off the booster with a clamp. Pick where you want the union, cut the hose and insert that 1/2” to 3/8” barbed reducer and clamp it all in place. Or whatever solution you plan to use for your vacuum hose. A hard-plastic line may be safer some people have had no issues long term with the fuel line, but it’s your car and your safety you make the decision for yourself!
19.Now use the brake lines and fittings you chose and hook up the MC to the unions you created in step 16.
20.You’ve successfully finished all the mechanical components of the install, nice work!
21.Start electrical work
22.You’ll need to either trim the locking pin of the GTI fluid cap or swap the whole reservoir from the GTI over to the Touareg. The Touareg sends the opposite signal so a full reservoir results in a brake light (and it requires a re-pin like the brake light switch)
23.You’ll need to de-pin the 4-pin connector from the GTI harness that went to the brake light switch, this will be very important that you get it right so make sure you know which wire came from which pin. De-pin the 6-pin pig tail from the Touareg brake light switch (only 5 wires)
24.Now to the critical point of this you need to Take PIN 4 (constant 12v) from your wire harness and put it into PIN 3 of the Touareg connector, Take PIN 2 (constant ground) from your wire harness and put it into PIN 1 of the Touareg connector, Take PIN 3 from your harness and put it into PIN 2 of the Touareg connector, Take PIN 1 from your harness and put it into PIN 4 of the Touareg connector. PIN 5 and PIN 6 from the Touareg connector won’t be used. When you plug this in and turn the car on the brake lights should be off, when you depress the pedal they should be on. If you don’t have this result then re check your wiring and possibly the fuses, or you need to go through and check continuity on each pin of the sensor you have and if you find a variance from my drawings then you will need to adjust your wiring accordingly.
25.Bleed the system (plan on needing a VCDS ABS Pump bleeding but if you do this over the course of a single day you may not need to. My system was open for weeks.
26.You should be ready for your first test drive!
CONGRATULATIONS!
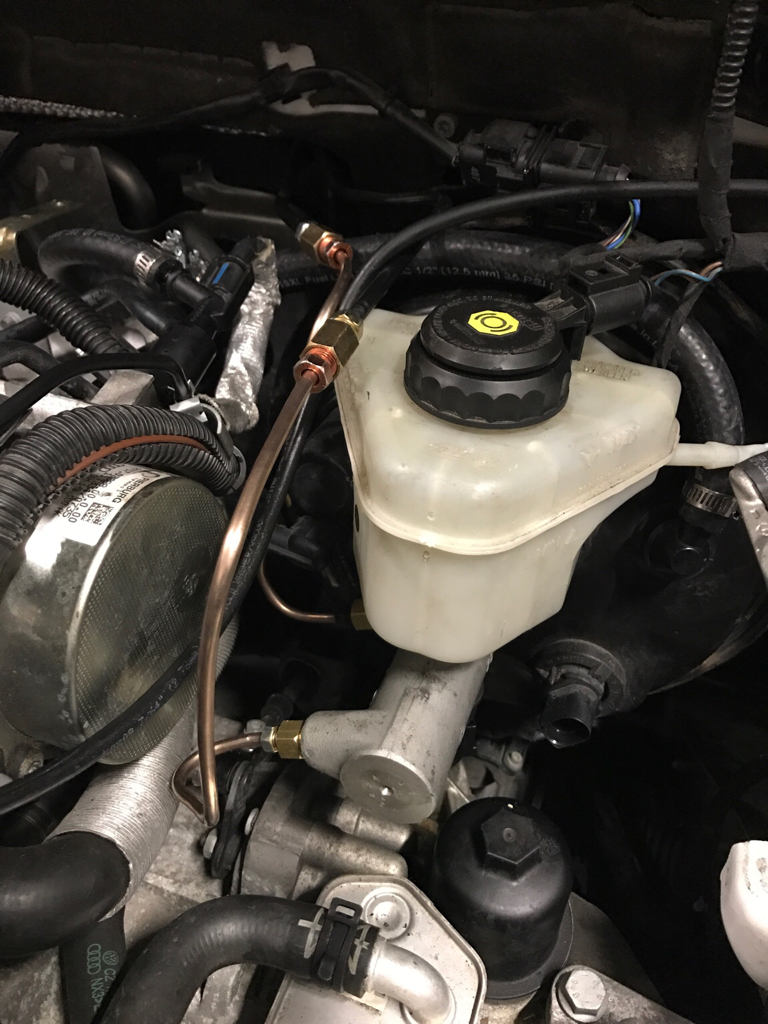
Final installed pic of my booster and MC.

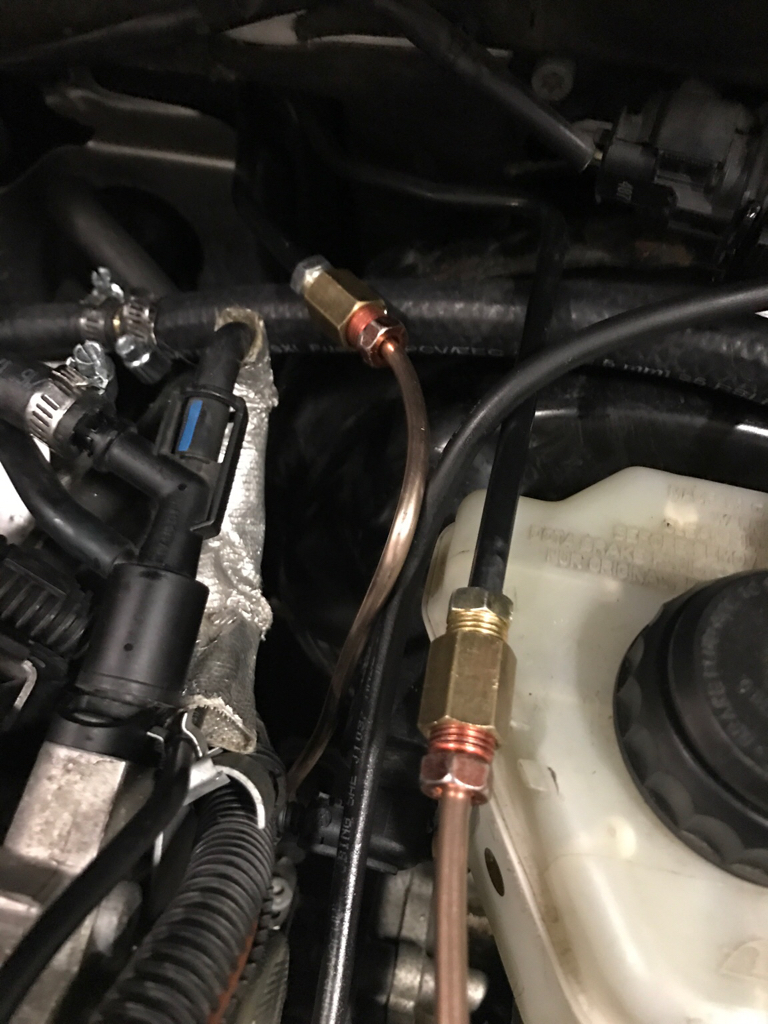
Pics of the brake lines when I completed that piece.
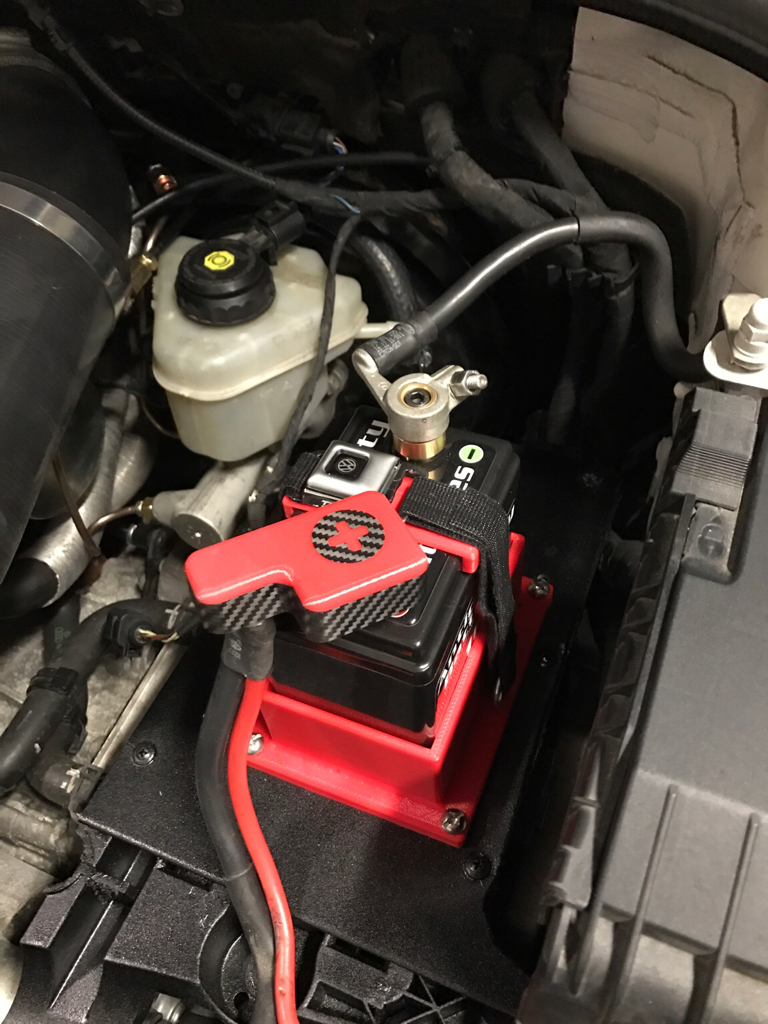
Pics of my final battery and battery tray modifications.


Disclaimer: I’m an idiot and can’t be trusted with the safety of you, your car, or your loved ones. Anything you do as a result of reading this “tutorial” is your fault and I take no blame for of the terrible awful bad things that may come from it.
At the time of writing this my car is still on jack stands and I haven’t had an opportunity to run the VCDS bleed procedure to make sure that the performance of this modification is worth the effort/time it takes to do it. If you have any questions about this install as long as I'm an active member send me a PM and I'll help you out how I can. The TT-RS/Golf R master cylinder thread is also a great resource for this as much of this process plays out there.
Some tools you’ll need/want: These are specific to the Booster/MC portion of the project. You should be familiar with what you need to remove the battery tray and intake on your car.
•13mm socket short and long
•12mm socket short and long
•12mm open end wrench
•Various length extensions
•Swivel joints may be handy but I didn’t use any
•Brake release tool – I used this one if there is a tool that is mirror image it would work better in the foot well of the GTI but this one gets the job done https://www.amazon.com/gp/product/B00VX0C2W0/ref=oh_aui_detailpage_o09_s00?ie=UTF8&psc=1
•Terminal pin release tool – I used this one https://www.amazon.com/gp/product/B007ZOMMT6/ref=oh_aui_detailpage_o06_s00?ie=UTF8&psc=1
•Various size/length flat head screw drivers if you also struggle to release VW wiring clips by hand
•Double flare tool – not required if you buy unions that are bubble flare (this is the only tool I could rent locally though)
•Bubble flare tool – (not required if you buy an adapter to go from your brake line fitting to the MC and use double flare unions… which I did)
•Tube bender for the brake lines
•Fluid extractor
•Rags and pee pads (like for training dogs to go to the bathroom) these are absorbent on one side with a plastic liner that keeps fluid from getting all the way through I use them all the time for oil changes and what not to minimize clean up.
Parts: I used a Touareg MC and booster from a European car that was RHD in attempt to use the original brake lines… that didn’t work out so you can likely use a US Booster and MC and the only difference will be that you may have to lengthen the wires for the brake light switch instead of just re-pinning them, and you’ll route your brake lines differently than I did.
•Search the European eBay site for “7L6612101A” you should find a packaged brake booster and master cylinder with reservoir and it will likely be from a mid-2000s 2.5 TDI Touareg. All Touareg models came with the 26.99CM MC which is the sole purpose of this endeavor.
•Unions for 1/4” brake line: I used these https://www.amazon.com/gp/product/B01KNGVDUG/ref=oh_aui_detailpage_o06_s00?ie=UTF8&psc=1
•Brake line: the simplest solution: buy 2 12” sections of copper nickel 3/8” brake line. My local shops carried 8” sections only but they sell these that will thread into your 1/4” union on one side and on the other it will thread into an m10 to m12 bubble fitting. Which converts your double flare line to be compatible with your bubble flare MC. If you do this the only line you must flare is the vehicle lines which even that could be avoided depending on how clean you want your lines but this write up is about how I did it not the infinite possibilities that exist…
•Brake line: less simple, but what I did buy 30” of 3/8” copper nickel line or steal if you want to fight with getting the right bends. You’ll use some of the extra fittings that come in the next item
•Fittings: I bought these- you’ll use 2 fittings on the hard lines at the fire wall to thread you’re your unions and you’ll use two of the red fittings so that you can reduce you’re your union to the 3/8 line and you may or may not need additional fittings based on how you connect to the MC.https://www.amazon.com/gp/product/B015YGR412/ref=oh_aui_detailpage_o06_s00?ie=UTF8&psc=1
•Vacuum hose, you’ll have to bridge from 3/8” to 1/2” line I bought 2’ of each and that was plenty. I’m currently using “fuel line” but will likely upgrade in the future to a polyethylene as that’s more like what was used from the factory, plus it will allow me to add another touch of Red to my engine bay.
•Clamps for your vacuum hose
•3/8-1/2 straight barbed fitting.
Notes: The potentiometer isn’t used but does have a seal to prevent vacuum leaks, the brake pressure switch also won’t be used and for a cleaner install I would recommend removing it from the MC and plugging it before starting the install process.
You will need to modify your battery tray and move to a smaller form factor battery. I'll share pictures and details of my setup and probably a separate DIY for that process.
Useful Links:
A video of someone removing a booster and demonstrating how to use the brake release tool
https://www.youtube.com/watch?v=wGiBXD_dKSk
This link is great for cross referencing parts or looking things up like the gasket between the MC and the booster if you remove the MC and don't want to reuse the gasket (~$10 each)
http://realoem.me
Instructions: These are not all inclusive, the bulk of my work resulted in 30 mins increments with updates after nearly every working segment in the TT-RS/Golf R master cylinder thread. Start reading at post #243 if you’d like to see the entire process unfold.
1.If you want to get this done in a single day/weekend attain all the parts before you get started
2.Remove your intake, battery, battery tray so you have full access to the components you’re swapping.
3.Lay down some pee pads to catch any fluid you may spill or drip on the trans and wiring harnesses.
4.Remove the connector to the fluid reservoir cap, and if you can reach it also undo the connector from the brake light switch. I was able to take these and fold them over the firewall and use my driver’s side wiper to hold them up there.
5.Pull the reservoir cap off carefully and set it somewhere safe NOT ON YOUR PAINT
6.Use the fluid extractor to remove as much of the fluid from the MC reservoir as you can, and disconnect the hard lines coming in. prepare a zip lock bag or maybe a 12ishmm vacuum cap for each line to minimize drips.
7.You’ll notice a hard-plastic hose arching from a small vacuum manifold on your motor to the booster. You can’t save it so don’t try go ahead and cut it like you’re never looking back.
8.Connectors and hoses disconnected and fluid empty you may now remove the whole assembly, if you couldn’t remove the brake light switch connector then you’ll either need to remove the 2 nuts and pull the MC so you can easily access that or you need to use torx bit to remove the whole sensor from the MC.
9.To remove the booster, move your steering wheel as far up as the column will allow and move your driver seat as far back as you can to give you the most room to work. You’ll want a flashlight or something to maximize your ability to see while you work.
10.Use the brake release tool to pop the rod out of the back of your pedal.
11.There are 4studs with 13mm nuts coming through your firewall. The bottom two have small locking metal discs holding foam over the studs. You can use a pair of pliers or a flat head to pry/spin these off they’re a bit of a PITA but you’ll get them and if you break them you can just pick up another nut with a washer to serve the same purpose later.
12.Fold back the foam and tuck it into any nook cranny you can w/o damaging it to free up access to the 4 nuts. Use your various combination of swivels, extensions, short, and long sockets to remove these 4 nuts, and you should be able to go to the engine bay and pull the unit out.
13.I pulled both MCs off the boosters for comparison, getting the Touareg booster in place was a bear you may find that it is necessary to remove the MC to wedge this guy in. I found that removing the DSG filter housing and filter was necessary to get it in. Do make sure you cover this as you don’t want to drop anything in there!
a.You may think that you want to remove the potentiometer or the brake light switch from the booster for some reason like confirming part #s or cleaning up the appearance as the potentiometer isn’t used. Don’t do it… just don’t…
14.Once you’ve muscled the booster into place you can hop back in the car and replace the 4 13mm nuts, the foam and the little locking discs if you didn’t destroy them removing them.
15.Back to the engine bay while you could have done this a little easier with the booster and MC out you can now see how everything lines up and decide on where you want to cut the lines and add your unions. Keep in mind you need a few inches of straight line to account for the fitting and the flare you’ll have to make, don’t forget to put the fitting on before you flare!
16.With your hard lines marked you can cut your brake lines, install your fittings, flare your ends and install your unions.
17.Finish removing the hard-plastic lines from the vacuum manifold on the block, I used a utility knife with a fresh blade to carefully split the hose all the way up the length of the barbed fitting.
18.Use your 3/8” hose off that manifold with a clamp and your 1/2” hose off the booster with a clamp. Pick where you want the union, cut the hose and insert that 1/2” to 3/8” barbed reducer and clamp it all in place. Or whatever solution you plan to use for your vacuum hose. A hard-plastic line may be safer some people have had no issues long term with the fuel line, but it’s your car and your safety you make the decision for yourself!
19.Now use the brake lines and fittings you chose and hook up the MC to the unions you created in step 16.
20.You’ve successfully finished all the mechanical components of the install, nice work!
21.Start electrical work
22.You’ll need to either trim the locking pin of the GTI fluid cap or swap the whole reservoir from the GTI over to the Touareg. The Touareg sends the opposite signal so a full reservoir results in a brake light (and it requires a re-pin like the brake light switch)
23.You’ll need to de-pin the 4-pin connector from the GTI harness that went to the brake light switch, this will be very important that you get it right so make sure you know which wire came from which pin. De-pin the 6-pin pig tail from the Touareg brake light switch (only 5 wires)
24.Now to the critical point of this you need to Take PIN 4 (constant 12v) from your wire harness and put it into PIN 3 of the Touareg connector, Take PIN 2 (constant ground) from your wire harness and put it into PIN 1 of the Touareg connector, Take PIN 3 from your harness and put it into PIN 2 of the Touareg connector, Take PIN 1 from your harness and put it into PIN 4 of the Touareg connector. PIN 5 and PIN 6 from the Touareg connector won’t be used. When you plug this in and turn the car on the brake lights should be off, when you depress the pedal they should be on. If you don’t have this result then re check your wiring and possibly the fuses, or you need to go through and check continuity on each pin of the sensor you have and if you find a variance from my drawings then you will need to adjust your wiring accordingly.
25.Bleed the system (plan on needing a VCDS ABS Pump bleeding but if you do this over the course of a single day you may not need to. My system was open for weeks.
26.You should be ready for your first test drive!
CONGRATULATIONS!
Final installed pic of my booster and MC.
Pics of the brake lines when I completed that piece.
Pics of my final battery and battery tray modifications.
Last edited:
") If you're not local and you want to drive her and get help you're crazy and I don't want you to know where I live ;-) J/K let me know and we can work something out. All of this is of course contingent on my road tests being satisfactory, if they aren't then there is no reason to do this.
If you're not local and you want to drive her and get help you're crazy and I don't want you to know where I live ;-) J/K let me know and we can work something out. All of this is of course contingent on my road tests being satisfactory, if they aren't then there is no reason to do this.