speedster
Go Kart Champion
I just finished installing my Unibrace XB and thought I'd put together a quick tutorial. With some guidance from Bruce I did it without removing any trim or the seats which saved lots of time. I also installed the XB without removing the child seat tethers (LATCH) (sometimes called grocery bag hooks) which is a big plus if you need a child seat in the back.
After the install I took the car for a quick spin and all I can say is WOW! The rear end is so planted. Its amazing. It feels like a completely different car.
I highly recomment this mod to anyone interested in performance driving. Its important to know that this install does take patience and care since its hard to rectify a problem once you've started drilling into your car. Here the adage measure twice, cut once is particularly apt.
Before we get started please know that you do this mod completely at your own risk to both yourself and your car. I am in no way an expert in this area and am only sharing my own experience for other's information. If you feel uncomfortable doing this type of work get a professional to install the unibrace XB, as this does require some care and experience.
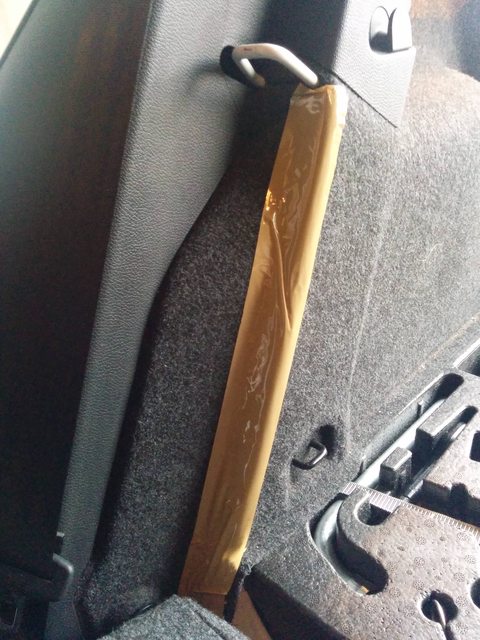
Here's my new Unibrace XB just after it was delivered. As many others have already said, the fit and finish is amazing. A really well constructed, high quality piece.

First step, clean out the back.

Place some tape over the area where the unibrace XB will be mounted.
Check fitment with the seats up. Ensure that the seats lock in place properly with your unibrace placement.
In my case I was also careful to ensure the unibrace cleared the child seat tethers.

Once you've determined the right placement use some bungies to keep the unibrace in place.

Fold the seats back down and mark the mounting points for the unibrace XB with a sharpie. Top

And bottom.

Put the unibrace to the side and use a craft knife to cut flaps at the mounting points.

If you just cut 3 sides the trim can be put back in place afterwards with some glue for a clean appearance.

Put the unibrace back in place, secure with bungees and check the fitment again.

Mark the center of the first mount point with a punch. Only do one mount point for now. We will do a single nutsert at a time and then fasten that mount before punching any more mount points. This increases the chance of getting a good fitment and as Bruce puts it, prevents the accumulation of errors.

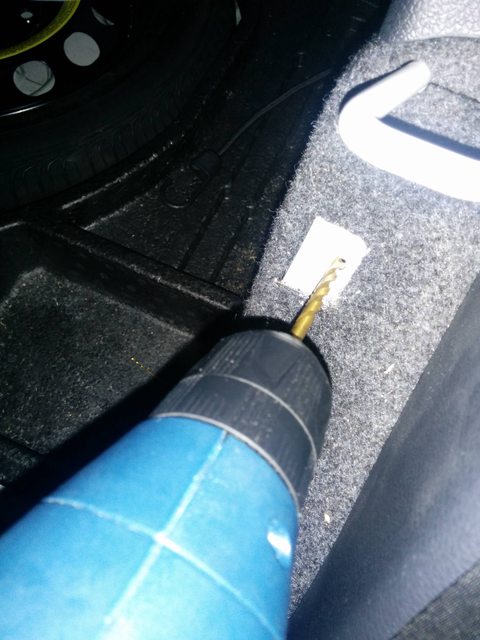
Drill a pilot hole, and then progressively work your way up to a 1/2" hole for the nutsert. I actually found it easier to do this in 5 steps, by gradually increasing the drill bit size each time. This was faster and led to a cleaner, more symmetrical hole. FYI for the top mount points I used only regular drill bits. For the bottom mount points the nutsert wouldn't go in as the hole was too small. I used a tappered drill bit to slightly enlarge the hole until the nutsert fit. Using new, sharp, carbon titanium drill bits will make drilling through the car much faster and easier.
The nutsert tool confused me at first. You need to thread the long bolt through the main piece of the tool. I find it useful to then thread the nutsert onto the end of the bolt and use the tool to push the nutsert into the hole snugly.

Use an open ended spanner or similar to hold the wider part of the nutsert tool, and prevent it from spinning around. I used a 22mm spanner I had left over from a previous coilover job.


Then use a 11/16" socket wrench to turn the smaller part of the nutsert tool clockwise. This will cause part of the nutsert to be squashed and expand inside the hole like a rivet, locking it in place.

Now fasten the unibrace at that mounting point with the provided bolt.

With the first mounting point fastened, use the punch to mark the drilling point at the second mounting point. Then remove the bolt from the first fastening point and put the unibrace to the side. Drill a hole at the new fastening point to 1/2". Install the nutsert. Fasten the first two points and move onto the third point and so on. Remember to fasten the unibrace at all existing points before using the punch to mark the next point. This takes a few minutes extra but significantly improves your chances of getting a good fitment.
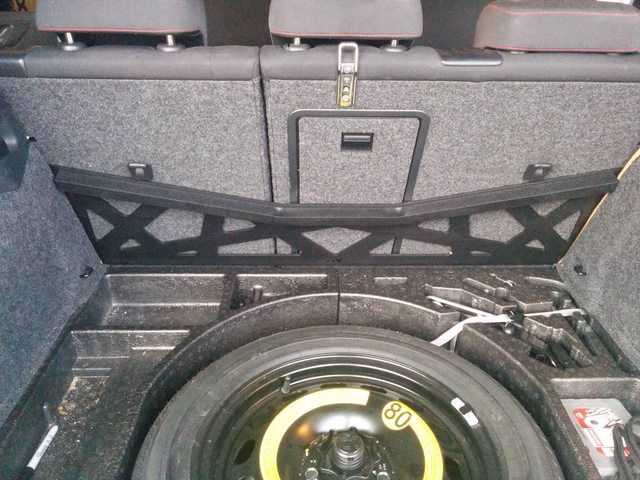
Finally fold the carpet flaps back in place, use glue if you like, and bolt the unibrace in place on top of the carpet.
Go for a ride and have your mind blown!

A big thanks to Bruce for taking the time to describe this approach to me. Not removing the trim and seats saves so much time, and makes it easier to get a great fitment as well. I hope you found this useful, and please share your own experiences with the install.
After the install I took the car for a quick spin and all I can say is WOW! The rear end is so planted. Its amazing. It feels like a completely different car.
I highly recomment this mod to anyone interested in performance driving. Its important to know that this install does take patience and care since its hard to rectify a problem once you've started drilling into your car. Here the adage measure twice, cut once is particularly apt.
Before we get started please know that you do this mod completely at your own risk to both yourself and your car. I am in no way an expert in this area and am only sharing my own experience for other's information. If you feel uncomfortable doing this type of work get a professional to install the unibrace XB, as this does require some care and experience.
Here's my new Unibrace XB just after it was delivered. As many others have already said, the fit and finish is amazing. A really well constructed, high quality piece.
First step, clean out the back.
Place some tape over the area where the unibrace XB will be mounted.
Check fitment with the seats up. Ensure that the seats lock in place properly with your unibrace placement.
In my case I was also careful to ensure the unibrace cleared the child seat tethers.
Once you've determined the right placement use some bungies to keep the unibrace in place.
Fold the seats back down and mark the mounting points for the unibrace XB with a sharpie. Top
And bottom.
Put the unibrace to the side and use a craft knife to cut flaps at the mounting points.
If you just cut 3 sides the trim can be put back in place afterwards with some glue for a clean appearance.
Put the unibrace back in place, secure with bungees and check the fitment again.
Mark the center of the first mount point with a punch. Only do one mount point for now. We will do a single nutsert at a time and then fasten that mount before punching any more mount points. This increases the chance of getting a good fitment and as Bruce puts it, prevents the accumulation of errors.
Drill a pilot hole, and then progressively work your way up to a 1/2" hole for the nutsert. I actually found it easier to do this in 5 steps, by gradually increasing the drill bit size each time. This was faster and led to a cleaner, more symmetrical hole. FYI for the top mount points I used only regular drill bits. For the bottom mount points the nutsert wouldn't go in as the hole was too small. I used a tappered drill bit to slightly enlarge the hole until the nutsert fit. Using new, sharp, carbon titanium drill bits will make drilling through the car much faster and easier.
The nutsert tool confused me at first. You need to thread the long bolt through the main piece of the tool. I find it useful to then thread the nutsert onto the end of the bolt and use the tool to push the nutsert into the hole snugly.
Use an open ended spanner or similar to hold the wider part of the nutsert tool, and prevent it from spinning around. I used a 22mm spanner I had left over from a previous coilover job.
Then use a 11/16" socket wrench to turn the smaller part of the nutsert tool clockwise. This will cause part of the nutsert to be squashed and expand inside the hole like a rivet, locking it in place.
Now fasten the unibrace at that mounting point with the provided bolt.
With the first mounting point fastened, use the punch to mark the drilling point at the second mounting point. Then remove the bolt from the first fastening point and put the unibrace to the side. Drill a hole at the new fastening point to 1/2". Install the nutsert. Fasten the first two points and move onto the third point and so on. Remember to fasten the unibrace at all existing points before using the punch to mark the next point. This takes a few minutes extra but significantly improves your chances of getting a good fitment.
Finally fold the carpet flaps back in place, use glue if you like, and bolt the unibrace in place on top of the carpet.
Go for a ride and have your mind blown!
A big thanks to Bruce for taking the time to describe this approach to me. Not removing the trim and seats saves so much time, and makes it easier to get a great fitment as well. I hope you found this useful, and please share your own experiences with the install.
Last edited:


