6
You are using an out of date browser. It may not display this or other websites correctly.
You should upgrade or use an alternative browser.
You should upgrade or use an alternative browser.
never try to park when you're angry...
- Thread starter DanSandGTI
- Start date
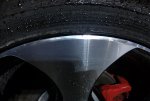
The fixed picture shows the repair to one spoke, no photography fail, take a closer look :thumbsup: that larger hole by the looks of it is further back of that same spoke.

Good job OP, and yes I nth the suggestion to post a DIY
Let's see a pic of the fix to the worse damaged section - the smaller ones look good though!
nice work!
so the machined finish on the face of the detroits aren't clearcoated for anticorrosion?
I ask because I used to have a benz with machined finish wheels and gashed it on a careless parking job, and some time later, the gashed portion started to show rust. I just assumed it was because the protective clear coat was stripped in the damaged area.
DanSandGTI
New member
So, I guess in retrospect I should have done a DIY. However, I didn't think of it at the time because I really didn't expect the results to be as good as they were. Good news is that I will be repairing my brother-in-law's 18" huffs on his '09 GTI either this weekend or next. The damage on his is similar to mine.
At that time I will do a full DIY and post it. Meanwhile, I will address a few of the questions that were posted.
First, there is no balance issue after the repair. The amount of material ground and sanded off is insignificant.
Second, the issue with repairing these wheels is that they are machined aluminum alloy. By right the the worst of the curb damage would normally be filled, sanded, and then painted. However, getting paint to match the non painted machined surface of the detroits would be problematic. As for the potential for rust... "aluminum corrosion is aluminum oxide, a very hard material that actually protects the aluminum from further corrosion. Aluminum oxide corrosion also looks a lot more like aluminum, so it isn't as easy to notice as rusted iron."(Rust Store) In other words, clean/polish it occasionally and you'll be fine.
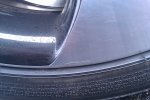
Third, as requested by PHO_TOE, here are some additional pictures of the entire spoke as well as a close up of the worst damaged part. Sorry about the image quality. I took these with my droid this afternoon and then under the lights after leaving work tonight here in rainy N.E.


By no means is this a 100% repair, but it is far less noticeable than it was to the extent that I can now live with it. I've had several people look at the repaired rim and struggle to find where the repair was done. The close-ups certainly show the repair, but from a distance of a few feet you cannot tell. Not bad considering this cost me about $15 and about 2 hours of time. Tomorrow, I'll post some brief instructions in case anyone doesn't want to wait for the DIY.
At that time I will do a full DIY and post it. Meanwhile, I will address a few of the questions that were posted.
First, there is no balance issue after the repair. The amount of material ground and sanded off is insignificant.
Second, the issue with repairing these wheels is that they are machined aluminum alloy. By right the the worst of the curb damage would normally be filled, sanded, and then painted. However, getting paint to match the non painted machined surface of the detroits would be problematic. As for the potential for rust... "aluminum corrosion is aluminum oxide, a very hard material that actually protects the aluminum from further corrosion. Aluminum oxide corrosion also looks a lot more like aluminum, so it isn't as easy to notice as rusted iron."(Rust Store) In other words, clean/polish it occasionally and you'll be fine.
Third, as requested by PHO_TOE, here are some additional pictures of the entire spoke as well as a close up of the worst damaged part. Sorry about the image quality. I took these with my droid this afternoon and then under the lights after leaving work tonight here in rainy N.E.


By no means is this a 100% repair, but it is far less noticeable than it was to the extent that I can now live with it. I've had several people look at the repaired rim and struggle to find where the repair was done. The close-ups certainly show the repair, but from a distance of a few feet you cannot tell. Not bad considering this cost me about $15 and about 2 hours of time. Tomorrow, I'll post some brief instructions in case anyone doesn't want to wait for the DIY.
DanSandGTI
New member
As promised, here is a quick guide to this type of repair... Full DIY with pics to follow in the coming weeks. Note that this is for minor to moderate curb rash only.
You will need:
- a VARIABLE SPEED Dremel (a two speed type will not work - the RPMs are too high to do proper grinding and sanding)
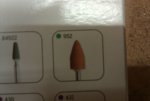
- a #952 cone shaped stone grinding bit
- #413 sanding disks
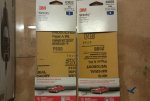
- 800 grit & 2000 grit automotive sand paper
- Eagle One NEVR-DULL wadding metal polish
- Several rags and a degreaser such as Simple Green


STEP 1
- clean the entire rim with Simple Green & wipe dry
- using the dremel with the stone grind bit, begin to grind the affected burrs from the curb damage by keeping the dremel on the LOWEST setting (5000 to 7000 RPMs) to maintain control and to avoid removing too much material. Work from side to side on the affected area to smooth out the "peaks & valleys" the best you can. Rim should have a rough texture after this. Change the Dremel to the sanding disks and smooth out the area even more. Wipe the area with a rag to remove metal particles.
STEP 2
- hand sand the area you just grinded with the 800 grit paper. This will take some time. The goal is to sand down all the pits and scratches to a smooth of a surface as possible. You may find that you have to go back to the Dremel and grind over some areas and then sand over again. All the while you need to start blending in the affected area with the non-damaged part of the rim.
- Wipe the rim again and move on to sanding with the 2000 grit paper. This is when things really start to shine and you can really blend it all together.
- Once you have a completely smooth surface polish the entire area with NVER-DULL wadding and then wipe with a rag. This is where you will see if you missed any spots, in which case re-sand until completely smooth. Re-polish with NVER-DULL and wipe dry.
As stated before, I will post a full DIY with pics and more exact steps in the near future. Thanks to everyone for the compliments.
You will need:
- a VARIABLE SPEED Dremel (a two speed type will not work - the RPMs are too high to do proper grinding and sanding)
- a #952 cone shaped stone grinding bit
- #413 sanding disks
- 800 grit & 2000 grit automotive sand paper
- Eagle One NEVR-DULL wadding metal polish
- Several rags and a degreaser such as Simple Green


STEP 1
- clean the entire rim with Simple Green & wipe dry
- using the dremel with the stone grind bit, begin to grind the affected burrs from the curb damage by keeping the dremel on the LOWEST setting (5000 to 7000 RPMs) to maintain control and to avoid removing too much material. Work from side to side on the affected area to smooth out the "peaks & valleys" the best you can. Rim should have a rough texture after this. Change the Dremel to the sanding disks and smooth out the area even more. Wipe the area with a rag to remove metal particles.
STEP 2
- hand sand the area you just grinded with the 800 grit paper. This will take some time. The goal is to sand down all the pits and scratches to a smooth of a surface as possible. You may find that you have to go back to the Dremel and grind over some areas and then sand over again. All the while you need to start blending in the affected area with the non-damaged part of the rim.
- Wipe the rim again and move on to sanding with the 2000 grit paper. This is when things really start to shine and you can really blend it all together.
- Once you have a completely smooth surface polish the entire area with NVER-DULL wadding and then wipe with a rag. This is where you will see if you missed any spots, in which case re-sand until completely smooth. Re-polish with NVER-DULL and wipe dry.
As stated before, I will post a full DIY with pics and more exact steps in the near future. Thanks to everyone for the compliments.
Graustark
Ready to race!
+1 compliment. I crunched one of my Detroits only slightly in my first week of ownership, so this will be a future fix-up task for me. Thanks again.
...
As stated before, I will post a full DIY with pics and more exact steps in the near future. Thanks to everyone for the compliments.