lilfleck's K04 Install Notes/Tips
Edited 8/17/2015 from my second go around
I posted about my K04 install on my first build thread and desperation thread (mid install). I also posted about my second go around in my second build thread.
I wanted to share with you guys some helpful tips/notes about doing a K04 swap on your car. I want to help you avoid the headaches that I ran into to make it as smooth as possible.
The hardware:
-You can use any K04 kit you like; they all contain the necessary hardware you need to get going (APR, CTS, AWE, HPA, etc.)
-If you want to try an OEM S3/Golf R K04, you'll have to get a PCV Block off (integrated engineering), a DV relocate (custom or Unitronics), and you'll need to take it to a welder to remove the turbo muffler and weld on a matching flange. I thought it was 2.5" but I believe it may be a 2.25" outlet. Take a look at my research thread I opened about this.
-Turbo Outlet Pipe Elbow = a reducing elbow. The TOP has a larger opening than the turbo outlet. APR's elbow is a custom reducer.
Necessary nuts/bolts/washers/etc:
Downpipe Studs (4x) N0445203
Downpipe Gasket 1K0253115AB
Turbo Manifold Gasket 06F253039F
Oil Return Line Gasket (2x) 06F145757L
Oil Feed Line Washers (2x) N0138514
Downpipe Nuts (4x) N10286108
Turbo Manifold Nuts (5x) N90894601
Coolant Feed Line Washers (2x) N0138149
Coolant Return Line Washers (2x)

Additional Recommended Hardware:
Exhaust Manifold Studs (there are 5, but you don't need to replace them unless they break) - N0444115
6mm Allen Screws on Turbo Support (1x) - (not sure of PN)
6mm* (skinny) Allen Screws on Turbo Heat Shield (2x) - M8 X 1.25 (not sure of PN)
6mm* (fat) Allen Screw on Turbo Heat Shield (1x) - (not sure of PN)
*These may be triple square on some cars, be careful and check first.
*These 6mm allen screws are a terrible choice for screws in this place. You can't apply high torque to these types of bolts easily and as such, you can easily strip them in hard to reach areas.
*I would suggest using anti seize on these screws when you reinstall and torque to spec.
Fluids:
-5Q of oil
-1G of G12/G13 coolant
-1G of distilled water (for coolant mixture)
If you are buying used, you MUST buy all new nuts/bolts/washers/fluids prior to the install. It is also imperative that you get the correct elbow for the turbo outlet pipe.
The software:
-You can use any tuner you like
-If you are APR tuned already, the upgrade price is $499.99 + tax (and labor if applicable) -- this does NOT go on sale
-You can drive an IHI on K04 software or vice versa as long as you take it easy. I stayed out of boost. I did try going into boost once, and I just noticed that the boost was not consistent, it would fluctuate up and down.
-If you are going APR, make sure you purchase a 3bar map/boost sensor and install it with your flash. This one is important.
Install Instructions:
Follow Grambles guide -- it is the best guide that I found. I had the APR Stage 3 DIY manual, and several other DIY guides from MKV, but kept going back to Grambles' guide.
Print out the ENTIRE thread. Plac/2013R added some VERY insightful notes/tips/photos. Thank you.
Installation Tips:
-Have a pair of safety glasses for working under the car--this is a MUST IMO
-Remain calm and do not rush through this job
-Take a break when you begin to get stressed/frustrated
-Buy anti-seize, Loctite blue, silicone spray (for rubber hoses), and PB blaster
-Have a wide variety of extensions (various sizes & wobble), impact joint sockets, and picks actually helped remove stubborn rubber hosing
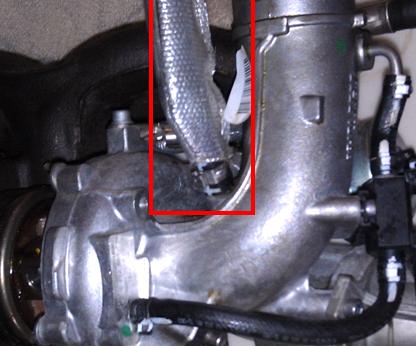
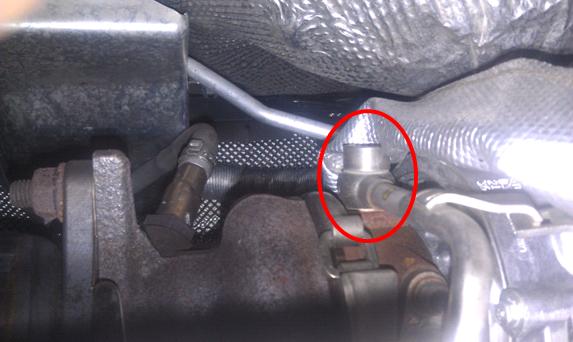
-You need something like this to get to two different bolts,
http://www.ebay.com/itm/Herbrand-11...nd-Short-M5-M12-1-2-Inch-Drive-/190798001998?

and
and

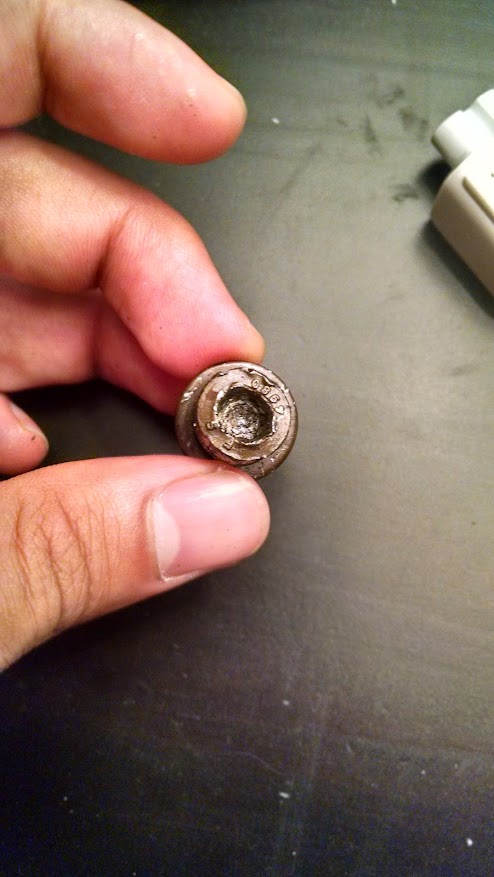
-I would highly recommend getting the highest quality 6mm allen you can find--you will need it for the heat shield and turbo support bracket.
This was the tool I used to get the turbo heat shield out:
http://www.amazon.com/Ball-End-Allen-Wrench-Hex/dp/B0006TW0CQ
Attached a small wrench (10mm) to the end of it and was able to get it out.
Here is the bolt it will be used on,

-Be very careful and light on the DV housing bolts. The metal is very soft and you don't want to strip these out.
-Test fit all of your components well in advance
-When you remove the coolant line from the turbo, some liquid will come out
-When you remove a second coolant line, ALL of the coolant will drain out, there isn't an easy way to catch it all, it rains EVERYWHERE. Not sure on how I could have done this without disconnecting the long coolant line.
-My suggestion would be to first disconnect the hard lines on top of the motor, then slowly remove the coolant supply line to the turbo. As you remove it, have a long funnel or something to catch the coolant and into an oil pan/container. This was really helpful in containing the mess. My buddy even blew into the coolant reservoir to push all the coolant out lol.
-When you are putting it back together, do not put on the heat shield until you have done a test drive. This means leaving out the belly pan as well. The reason behind this is so you can look at the turbo from the top to see if there are any leaks. In my case, I had an oil leak from the oil supply line on top. Lucky I was able to spot it out before putting the heat shield back on.
Helpful Tools:
-Safety Glasses (must have)
-PB Blaster (must have)
-Universal Impact Joint Socket Set (http://goo.gl/QWlAvV)
-Short AND long sockets (wobble is helpful)
-Short/long triple square socket bit set (http://goo.gl/QwLAU9) - this is needed for two tight areas (the short triple square bits); used in combination with a small 10mm (I think) combination wrench around the bit itself
-Long Ball Head Hex Socket Set (http://goo.gl/KqcDj8) - immensely helpful in removing the (only) two 6mm hex bolts. Another tip, try to hit the end of the wrench when using this bit so it makes an impact. You don't want to strip the bolt head (easy to do). You want to get the bit in as deep as it goes and knock it loose quick. Make sure you spray the crap out of all your bolts (PB Blaster).
-Long Hex Socket Set (http://goo.gl/Xu6gej) - if you feel confident, use this on the 6mm bolts instead. I would go with whichever you feel you have better grip on (grip on the bolt head).
-Small power drill - to undo the T25 underpanel screws
Troublesome areas/Common Issues & How-To Deal With Them
6mm allen screws on the turbo heat shield AND turbo support bracket are very fragile when torque is applied. Get the highest quality allen and make sure it seats snug and all the way to the bottom of the top of the screw. Apply torque and make sure you stay square in the seat of the screw head while turning. It would be helpful to spray these bolts before you attempt the installation, it will help you a lot later. I don't know if applying PB/lube while doing it on these bolts is really helpful because it will lubricate the inside of the screw head which you don't want.
If you happen to strip any of these screw heads, remain calm and try a few things:
Try again but go very slowly to make sure you maintain control and feel that you aren't slipping/stripping the screw head. Tap the end of the allen to make sure its seated all the way in. Try tapping the screw itself in all directions to try and free it of anything that might be holding it. If this fails and your allen is fully stripped out, try moving up a size or a torx bit to see if that will fit. Might need to hammer/tap it in to get a bite.
If it is the turbo support bracket, you should be able to get a vice grip on it and try to turn it that way. If that fails, you can either remove the turbo with the support bracket still attached (disconnected from the block of course); however, you will have to loosen the manifold V support bracket. Pain in the A to loosen on the compressor side because its tight. You can only use a manual hand wrench...
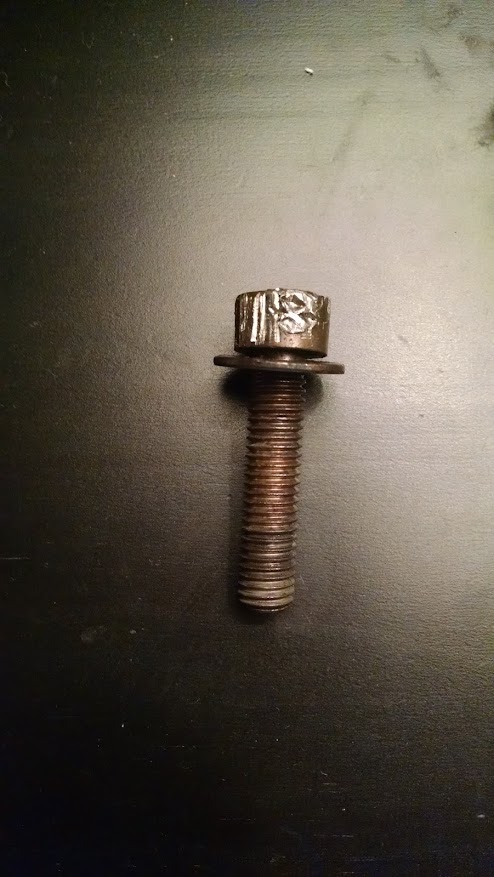
Another thing you could do alternatively OR after it is out to remove the turbo support 6mm is to attach a breaker bar and socket to the end of the welded nut and crack the weld. This is what I did after I removed the turbo to get the bolt out. I then replaced it with a traditional hex head and nut combo.
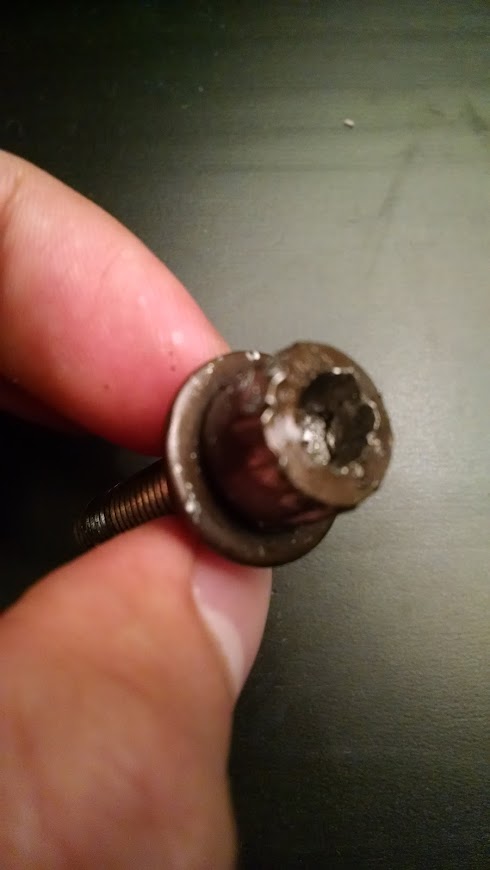
Here is a bolt I stripped during my latest install (turbo support bracket, (was a) 6mm allen):
FAQ's
Should you undertake this project?
Yes and no. I would say yes if you have the necessary tools, a garage, a second car (just in case), and the confidence/mechanical inclination to do so. You must be mentally prepared for unforeseen issues/headaches. I did my best to keep calm, but I was most definitely very stressed throughout the process.
I will tell you this, if I go back to IHI, I would consider paying someone to do it for me. It's not worth doing again in the event I were to strip one of the hex bolts.
How long does it take?
Grambles included estimates in his thread. I think those estimates are for if you know what you are doing. But as he mentions at the end, "Realistic FULL PROJECT TIME: 2 x 12 Hour days. I ran into some issues but would suggest 2 full days for this."
On the first go around: It took me two FULL days. Total work time was about 17 hours not including the dv relocate I did. This included trips to the hardware store and side projects dealing w/ the headaches (had to cut off a bolt; pull downpipe studs, fight with stubborn bolts, etc.).
On the second go around: It took me 2-3 hours to remove the turbo, but total time was actually closer to 10. My time eaters were stripped 6mm allen on the turbo support bracket, which led to added time to loosen the exhaust manifold V support bracket. Then it was running to the hardware store to get a nut/bolt combo for the crapped bolts. Definitely A LOT smoother. I started Friday night at 7pm, and was done Saturday night (started at 3PM). I was also by myself on Saturday for a majority of the evening.
My thoughts and about me:
A little about myself--I am in my 20s and the biggest mechanical jobs I've done prior to this have been oil changes, spark plugs, air intake, downpipe, and replacing a wheel hub... This car is my only/daily car.
Prior to undertaking this project, I did a lot of research. I read through Gramble's DIY thread multiple times. From page 1 - 11. I studied it. I tried visualizing the process as best I could to understand it. I walked through the entire process from start to finish in my head, making notes of things I needed to research further or buy. I ensured I had all of the right tools to do the job, including the super short triple squares.
Even with all of the right tools and research, I still ran into issues that I didn't expect. You can read more about my problems in my build thread. The headaches will break you down mentally and physically. Not having the right hardware/parts will drive you mad!
I think the biggest challenge of this project was just learning all of the parts of your car and how the various pieces connect and disconnect from each other. The simple things like, how to remove a vacuum line from the intake stage 2 pipe. That proved to be challenging. I wondered how many parts I actually needed to remove to fit the turbo out. I wondered if the turbo would actually fit out the top. I wondered if I'd strip the 6mm hex bolts. Lots of questions that I had to figure out myself. As others have mentioned, the heat shield is by far the most challenging aspect of this job. The next trickiest part is the washer setup on the banjo bolts. Before going into this install, I had no idea what the hell a banjo bolt was or looked like.
The turbo fit out the top without a problem. I was happy about that. It was a big milestone in the install process. Putting it back together was the easy part. It went a lot faster because I was familiar with the parts/connections. That being said, I did of course run into issues only because I didn't have all of the right parts I needed (downpipe stud, thick washer, turbo outlet elbow). I spent about 17 hours on this install. It may have been a little longer if you account for the oil leak I discovered after it was all buttoned up.
I hope this helps anyone out there willing to undertake this project. Please feel free to add any notes/tips that I may have missed.
Some photos from the garage I was working in:

These vacuum lines suck... seriously, clips were broken in trying to get them off

Edited 8/17/2015 from my second go around
I posted about my K04 install on my first build thread and desperation thread (mid install). I also posted about my second go around in my second build thread.
I wanted to share with you guys some helpful tips/notes about doing a K04 swap on your car. I want to help you avoid the headaches that I ran into to make it as smooth as possible.
The hardware:
-You can use any K04 kit you like; they all contain the necessary hardware you need to get going (APR, CTS, AWE, HPA, etc.)
-If you want to try an OEM S3/Golf R K04, you'll have to get a PCV Block off (integrated engineering), a DV relocate (custom or Unitronics), and you'll need to take it to a welder to remove the turbo muffler and weld on a matching flange. I thought it was 2.5" but I believe it may be a 2.25" outlet. Take a look at my research thread I opened about this.
-Turbo Outlet Pipe Elbow = a reducing elbow. The TOP has a larger opening than the turbo outlet. APR's elbow is a custom reducer.
Necessary nuts/bolts/washers/etc:
Downpipe Studs (4x) N0445203
Downpipe Gasket 1K0253115AB
Turbo Manifold Gasket 06F253039F
Oil Return Line Gasket (2x) 06F145757L
Oil Feed Line Washers (2x) N0138514
Downpipe Nuts (4x) N10286108
Turbo Manifold Nuts (5x) N90894601
Coolant Feed Line Washers (2x) N0138149
Coolant Return Line Washers (2x)
Coolant Return Line Washer (thin) N0138149
Coolant Return Line Washer (thick) N0138144
EVAP Line One Time Use Hose Clamps (1x) - PEX Pinch Clamp N10108301 Coolant Return Line Washer (thick) N0138144
Additional Recommended Hardware:
Exhaust Manifold Studs (there are 5, but you don't need to replace them unless they break) - N0444115
6mm Allen Screws on Turbo Support (1x) - (not sure of PN)
6mm* (skinny) Allen Screws on Turbo Heat Shield (2x) - M8 X 1.25 (not sure of PN)
6mm* (fat) Allen Screw on Turbo Heat Shield (1x) - (not sure of PN)
*These may be triple square on some cars, be careful and check first.
*These 6mm allen screws are a terrible choice for screws in this place. You can't apply high torque to these types of bolts easily and as such, you can easily strip them in hard to reach areas.
*I would suggest using anti seize on these screws when you reinstall and torque to spec.
Fluids:
-5Q of oil
-1G of G12/G13 coolant
-1G of distilled water (for coolant mixture)
If you are buying used, you MUST buy all new nuts/bolts/washers/fluids prior to the install. It is also imperative that you get the correct elbow for the turbo outlet pipe.
The software:
-You can use any tuner you like
-If you are APR tuned already, the upgrade price is $499.99 + tax (and labor if applicable) -- this does NOT go on sale
-You can drive an IHI on K04 software or vice versa as long as you take it easy. I stayed out of boost. I did try going into boost once, and I just noticed that the boost was not consistent, it would fluctuate up and down.
-If you are going APR, make sure you purchase a 3bar map/boost sensor and install it with your flash. This one is important.
Install Instructions:
Follow Grambles guide -- it is the best guide that I found. I had the APR Stage 3 DIY manual, and several other DIY guides from MKV, but kept going back to Grambles' guide.
Print out the ENTIRE thread. Plac/2013R added some VERY insightful notes/tips/photos. Thank you.
Installation Tips:
-Have a pair of safety glasses for working under the car--this is a MUST IMO
-Remain calm and do not rush through this job
-Take a break when you begin to get stressed/frustrated
-Buy anti-seize, Loctite blue, silicone spray (for rubber hoses), and PB blaster
-Have a wide variety of extensions (various sizes & wobble), impact joint sockets, and picks actually helped remove stubborn rubber hosing
-You need something like this to get to two different bolts,
http://www.ebay.com/itm/Herbrand-11...nd-Short-M5-M12-1-2-Inch-Drive-/190798001998?
With this tool, I was able to use a tiny (10mm I believe) combination wrench to get into the hard to reach spots.
This is where it will be needed:
and
and
-I would highly recommend getting the highest quality 6mm allen you can find--you will need it for the heat shield and turbo support bracket.
This was the tool I used to get the turbo heat shield out:
http://www.amazon.com/Ball-End-Allen-Wrench-Hex/dp/B0006TW0CQ
Attached a small wrench (10mm) to the end of it and was able to get it out.
Here is the bolt it will be used on,
-Be very careful and light on the DV housing bolts. The metal is very soft and you don't want to strip these out.
-Test fit all of your components well in advance
Check downpipe studs & nuts (they are locking nuts and will not spin on the stud all the way; it will only spin a few times before it stops--this is normal.
Check to make sure you have the correct # of washers; know where they all go (before and after the banjo bolt)
Know what the thick coolant washer looks like and where it goes
Check to see elbow fits the K04 and your turbo outlet pipe
Make sure you have extra clamps just in case. I ended up using a regular hose clamp for the vacuum line on the turbo.
-Bag up & labor your parts. Might also be helpful to use an egg carton for screws and suchCheck to make sure you have the correct # of washers; know where they all go (before and after the banjo bolt)
Know what the thick coolant washer looks like and where it goes
Check to see elbow fits the K04 and your turbo outlet pipe
Make sure you have extra clamps just in case. I ended up using a regular hose clamp for the vacuum line on the turbo.
-When you remove the coolant line from the turbo, some liquid will come out
-When you remove a second coolant line, ALL of the coolant will drain out, there isn't an easy way to catch it all, it rains EVERYWHERE. Not sure on how I could have done this without disconnecting the long coolant line.
-My suggestion would be to first disconnect the hard lines on top of the motor, then slowly remove the coolant supply line to the turbo. As you remove it, have a long funnel or something to catch the coolant and into an oil pan/container. This was really helpful in containing the mess. My buddy even blew into the coolant reservoir to push all the coolant out lol.
-When you are putting it back together, do not put on the heat shield until you have done a test drive. This means leaving out the belly pan as well. The reason behind this is so you can look at the turbo from the top to see if there are any leaks. In my case, I had an oil leak from the oil supply line on top. Lucky I was able to spot it out before putting the heat shield back on.
Helpful Tools:
-Safety Glasses (must have)
-PB Blaster (must have)
-Universal Impact Joint Socket Set (http://goo.gl/QWlAvV)
-Short AND long sockets (wobble is helpful)
-Short/long triple square socket bit set (http://goo.gl/QwLAU9) - this is needed for two tight areas (the short triple square bits); used in combination with a small 10mm (I think) combination wrench around the bit itself
-Long Ball Head Hex Socket Set (http://goo.gl/KqcDj8) - immensely helpful in removing the (only) two 6mm hex bolts. Another tip, try to hit the end of the wrench when using this bit so it makes an impact. You don't want to strip the bolt head (easy to do). You want to get the bit in as deep as it goes and knock it loose quick. Make sure you spray the crap out of all your bolts (PB Blaster).
-Long Hex Socket Set (http://goo.gl/Xu6gej) - if you feel confident, use this on the 6mm bolts instead. I would go with whichever you feel you have better grip on (grip on the bolt head).
-Small power drill - to undo the T25 underpanel screws
Troublesome areas/Common Issues & How-To Deal With Them
6mm allen screws on the turbo heat shield AND turbo support bracket are very fragile when torque is applied. Get the highest quality allen and make sure it seats snug and all the way to the bottom of the top of the screw. Apply torque and make sure you stay square in the seat of the screw head while turning. It would be helpful to spray these bolts before you attempt the installation, it will help you a lot later. I don't know if applying PB/lube while doing it on these bolts is really helpful because it will lubricate the inside of the screw head which you don't want.
If you happen to strip any of these screw heads, remain calm and try a few things:
Try again but go very slowly to make sure you maintain control and feel that you aren't slipping/stripping the screw head. Tap the end of the allen to make sure its seated all the way in. Try tapping the screw itself in all directions to try and free it of anything that might be holding it. If this fails and your allen is fully stripped out, try moving up a size or a torx bit to see if that will fit. Might need to hammer/tap it in to get a bite.
If it is the turbo support bracket, you should be able to get a vice grip on it and try to turn it that way. If that fails, you can either remove the turbo with the support bracket still attached (disconnected from the block of course); however, you will have to loosen the manifold V support bracket. Pain in the A to loosen on the compressor side because its tight. You can only use a manual hand wrench...
Another thing you could do alternatively OR after it is out to remove the turbo support 6mm is to attach a breaker bar and socket to the end of the welded nut and crack the weld. This is what I did after I removed the turbo to get the bolt out. I then replaced it with a traditional hex head and nut combo.
Here is a bolt I stripped during my latest install (turbo support bracket, (was a) 6mm allen):
FAQ's
Should you undertake this project?
Yes and no. I would say yes if you have the necessary tools, a garage, a second car (just in case), and the confidence/mechanical inclination to do so. You must be mentally prepared for unforeseen issues/headaches. I did my best to keep calm, but I was most definitely very stressed throughout the process.
I will tell you this, if I go back to IHI, I would consider paying someone to do it for me. It's not worth doing again in the event I were to strip one of the hex bolts.
How long does it take?
Grambles included estimates in his thread. I think those estimates are for if you know what you are doing. But as he mentions at the end, "Realistic FULL PROJECT TIME: 2 x 12 Hour days. I ran into some issues but would suggest 2 full days for this."
On the first go around: It took me two FULL days. Total work time was about 17 hours not including the dv relocate I did. This included trips to the hardware store and side projects dealing w/ the headaches (had to cut off a bolt; pull downpipe studs, fight with stubborn bolts, etc.).
On the second go around: It took me 2-3 hours to remove the turbo, but total time was actually closer to 10. My time eaters were stripped 6mm allen on the turbo support bracket, which led to added time to loosen the exhaust manifold V support bracket. Then it was running to the hardware store to get a nut/bolt combo for the crapped bolts. Definitely A LOT smoother. I started Friday night at 7pm, and was done Saturday night (started at 3PM). I was also by myself on Saturday for a majority of the evening.
My thoughts and about me:
A little about myself--I am in my 20s and the biggest mechanical jobs I've done prior to this have been oil changes, spark plugs, air intake, downpipe, and replacing a wheel hub... This car is my only/daily car.
Prior to undertaking this project, I did a lot of research. I read through Gramble's DIY thread multiple times. From page 1 - 11. I studied it. I tried visualizing the process as best I could to understand it. I walked through the entire process from start to finish in my head, making notes of things I needed to research further or buy. I ensured I had all of the right tools to do the job, including the super short triple squares.
Even with all of the right tools and research, I still ran into issues that I didn't expect. You can read more about my problems in my build thread. The headaches will break you down mentally and physically. Not having the right hardware/parts will drive you mad!
I think the biggest challenge of this project was just learning all of the parts of your car and how the various pieces connect and disconnect from each other. The simple things like, how to remove a vacuum line from the intake stage 2 pipe. That proved to be challenging. I wondered how many parts I actually needed to remove to fit the turbo out. I wondered if the turbo would actually fit out the top. I wondered if I'd strip the 6mm hex bolts. Lots of questions that I had to figure out myself. As others have mentioned, the heat shield is by far the most challenging aspect of this job. The next trickiest part is the washer setup on the banjo bolts. Before going into this install, I had no idea what the hell a banjo bolt was or looked like.
The turbo fit out the top without a problem. I was happy about that. It was a big milestone in the install process. Putting it back together was the easy part. It went a lot faster because I was familiar with the parts/connections. That being said, I did of course run into issues only because I didn't have all of the right parts I needed (downpipe stud, thick washer, turbo outlet elbow). I spent about 17 hours on this install. It may have been a little longer if you account for the oil leak I discovered after it was all buttoned up.
I hope this helps anyone out there willing to undertake this project. Please feel free to add any notes/tips that I may have missed.
Some photos from the garage I was working in:
These vacuum lines suck... seriously, clips were broken in trying to get them off
Last edited: