GOLFMK8
GOLFMK7
GOLFMK6
GOLFMKV

UBER-STEALTH Under Floor Sub Install

Skirball

Ready to race!
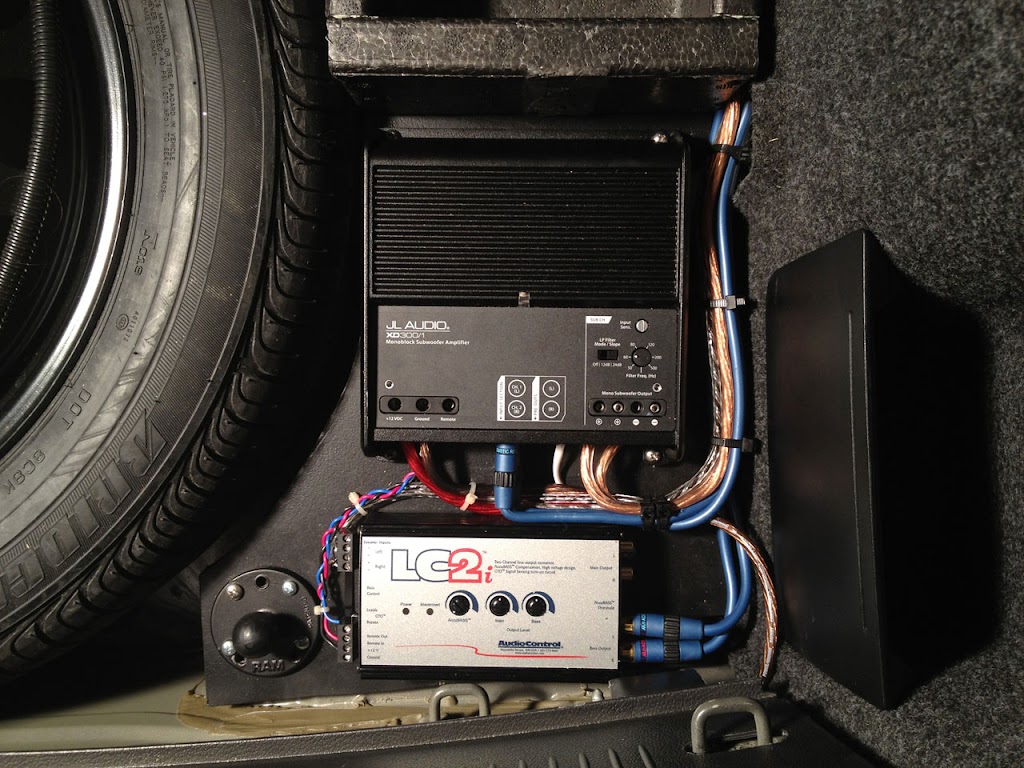
Do I get just a basic 1amp fuse holder and run it inline? I dont think Ive seen any pics of the LC2i fused...everyone just uses the power and ground leads directly to the LC2i...

That's what I did. I had a 2.5A fuse laying around so I just stuck that in there.

I'm sure a lot, if not most people don't bother. And a lot, perhaps all, will never have issue from it. But small wires have even smaller insulation; a little pinch from stuff sliding around is all it takes to expose the conduit. Basically you are shorting your 8 ga. power supply wire to ground or the electronics in there. Yup, unlikely. Yup, you have a fuse at the other end of the power supply line. But I had already spent so much time with the install and building a purdy amp rack and making my wires look nice - it cost me an extra dollar for the fuse holder and a couple more minutes of my time. YMMV.
 

Greecefleece88

New member
LC2i (can't get a pic of the threshold though):


AMP (sensitivity is vertical, crossover at 60 Hz, LP filter at 24dB):


Where are those the wires going? The blue black and red. (remote out, 12v, and I'm not sure what the blue is connected to
 

Skirball

Ready to race!
The blue is the remote wire. It goes from remote out on the LC2i to the remote in on the amp; that way you use the auto-on function of the LC2i to turn the amp on/off. The red and black are the power wires for the LC2i that are dove-tailed off the power on the amp.
 

veedoubleme

Go Kart Champion
The blue is the remote wire. It goes from remote out on the LC2i to the remote in on the amp; that way you use the auto-on function of the LC2i to turn the amp on/off. The red and black are the power wires for the LC2i that are dove-tailed off the power on the amp.

Precisely. :thumbsup:
 

SwedishNinja

New member
Quick question. When using the uberstealt box, does the speaker hit the cover you put over it? Is there enough clearance?
 

veedoubleme

Go Kart Champion
Quick question. When using the uberstealt box, does the speaker hit the cover you put over it? Is there enough clearance?

If it does, you can't tell. Even when I load my trunk full of stuff. I had the same worry, and was happy to find out it's a complete non-issue.
 

veedoubleme

Go Kart Champion
I just updated my first post with this:

I'm still happy with my MB Quart sub and it's going strong, but there have been some people who have blown theirs. See the thread here: Two blown MB Quart subs... ideas?. The OP finally replaced it with the Pioneer SW-2501 and said it sounds at least as good as the MB Quart. Just something to consider.

I figured if people are reading this thread and looking to build the same thing I did, it'd be good to know that piece of info.
 

FamousEric

Ready to race!
Subscribed for wire taps (I'm sure it'll be easier to reference this thread than to search for pinouts later).

Awesome setup.
 

acrasso

New member
Thanks

I completed this install this weekend. I don't know what I would have done without this thread. THANK YOU!

There was one part I found really hard to do nicely and that was get the power and left speaker wire to the back. The right side was easy since I the part of the plastic that had the outlet in the back already taken apart and almost all the rest of the paneling. Now I realize you said to run it under the seat. Did you have the seat out? Or did you just tuck it in in the front? For now I just have it where the top and bottom of the seat meet on the corner pushed threw to the back. But you can see the wire and I am afraid it will get pinched in the put the seat up and down often. Luckily I didn't take any trunk space up so I shouldnt have to!

Now to just let this speaker break in and tweak the settings. A little boomy right now but I kind of like that in a car. And I have to do the volume knob. I was smart enough to run the wire while everything was taken apart, but not super moder enough to get that all in on the same day!
 

veedoubleme

Go Kart Champion
I completed this install this weekend. I don't know what I would have done without this thread. THANK YOU!

:w00t:

There was one part I found really hard to do nicely and that was get the power and left speaker wire to the back. The right side was easy since I the part of the plastic that had the outlet in the back already taken apart and almost all the rest of the paneling. Now I realize you said to run it under the seat. Did you have the seat out?

Yes I took the seat out. It's pretty easy (although putting it back in a a little bit of a PITA) and well worth it since you can hide the wire under it. In this pic you can see the seat is out:


Now to just let this speaker break in and tweak the settings. A little boomy right now but I kind of like that in a car. And I have to do the volume knob. I was smart enough to run the wire while everything was taken apart, but not super moder enough to get that all in on the same day!

It shouldn't be "boomy" and mine didn't really have any break in period. As soon as the polyfill was dialed it, it sounded excellent. Did you put any polyfill in?
 

acrasso

New member
Yea that picture was tough to tell what was going on, but I see it now. I was trying to take the seat off, but unlike the rest of the stuff i was pulling apart, the seat needs to be safe and usable so I didnt want to mess with it. And the PITA warning makes me glad I didn't.

It does sound a bit boomy. Now, my definition of boomy might be different than yours, I tend to like really tight bass. It does not have any poly fill so maybe thats what I need to tighten it up a little. So you just stuff some of a pillow in there? I may need to reread the thread for the 10th time.
 

Skirball

Ready to race!
Yea that picture was tough to tell what was going on, but I see it now. I was trying to take the seat off, but unlike the rest of the stuff i was pulling apart, the seat needs to be safe and usable so I didnt want to mess with it. And the PITA warning makes me glad I didn't.

That's funny, I clearly remember thinking :confused: when looking at that picture when doing the install. Afterwards, coming back and looking at the picture it made sense, but pre-install I was scratching my head too.

As far as the seat, I think it was the easiest thing to pull apart in the install. Certainly easier than yanking up that floor trim, and a lot less scary. You just grab the front of it and pull up, pops right off. I ended up running mine just above the seat, under the folding section and around the support posts, because I was worried about pinching, but it probably wasn't a concern to begin with.
 

veedoubleme

Go Kart Champion
Yea that picture was tough to tell what was going on, but I see it now. I was trying to take the seat off, but unlike the rest of the stuff i was pulling apart, the seat needs to be safe and usable so I didnt want to mess with it. And the PITA warning makes me glad I didn't.

It's not that bad. Considering you did everything else, I wouldn't worry about getting it back in place.

It does sound a bit boomy. Now, my definition of boomy might be different than yours, I tend to like really tight bass. It does not have any poly fill so maybe thats what I need to tighten it up a little. So you just stuff some of a pillow in there? I may need to reread the thread for the 10th time.

Yes, the inside of a pillow is exactly what I used. Mine was boomy until I got the right amount in there. Just don't over fill it. I didn't measure it, so the best way to describe how much I put in is that it's packed in about as tight as it was when it was in the pillow.

As far as the seat, I think it was the easiest thing to pull apart in the install. Certainly easier than yanking up that floor trim, and a lot less scary. You just grab the front of it and pull up, pops right off.

Yes, it comes out easy. Putting it back in was a PITA for me though. Maybe it went easier for you. It wasn't terrible, but wasn't super simple either.
 

chid

Ready to race!
I finally had the sub installed in my Golf last weekend.

First, thank you Nik!
I had the box delivered very fast, very good communication with Nik and it fits perfectly.
I just dropped it in place and that's it!
I had it installed at a stereo shop, I didn't have time to do it myself and I was anxious to hear it.
I have the setup with Rockford amp, Pioneer sub and Rockford wire kit.
It changes the sound in the car completely! I'm not an expert, I won't invest probably more than this in the sound, but it does perfectly what I need!
I lost probably 1 in of vertical space in one corner because I use a grill (to protect the speaker maybe...!?)
In the end, I'm very happy!
Did I say thank you Nik??? ;)
 

ka_kiluh

Ready to race!
I am currently in the middle of my slow Uber Stealth install, and this thread has been a great asset!

There is something I have noticed that is not mentioned in this thread. After raising up right right side trunk foam to match the sub box, I noticed how soft and mushy the center now is. The "floor" of the trunk rests on the spare tire spindle in the center. Once the sides are raised up, the floor can no longer sit on this spindle for strength. I remedied this problem.

First of all, my sub box is 3/4" higher than the stock foam that it replaces. To save everyone some time: lumber is measured rough cut, then planed smooth. This means that to get 3/4" thick lumber, you need to buy something that is labeled as 1". I purchased a 7' length of 1x2" red oak and used it in conjunction with gorilla glue to raise the passenger side foam up even with the sub box. Glue some rubber to the bottom of the wood so it doesn't slide around. I used tool box drawer liner.

Now, on to the fun part. Use a flat head screwdriver to pop the cover off of the spare tire spindle. Cut a square off your 1x2. I used a soldering iron to quickly sink a hole through the hard plastic cover. Now drill a small pilot hole in your wood and screw it all together. Again, put a little square of rubber on the wood to prevent sliding. Pop the cover back into the spindle and feel the stock strength of your trunk floor. Keep in mind, there is a flat head built into the spare tire tool kit. If you ever get a flat, just pop it out and remove the tire. Pics:


Top