GOLFMK8
GOLFMK7
GOLFMK6
GOLFMKV

DIY install - Directed 4x10 remote start 3x oem lock

ShrekSquatch

Ready to race!
I may be tackling this myself soon, appreciate the writeup! Should be fairly simple (VW variations willing...) with DSG. Probably going to add one of the long distance RF remotes as well so I can actually start it at work...
 

deadcatz

New member
my time on the forums is over due to ban for no reason , however I just wanted to say thanks I got mine installed in about 1.5 hrs. This and another right up made it as simple as connecting a couple wires. if you can use some positaps and undo 4 screws then you can do this mod.

2013 DSG GtI
 

jgarcia1925

Go Kart Champion
my time on the forums is over due to ban for no reason , however I just wanted to say thanks I got mine installed in about 1.5 hrs. This and another right up made it as simple as connecting a couple wires. if you can use some positaps and undo 4 screws then you can do this mod.

2013 DSG GtI


Ban? I think they fixed it for you. The mods I know should take care of you lol


Sent from my distraction device
 

deadcatz

New member
Ban? I think they fixed it for you. The mods I know should take care of you lol


Sent from my distraction device

I'm definitely still banned for unspecified reasons, wish I knew what I did, I usually save most of my offensive comments for my sock puppet Twitter account.
 

zrickety

The Fixer
Glad you got it working anyway!
 

ShrekSquatch

Ready to race!
Ordered my stuff, including the 2-way RF remote kit (9856V). Half of it is here, the RF kit arrives tomorrow, but the 4x10 is on the slow boat from Texas. Ah well, it gets here when it gets here. Thanks zrickety for finally inspiring me to do it. Of course if I screw it up I may just show up in your driveway ;)
 

zrickety

The Fixer
Lol it's easy, but if you get stuck my driveway is open to you.
 

poodey

Ready to race!
4x10 on a Manual GTI

Finally, after 2 years, I have gotten my 4x10 remote start to work on my 2011 GTI. For those wanting to add remote start to their GTIs, I have attached a wiring diagram that I created showing the proper wire connections.

This is basically a "Type 3 with Regular Key"" installation retaining the "Ready Mode" for manual transmission, with everything not required taken off the diagram, and I added wire colors to connections Directed didn't include.
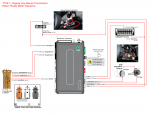
Ready Mode.png

One big change is that it was easier to connect the FT CAN wires at the "C plug" instead of a the "Steering Column Control Unit". They are the twisted wires (of the same color as on the 4x10 wires you are trying to connect) and they are right next to the clutch wire (in the bundle of wiring). I wanted to reduce the number of wires connected at the "Steering Column Control Unit", as space under the steering column is already tight, and I mounted my Valet key under there to limit the number of wires coming out from under the steering wheel to only 4.

I also installed a Viper 7656V for the added range, I will keep one of the remotes at my house and one at my work so I can start my car without having to get within 35 feet of the car (using the OEM remote). This was very easy, just plug the green 6 pin connector to its required port, run the harness up along the A-pillar, and connect the other end of the harness to the antenna module and attach to your windshield with the double sided tape.

Then it's time to find a place to hide the 4x10, I hid mine behind the footwell trim (the one with the hood release), it fit nicely behind it without having to remove the trim, add a little packing foam so it doesn't rattle behind the trim.

Other than that, follow Zrickety's procedure and you are all set.

Zrickety modified his wiring to work like an automatic, and remove the "Ready Mode" sequence. I have included a wiring diagram for that modification. It is basically cutting the yellow loop (Auto/Manual Transmission), and then connecting the Dark Green wire to the Purple/White instead of the Dark Blue. You then need to change the output of the Dark Green wire to "Grounded when Locked" when flashing the 4x10 unit with the XpressKit. This change is on the last page with all of the AUX options, at the very bottom.
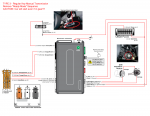
No Ready Mode.png

WARNING: Installing the 4x10 set up in this way (Auto Mode), the car will start when you hit the OEM lock 3X or with an auxiliary remote start button, REGARDLESS of it being in neutral or in gear! Install at your own risk. There is a bit of safety, due to it only outputting a signal to the clutch wire if the doors are locked, so if the doors are unlocked, the car will keep asking for you to depress the clutch pedal instead of starting. Most people don't work under the hood or under the car when the doors are locked, so you shouldn't kill yourself if you hit the remote start button on accident while working on your car. BUT, if you hit the remote start button while your car is parked and in gear, it will leap forward and crash into whatever is in front of it.
 
Last edited:

Vdubfourlife

Passed Driver's Ed
4x10 install 2010 gti manual

I used Zrickety method, Dark Green wire to the Purple/Black instead of the Dark Blue and then change the output of the Dark Green wire to "Grounded when Locked"

but it will only start if i press clutch in, any help would be greatly appreciated, thanks.
 

zrickety

The Fixer
Aljb I sent you a pm.
 

Vdubfourlife

Passed Driver's Ed
2010 GTI MK6 manual,
I installed the directed 4x10 in automatic mode (cutting yellow loop wire) I also use a magnetic switch on the shift linkage of the tranny as a safety. if the car is left in any gear It will not start. I connected this wire in series with the hood pin wire form the 4x10.
I have a violet/black wire pin 30 at the brown connector under dash so I had to use the clutch position sensor connector wires located at the fire wall just behind the battery. Yes the battery has to be removed along with the tray and you will see the clutch sensor 5 pin connector(not easy to remove) THE CONNECTOR FACES THE DRIVERS FENDER. I used pins 2 white/red and pin 4 violet/white and installed 2 diodes.
One on each wire diode cathode (the collar strip on the diode) points towards the 4x10 remote starter trigger wire. I also had to use the brown/black wire on connector H3 of the 4x10 and set it to ground when locked (THIS IS DONE DURING FLASHING WITH THE XKLOADER2. the dark green wire did not work for me. So that's it after a week at this I finally got it.
 

zrickety

The Fixer
So after 3 years, my remote start has stopped working. Directechs.com and smartstartsupport.com does NOT honor this 'lifetime warranty.' I have been in contact with them, told them I was the installer and they tell me to take it to another installer like Best Buy who will likely do nothing. LAME.
8/19/19 UPDATE
I got a response from them on the Twitter... @ViperSmartStart
Gave me an RMA and I sent it in.
They sent a new unit!
Now if I can program it without having a dealer account...they removed 'lite' accounts.
 
Last edited:
Top