When I started hearing about oil starvation issues, I got nervous because I have been planning on tracking my car. Then APR came out with the OPS system that supposedly solved the issue. I did some research myself and decided to build my own setup from another supplier. This thread is for discussion around the hardware, installation, problem solving, etc.
Reasons for Oil Starvation
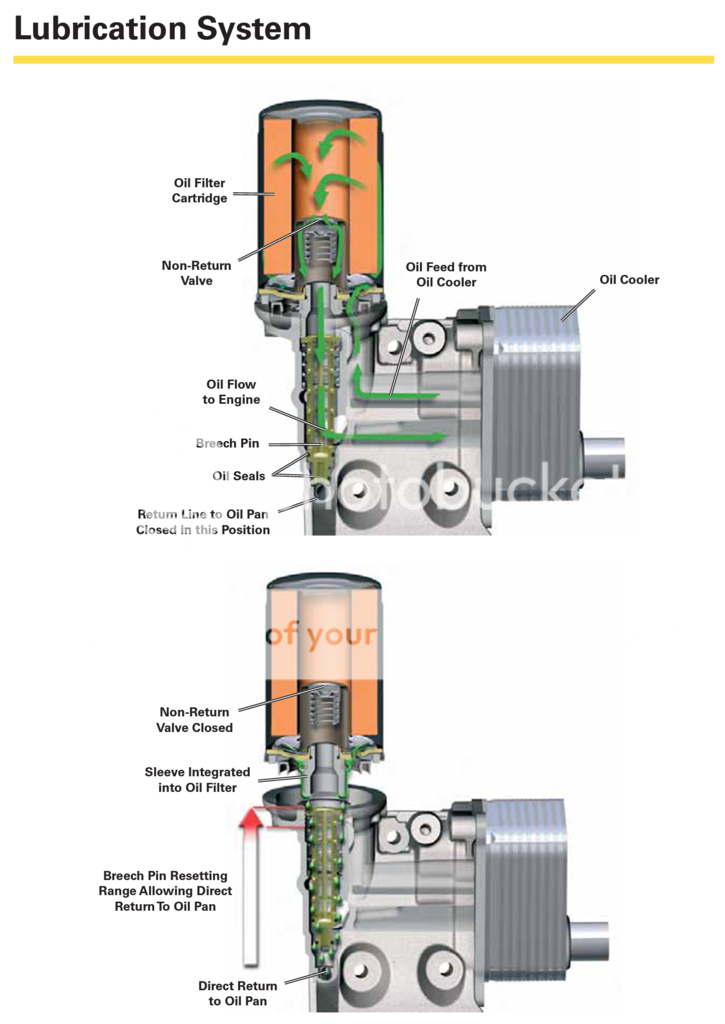
The issue is that oil does not return to the pan fast enough, so in a high G turn you have most of your oil sloshed to one side of the pan and the pickup starts pulling air. the oil accumulator compensates for engine's design flaw.
for reference, this is our oil pan. isolates oil to the rear of the pan but not side to side, which allows oil to move in high speed turns.
windage trays attached to the bottom of the block rather than the oil pan. also you see that the pickup isn't the lowest point, it's more of an optical illusion. the pan angles down then up then down again. also barely any holes to allow oil to flow freely back to the pickup.
you would need something that isolates oil at the lowest point of the pan that should also be the location of the pickup. either that or baffles on either side of the pickup to prevent oil from moving to the side of the pan and keep the pickup submerged.
Installation
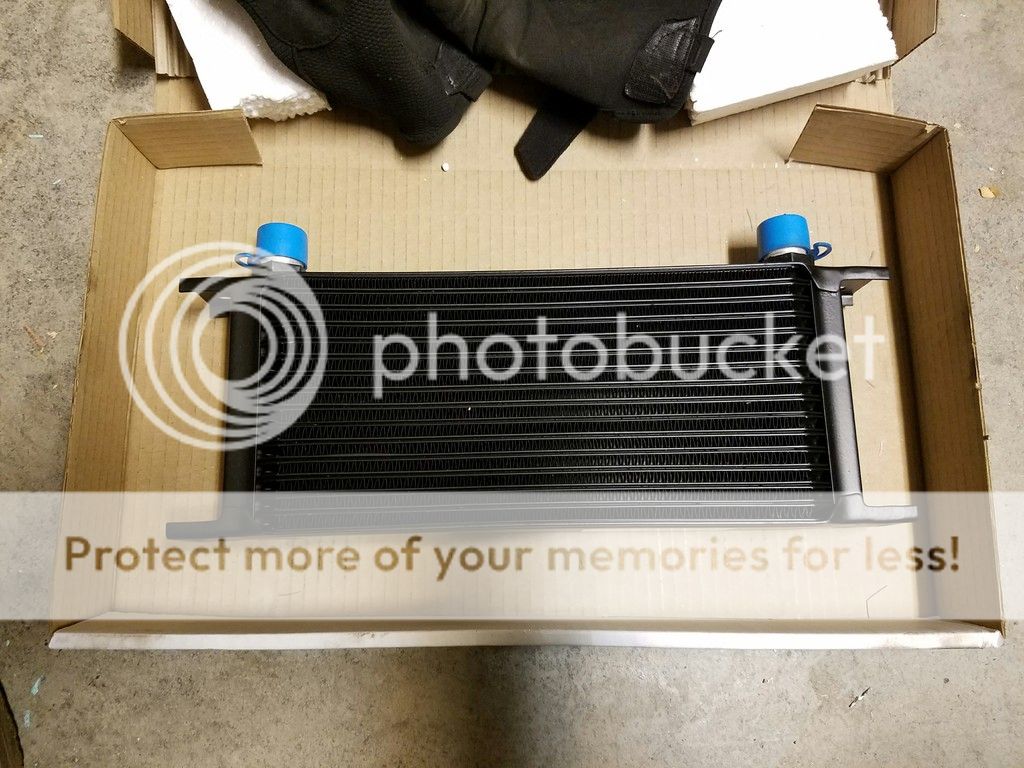
*Note that I also installed an oil cooler. It is optional but it doesn't hurt to do it at the same time if you ever plan on installing one in the future.
*A lot of things that I opted for are upgraded options; other options i ignored. Feel free to ask questions so you can put together a kit that fits your specific needs and concerns.
*This details installation on a MK5 TSI, but installation should be very similar for any MK6/FSI vehicle.
Procedure
1. Gain an understanding of your oil system and oil accumulator. Regarding our engines, there is a service manual online that is free to download and details all of the components in your long block. There's a lot of info out there on oil accumulators since they are universal parts that are used in several forms of racing. I will link/screenshot both below.
2. Drain your oil. If your oil was changed recently, feel free to drain into a container that can save the oil to be reused. If not, you can do an oil change at the same time. Either way you will need additional oil since your oil system capacity will be increasing.
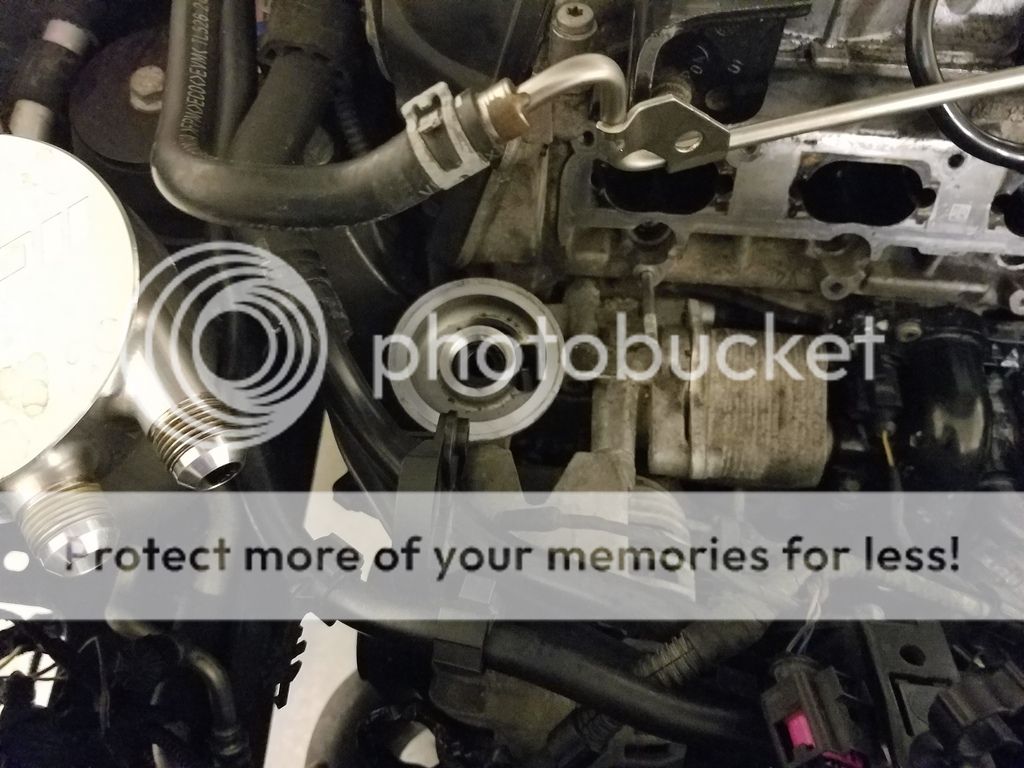
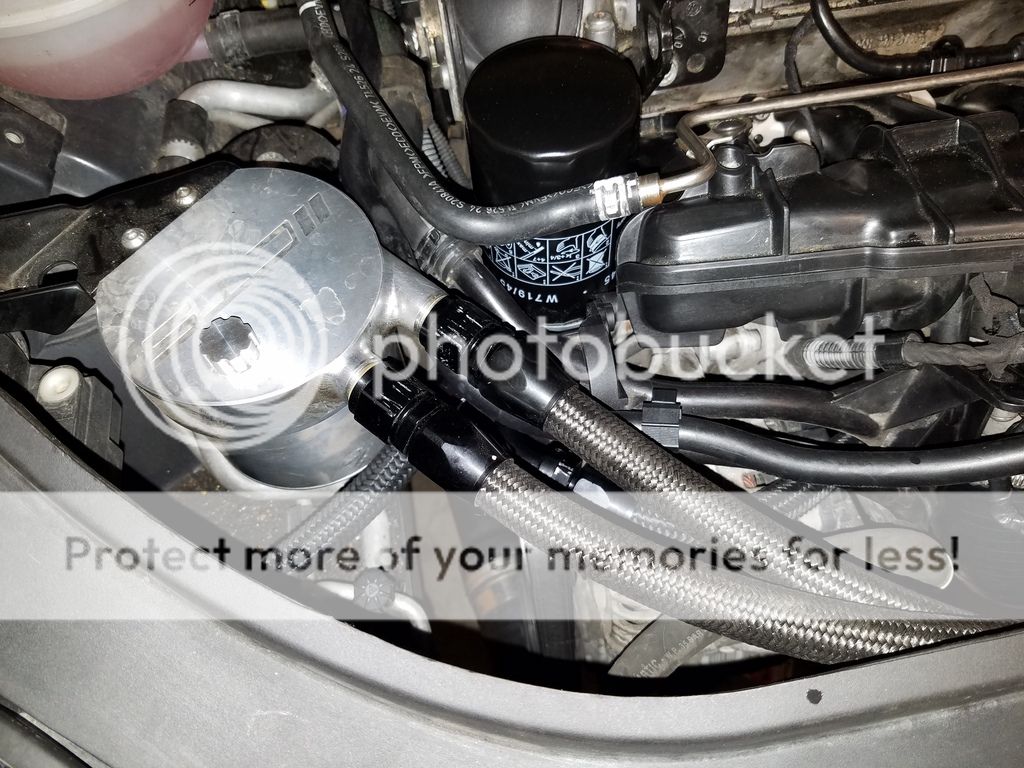
3. Remove your oil filter. In this picture I have the intake manifold removed for a separate project, but you can see easily how everything works.
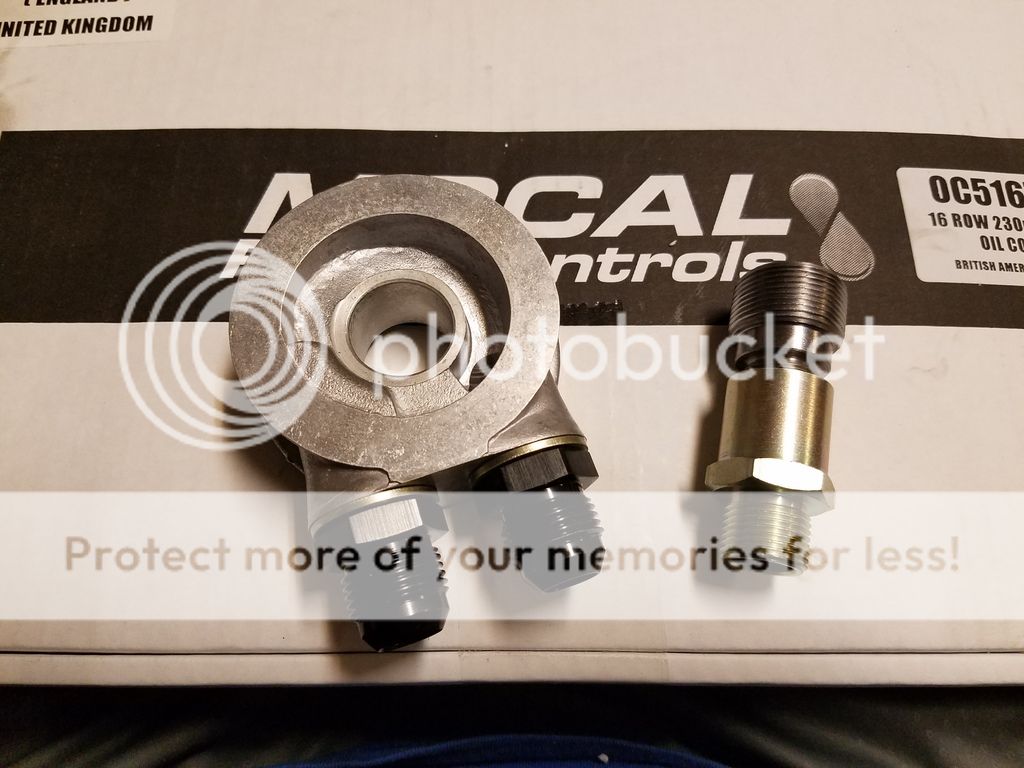
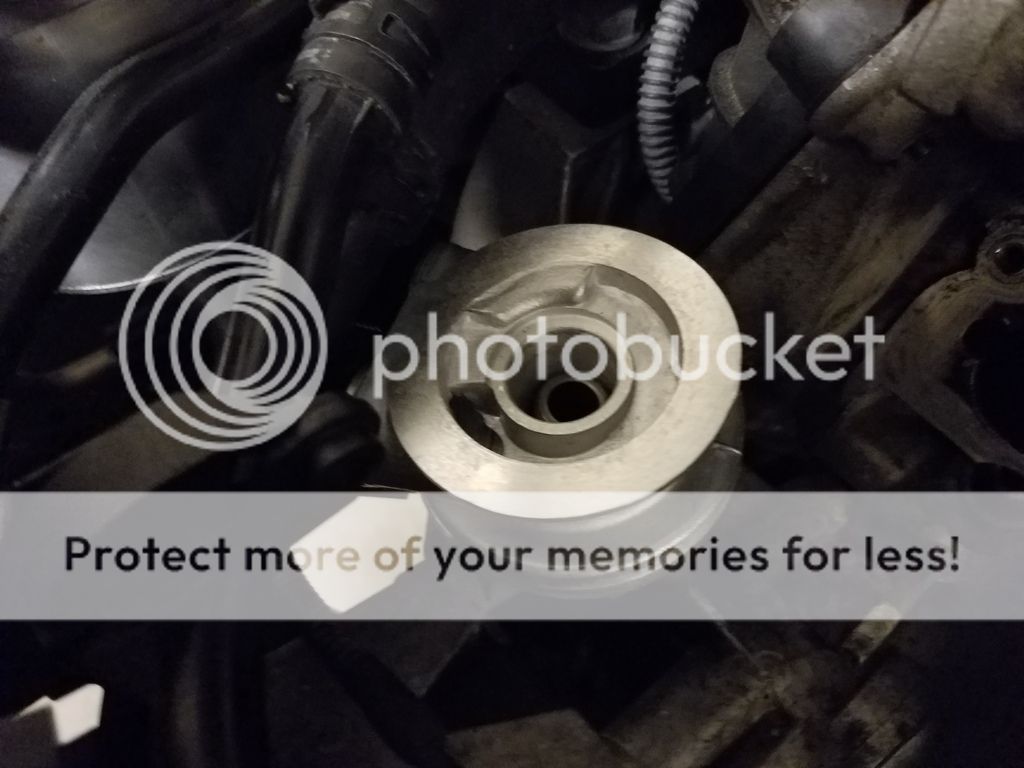
4. The sandwich plate requires some assembly. Place the sandwich adapter on top of the oil filter base. Make sure the rubber gasket seal is on the bottom. Then screw the thread adapters together and they slide through the plate and screw into the base. Make sure the AN outlet fittings clear your catch can/washer fluid reservoir/etc anything that you have in that area before you tighten it down. Then you can reinstall your oil filter or install a new one. This will require removing the threaded portion of your oil filter using channel locks and twisting it off. I have also heard of people using the 1.8T oil filter that has a female thread instead of male.
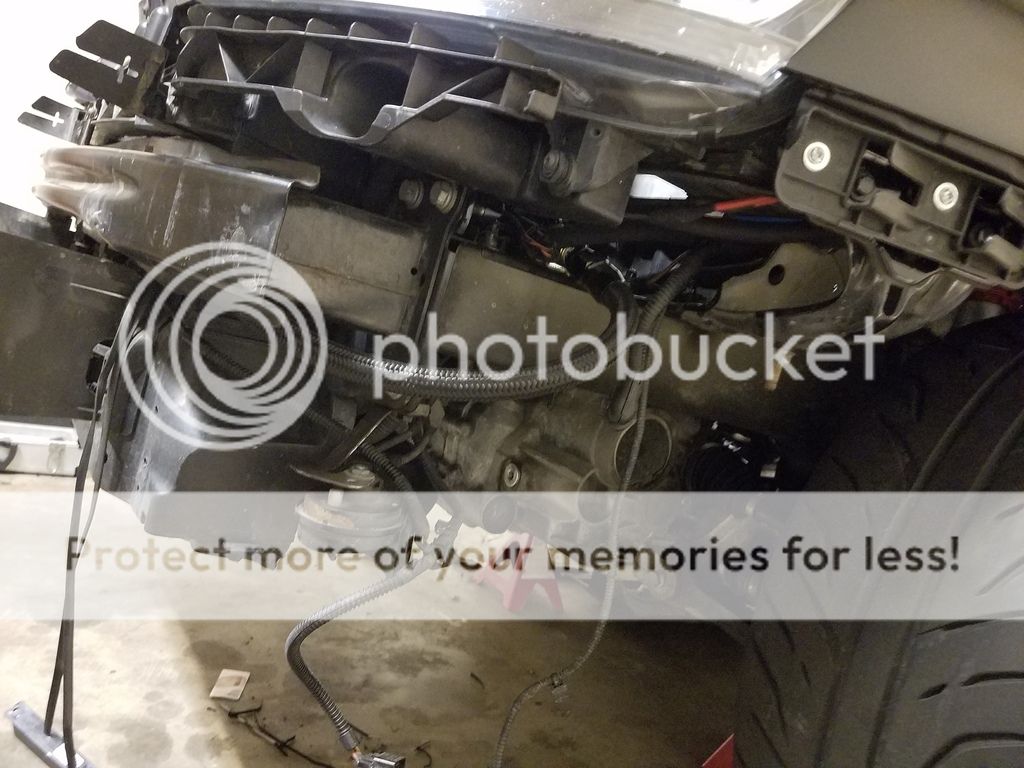
5. Determine where your Oil Cooler will be mounted. The 16 row Mocal Unit that came with my INA kit fit perfectly under the core support. I removed the front bumper and cut into the support preemptively, thinking that I would need clearance for the -AN fittings and hose. After I did a test fit I found that both fittings actually tuck neatly behind the support. The only modification I would say is required is drilling holes in the bottom of the radiator support to secure the bottom of the cooler core with zip ties.
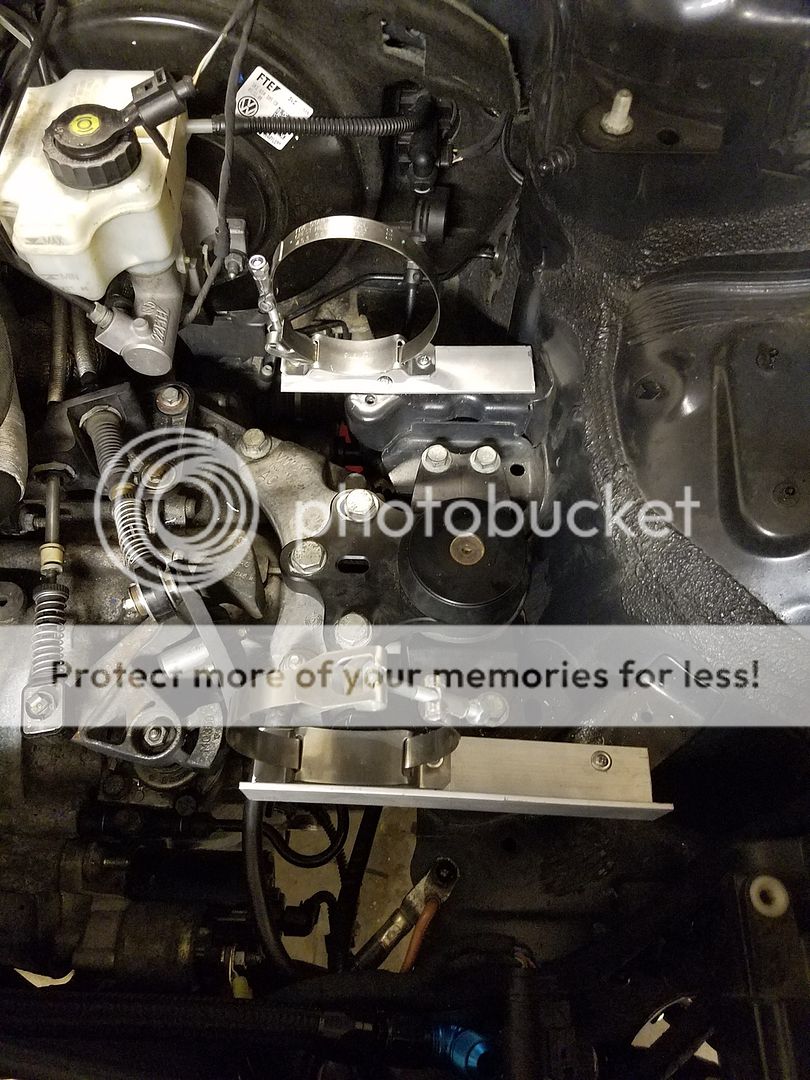
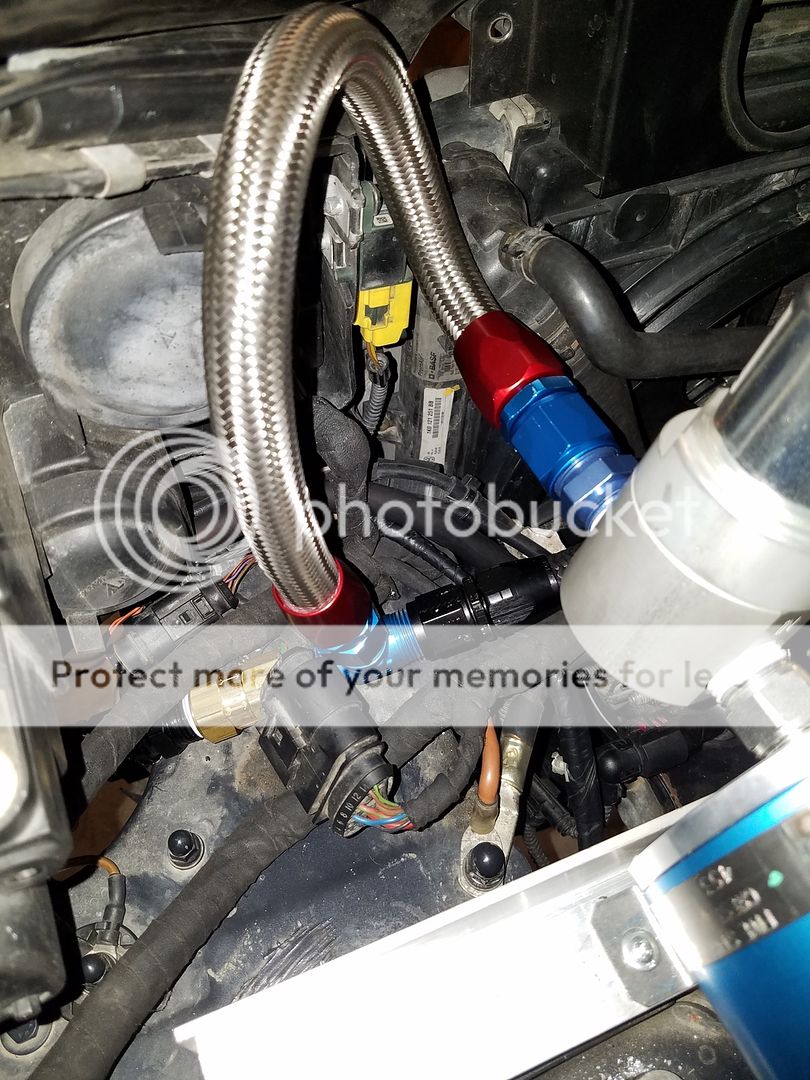
6. Determine where your oil accumulator will be mounted. I have my battery relocated, so I chose to mount it above the motor mount. Again, i was lucky to find that my accumulator fit perfectly if i mount each of the clamps above the metal where your battery tray bolts down. It is critical that the accumulator clamps are as close to the edges of the accumulator as possible to provide smooth operation of the internal piston. you can see here that i bolted aluminum angle to the metal and then bolted the clamps to the aluminum. The angle's purpose is to level the mounting surface since the battery tray mounting points have some curvature to them. Also, it is a good idea to complete the sub-assembly of the pressure control valve to the accumulator before mounting it.
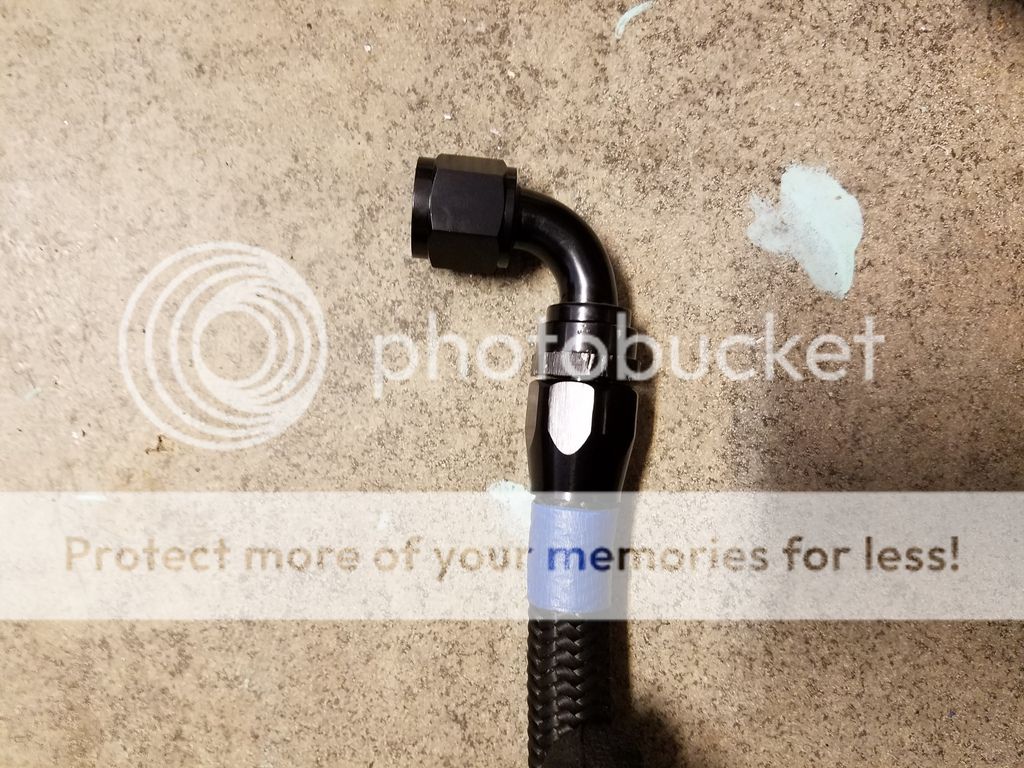
7. Now build the AN lines for your desired oil cooler routing. I attempted to follow the diagram that accusump provided. Also remember that oil comes up from the bottom, through the lines, then up into the filter and returns to the block down the center of the sandwich plate. All lines/check valves need to be oriented appropriately so that it does not prohibit the flow of oil to your engine.
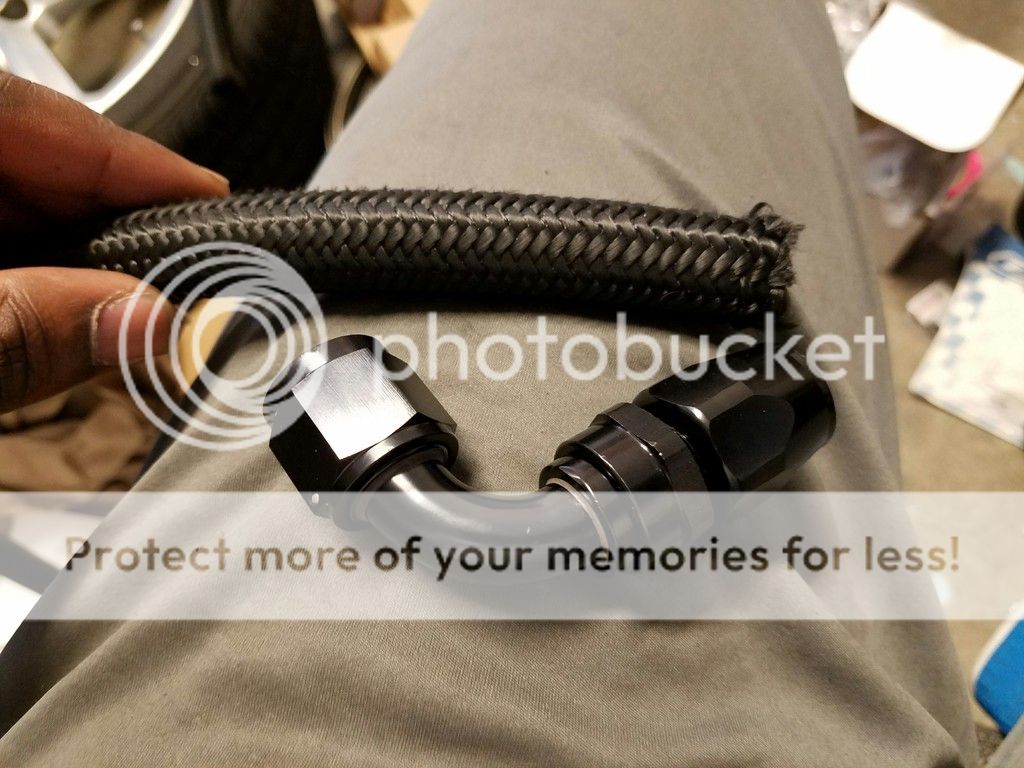
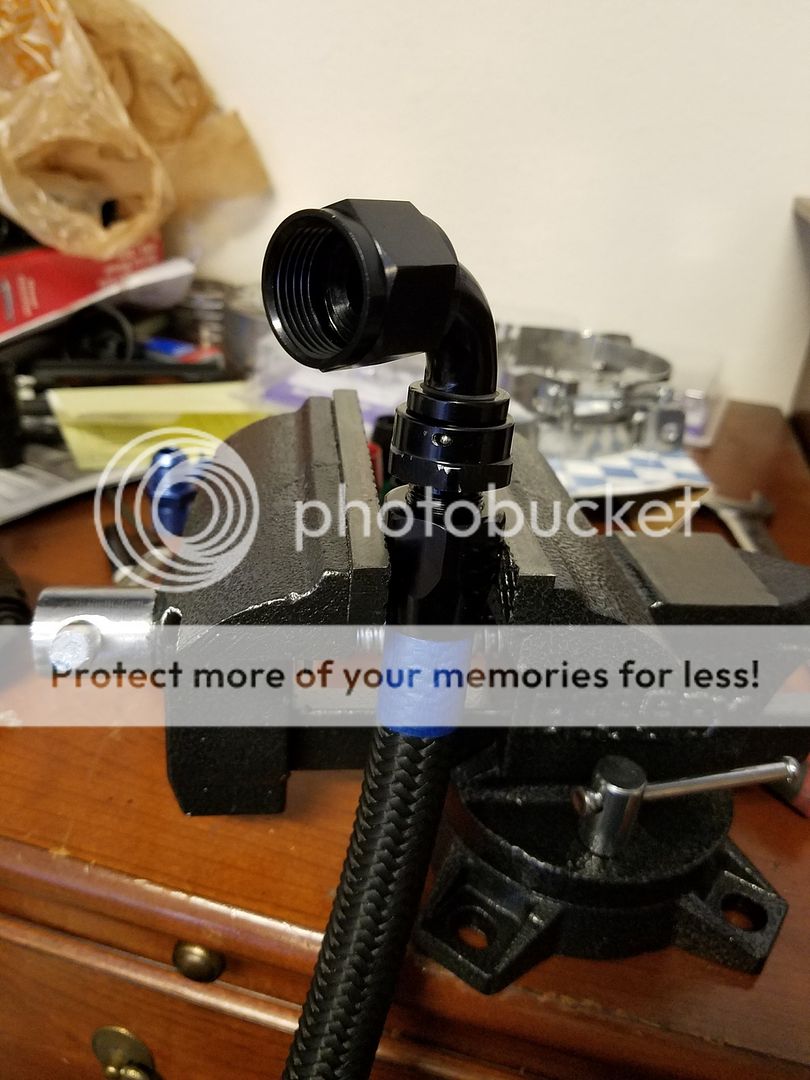
Making your AN lines isn't that hard if you have the right tools. I used a box wrench (1" for straight fittings and 1 1/8" for angle fittings) and a vise to make it more simple. Follow the instructions in this youtube video. This was my first time making AN lines from scratch and I didn't have any leaks from them after following this guide.
My chosen route of plumbing involves routing under the passenger's headlight, behind the core support and down to the cooler core. It then exits up and through the rest of the core support, under the driver's headlight, and across the engine bay back to the sandwich plate. I ran the last length of hose under the intake manifold so it is tucked away and not at risk of hitting the radiator fans. you will also need to plumb the t-fitting and check valve after the oil cooler but before the accumulator. I used two 90 fittings for the cooler core inlet and exit, as well as one for the sandwich plate inlet. Don't forget to include the check valve and t-fitting near the accumulator so you can plumb the hose to the oil cooler return line. Due to the size of the pressure valve, i had to run a loop behind the headlight. This will vary depending on your mounting location. Note that the brass fitting is the check valve. It must be mounted in the correct location and orientation to make sure oil can only flow one way through the system and the accumulator cannot push oil backwards through the cooler.
Picture from above and a close-up of the sandwich plate plumbing after the catch can is reinstalled.
8. Wire up the accumulator per the installation manual. I bought a bunch of 16 gauge wire from autozone and it worked perfectly. You will also need push terminals and ring terminals for the grounds and remote switch. I grounded mine using the one under the driver's headlight and mounted the switch under my instrument panel illumination dimmer.
9. Go back through and make sure all of your fittings are tightened. I found out the hard way that holding oil pressure at idle doesn't indicate holding oil pressure at redline. After getting it going i went out for a test drive and this is what the scene looked like after. One of my fittings began backing out at higher pressure. So remember, one last check that everything is snug can save you a few bucks of oil. This includes the small safety relief valve on the accumulator and the fittings that came as a part of the sandwich plate besides for all the an lines that you made.
Setup
Canton Racing explains it pretty well in their accusump manual, so follow their instructions and you'll have no problems.
1. Depress the relief valve that is by the accumulator pressure gauge. Bleed air pressure down to 7-10psi.
2. Add 5qts of oil to the engine.
3. Verify that the accumulator remote switch is in the off position.
4. Turn on your car. Let it run for 10 seconds or so. Rev the engine a few times to speed up the process.
6. Turn off the car
7. Verify that the accumulator oil pressure gauge is reading higher than 10psi. After turning my car on/revving a few times, it was close to 40psi. This indicates that your accumulator is filled with oil.
8. Add oil until your dipstick indicates that it is back to the correct level.
9. Go for a 5 min test drive.
10. Park and check the car for leaks, smoke, or any other indication that there is a problem with the install. If there are no signs, you're good to go.
Operation Pre-Oiling
Pre-Oiling is pretty easy. When your key is in the on position, the accumulator is activated. You have 0 psi of oil pressure on the engine side, so this allows the accumulator to purge oil. Turn the key to the on position, and flip the remote switch to the on position for a few seconds. There should be an audible indication that the pump is on and purging. Now when you start your car, oil is already pumping through the engine and protecting your internals from start-up wear. Once the engine is started, you can flip the switch back to the off position and it will fill with oil again.
Loss of Oil Pressure
Oil Starvation is caused by your pickup losing ability to supply oil to the engine. The known TSI concern is that the pickup can starve for oil when taking high speed turns and oil sloshes to one side of the oil pan. However, this can protect from various other failure modes such as cracked oil pans, blocked pickup, or even hard acceleration (launching) and hard braking.
With the electric pressure control valve, you will only fill and purge the accumulator at certain psi. Mine is the 35-40 psi switch. So it will purge below 35psi and fill above 40psi. With the car on and the remote switch in the on position, you will now have a supply of oil that can be purged into the engine any time the motor begins to lose pressure. If you turn the switch to the off position, the accumulator will fill with oil and stay on standby (it will not purge at any oil pressure).
How does an accumulator work?
This video is what answered most if not all of my questions. Watch it from start to finish to gain an understanding of what's really happening inside the accumulator.
Why would I pick an a-la-carte oil accumulator setup like the Accusump over the APR OPS?
- The main reason is cost. The APR unit is $1300 while all of the parts to put my setup together was closer to $1k. Without the Oil cooler it's closer to $600.
- You also eliminate the APR controller, which many people have had issues with. I had one previously that did not work after disconnecting and reconnecting the battery. So any time i disconnected the battery to work on something, i had to unplug and plug the controller back in in order for it to work after turning the car back on. And i was still never sure that it was working.
- Also, I don't believe that the APR version retains the pre-oiling functionality.
- Lastly, this allows a lot more flexibility in how you mount the unit. If you don't have a battery tray, their bracket will not work for you. I'll get more into mounting later.
Why would I pick the APR OPS over any other oil accumulator?
- The APR Unit is as plug and play as this can be. Especially for completely stock vehicles with full interior and all options, they developed their mounting strategy to allow everything to work.
- You also don't have to figure out mounting as long as you have your battery tray. Their bracket bolts right up to your existing hardware.
- The system is a lot more simple. With only one outlet on the sandwich plate, you really only have one hose to run across the engine bay without any t-fittings or check valves.
- Finally, the install is significantly quicker since you won't have to make your own AN lines.
What happens when the accumulator system is on and I'm at idle (stop light, stop and go traffic, etc.)?
Watch the video above to see how the accumulator works. The air pressure behind the piston equalizes with your oil pressure. At higher pressures, the accumulator holds more oil. At lower pressures, the accumulator holds less oil. However, The accumulator will only purge all of it's oil if there is no pressure coming from the engine (complete starvation, engine off) and it should NEVER be completely full. With this in mind, a 2qt accumulator should hold anywhere from .5-1.5qts of oil. So with an engine oil capacity of 4.5qts, you may have ~5qts of oil in the engine at idle with the accumulator on. This will in no way damage anything internally. However, you are free to leave the remote switch in the off position for daily driving and only resort to turning it on before track days or aggressive driving. You can also opt for a smaller accumulator that will put less oil in the engine at idle but still provide some protection.
So why is the APR Controller needed?
I'm not an APR employee so this is somewhat heresay, but my understanding is that they developed the controller so that it only activates accessories at certain rpm/load/boost/etc. combinations. This will prevent it from activating at idle. This is something that I don't believe is necessary based on the explanation above.
It also eliminates the need for a remote switch. This is more of a personal preference thing, you can also set up the pump without the switch if you want to run it that way. If you call Canton and talk to their tech support, they will explain that the switch option was added for customer peace of mind and it functions 100% without it.
What is the best way to mount the accumulator?
You can mount the accumulator in virtually any orientation. I chose to put it in the engine bay to reduce the plumbing, but a simple google search will indicate that many people mount it in the cabin or trunk as well, even behind the fenders. I'll post some examples below, but it all depends on the size of the pump and your personal preference. Erwan's was really nice since he bolted it to the battery tray after relocating the battery, but it looks like the picture link is broken. Either way, get creative.
Can I install it without an oil cooler?
Yes, even with a 2-outlet sandwich adapter. You will do the same loop with a t-fitting and check valve and run the accusump off of that.
How will oil changes be done?
You can purge the pump by turning the key to the on position and turning on the remote switch with the engine off. So you can drain the oil, reinstall the drain plug, purge the accumulator, and then drain again. Filling the oil is done the same way as initial startup for the accusump. Add oil, turn on the car, turn off the car, top off the oil.
What are my options for buying accumulator?
There are two reknown companies that I know of, and I'm sure there are other good/ebay/chinese/whatever brands out there if you search.
I HIGHLY recommend calling Canton Racing if you go that route. Their tech support is ridiculously helpful. When I called, they developed a parts list to meet my needs and gave me part numbers for each and every component as well as their pricing. All i had to do was search for online stores that sold the parts at the best price and pieced my own kit together. I'm sure Moroso is the same way. Canton Racing Accusump Moroso Oil Accumulator
How much does this cost?
This list is based on my parts list. Yours will vary based on your choice of hardware, mounting location, even color of the hose/fittings. I actually went the route of buying the Canton Racing installation kit, but buying the fittings/hose separately is cheaper and eliminates the random stainless/blue/red in your engine bay.
Hopefully this turns out great! I know a lot of people that went with the APR system hated it... it constantly gave problems and leaked all over the place.
Not to bash your idea or anything, but wasn´t it a better (or at least a suited upgrade along of this) to make a "REAL" baffled oil pan and get to the bottom of this oil starvation issue for good?
Not to bash your idea or anything, but wasn´t it a better (or at least a suited upgrade along of this) to make a "REAL" baffled oil pan and get to the bottom of this oil starvation issue for good?
Who makes a real baffled oil pan? Issam from INA mentioned one with a trap door I thought but I never saw it. JR/U-20T had one but there wasn't a real baffle design, still nicer than the one moddedeuros sells.
We'll see. I have my first track day this coming up weekend and wanted it installed prior, but may not make it. The goal is to run it with an external oil cooler. Total price for everything was under $1100 shipped to my door.
APR's kit compensates for some of Accusump's short comings with the controller. It only turns on the pump when both RPM's are high enough and oil pressure is low enough. This prevents it from dumping at idle or at a stop light. My system will have a manual switch. This way it will get power from the ignition, but I can turn it off while driving around town. The only times i'll need to turn it on is when i'm at the track or about to do something stupid on the street. At that point, the 35PSI switch will turn on whenever oil pressure drops below 35.
Another thing is the sandwich plate. APR's kit comes with a one-out plate. This means you can't run an external oil cooler with it. I ordered an oil cooler kit from INA, but the plate has to be non-thermostatic for the pump to work optimally. So in a typical oil cooler setup, it won't open to the external cooler until the oil gets up to temp. In my setup it will always run through the cooler. This will cause the oil to heat up more slowly than typical, but will allow pre-oiling on a cold motor.
I also get to figure out mounting and I have to make my own lines with the provided fittings.
Reasons I didn't want APR's kit:
-Price
-Reviews
-I no longer have a battery tray (relocated to trunk)
-I can run an external oil cooler
Reasons why other's might still want APR's kit:
-Ease of install
-Controller (100% hands-free operation)